
Overview
Outbound Campaigns are used to group your Outbound agents and calls. Lists of leads are loaded from Excel (file must be saved as a .CSV (comma delimited) and then fed into a dialler which dials and distributes calls based on rules set up in the Campaign and Dialler Strategy.
-
Open the Workspace.
-
Select Configuration from the Campaigns menu.
-
Select an Outbound campaign from the list or create a new campaign.
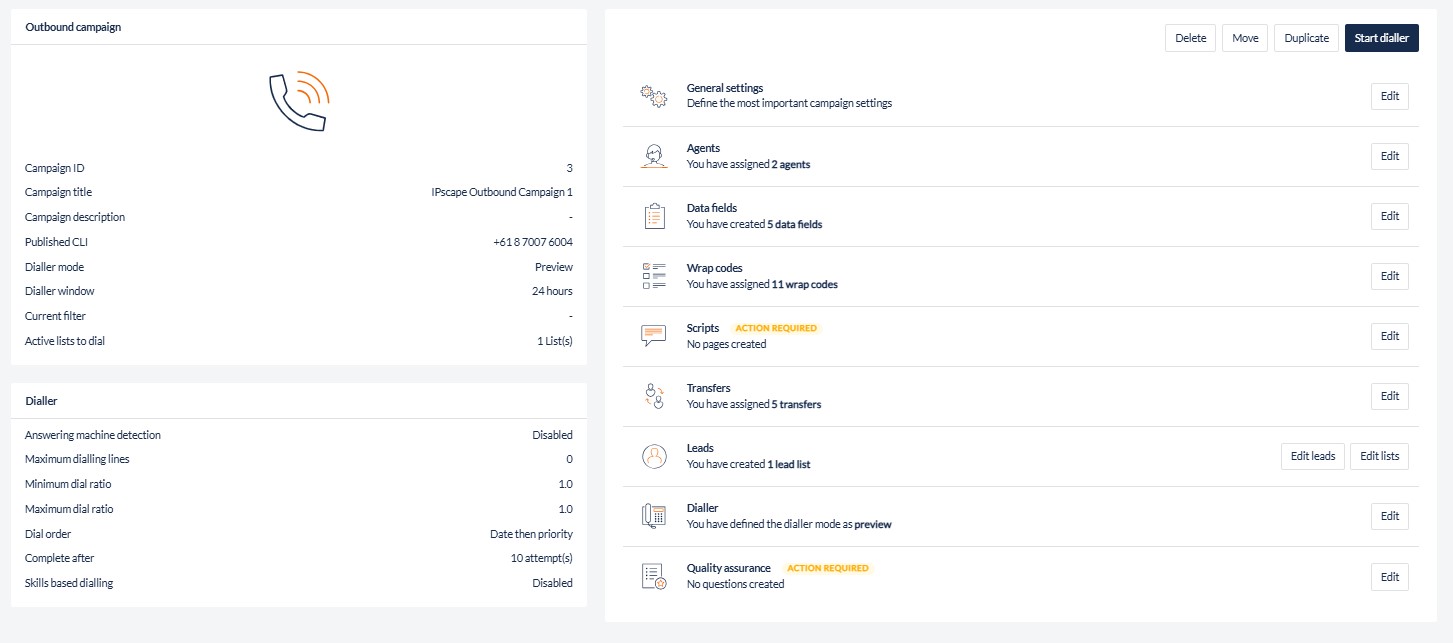
The Campaign holds general configurations once created you will also need to configure the following:
-
A list of agents assigned to the campaign. See Queues
-
A list of leads to be contacted. See Leads
-
A script that assists the agents to explain the purpose of the call, and to capture data provided during the call.
-
Campaign data fields so that relevant data about the interaction can be captured.
1. Add or Edit Outbound Campaign
This feature allows you to create and maintain outbound campaigns
Where to find this feature
-
Open the Workspace
-
Select Campaigns from the Configuration menu
-
To add a new campaign:
-
Click Create Campaign
-
Select Outbound Campaign from the drop-down selection list
-
Click Next. The Campaign Configuration wizard opens
-
-
To edit an existing campaign:
-
Select the campaign you wish to edit from the list of campaigns
-
Click Edit. The Edit outbound campaign dialog opens
-
-
-
Enter the Campaign Details as described in the tables below
-
Click Next to progress through the wizard when creating a new campaign, or click Save for any changes to an existing campaign
2. General Settings
|
Field |
Description |
|---|---|
|
Campaign Title
|
Enter a meaningful name for the new campaign. |
|
Campaign folder |
Select the pre-existing campaign folder which is to be assigned to the campaign. |
|
Teams
|
Select the pre-existing teams which are to be assigned to the campaign |
|
Require email address confirmation |
Click the checkbox to enable the display of a prompt for an agent to confirm the email of the caller when an agent wraps a call. If this option is not enabled, the system will attempt to send an email to the destination address without any notification to the agent. |
|
MOH Playlist |
Select a playlist to be used for Music on Hold.
See Resources > Files > Music on Hold Playlists. |
|
Auto wrap time |
Select the duration that the system waits before the call is wrapped automatically. The agent has this interval to commence applying a wrap code. |
|
Extended auto wrap time |
This drop down appears when an Auto wrap time is selected. This enables an agent to extend the auto wrap time by the amount of time you specify here if they need extra time to wrap the call |
|
Auto select wrap code |
This drop down appears when an Auto wrap time is selected. Select the wrap code that is applied to a call when Auto Wrap occurs. |
|
Enable Sound Quality Feedback |
Click in the checkbox to enable a quality rating display which the agent will see when wrapping a call, and which will require them to rate the voice quality of the most recent call between one (lowest) and five (highest) by clicking on one of five stars. |
|
Survey Call Ratio |
Select a ratio from 10% to 100% or select 'No Survey.' A setting of 50% will mean one in two callers are surveyed; a setting of 10% will mean one in ten callers are surveyed. |
|
Survey Workflow |
Enter the name of the workflow you have created to conduct the Post-call Survey. |
|
Survey minimum call length |
Determine the length of time a call needs to be to qualify for a Post-call survey. Options range between 1-10 minutes or select ‘No minimum’ to include a survey for all calls. |
|
Enable Call Recording |
Enable the recording of all calls made in the campaign.
|
|
Start recording automatically when agent connects |
This option appears when Enable Call Recording is selected. Click on the check box to start recording calls as soon as the agent and contact are connected. Alternatively, you may elect to not start recording immediately, to allow the agent time to request the contact's permission to record the call. If and when permission is given, the agent can stop & start the recording manually. This setting will only be available if call recording is enabled. |
|
Allow agent to start/pause/resume recording |
Click on the check box to enable controls for agents to start, pause, and resume recording during an interaction. This feature may be useful if the agents will be accepting confidential information that must not be recorded. This setting will only be available if call recording is enabled. If credit card payment or transaction tokenisation is required to be processed, ipSCAPE offers a PCI compliant payment solution ipSCAPE Pay. For more information, reach out to your Account Manager or ipSCAPE Support for more information on this feature. |
|
Continue call recording after external transfer |
Click on the checkbox to enable the call recording after the call has been transferred externally (attended or blinded) to a pre-defined phone number in the transfer pool, or a valid number dialed by the agent. By default, this checkbox is disabled. This setting will only be available if call recording is enabled. |
|
Enable call recording during consultation |
Click on the checkbox to enable the call recording during the consultation phase of a call (this is only possible for attended transfers via an agent, external phone number or workflow). By default, this checkbox is disabled. This setting will only be available if call recording is enabled. |
|
Allow transfer to any phone number |
Enables the ability for Agents in the campaign to conduct a transfer to a free-typed number not configured by an administrator in the workspace by selecting Other Number from the Transfers menu in the Agent Toolbar: 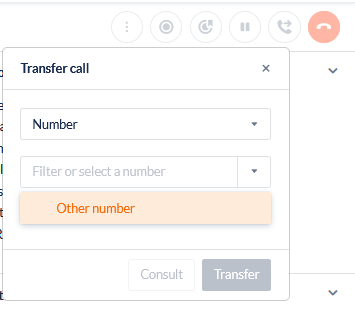
|
|
Allow agent to edit lead's phone numbers
|
Enables the ability for Agents to edit the phone numbers presented on a lead on the Agent Toolbar for the campaign. |
|
Allow manual calls during preview
|
Enables the ability for Agents to conduct a manual outbound call while a Preview lead is active on the Agent Toolbar for the campaign. |
|
Allow wrap without calling (Preview Outbound only) |
Permit or restrict agents from wrapping preview and callback leads without making a call. If the option is unchecked, the ‘Wrap lead’ buttons in Agent Toolbar will appear only after a call is made by the agent. |
|
Published CLI |
Select which CLI is to be used for transfers in this campaign. There is a choice of the Caller CLI (which is the default), Agent CLI, Organisation CLI, withholding the CLI, or selecting a specific numeric CLI. If Caller CLI is selected, this will only apply to transfers within the contact centre - that is, to connected agents. For privacy reasons, if the call is transferred to a party outside of ipSCAPE (ie, not an Agent, Workflow or Campaign within the system) the Caller CLI will not be passed on, and instead will be replaced by the Organisation CLI. |
Timezone
|
Field |
Description |
|---|---|
|
Region |
Select the appropriate Region for the campaign. This setting populates the Timezone drop down list box below with the available time zones for that region. |
|
Timezone |
Select the appropriate Timezone for the campaign. This setting is applied if the campaign uses a "Validate Operational Hours" workflow object to check whether the contact centre is operational when an incoming call is received.
|
Emails
|
Field |
Description |
|---|---|
|
Email Channel |
Select the email channel from the drop-down to be used for the campaign |
|
Allow free-format emails |
Click in the checkbox to enable agents to send free-format email replies. If this is not checked, agents will only be able to send emails based on pre-defined email templates. |
|
Email templates |
Any email templates assigned to the campaign will be displayed or can be added |
Announcements
The Announcements tab in the Agent Toolbar provides the facility for agents to play pre-recorded messages at any time to contacts. This could be used, for example, to play a pre-recorded warning that calls will be recorded, or play a pre-recorded explanation of contractual terms and conditions.
This section of campaign settings allows you to select which of the available soundfiles are made available to agents in the campaign. You can select any one or more of the soundfiles previously uploaded into the soundfiles repository through the Resources/Files menu.
If no soundfiles are selected, the Play Announcements button will not be displayed to Agents, and playing of pre-recorded messages will not be possible in the campaign.
ipSCAPE Pay
Enter the details required to add a merchant to the campaign and click Add account
|
Field |
Description |
|---|---|
|
Payment Account |
Select the Merchant to be used when processing payments for this Campaign. The Merchant is configured in Integration under ipSCAPE PAY. |
|
Account Alias |
Enter a meaningful name for the Payment account that can be recognised by agents. |
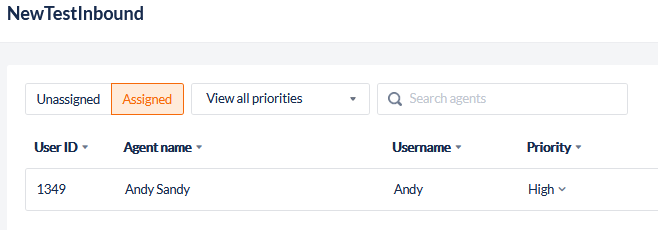
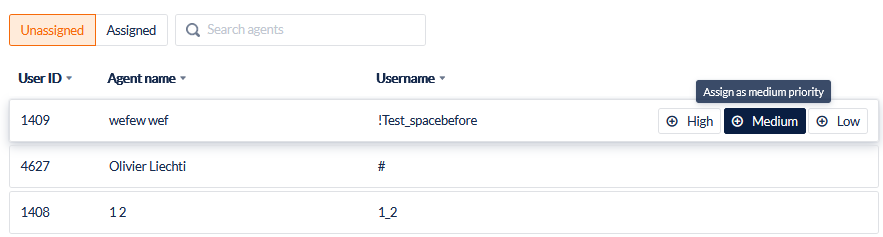
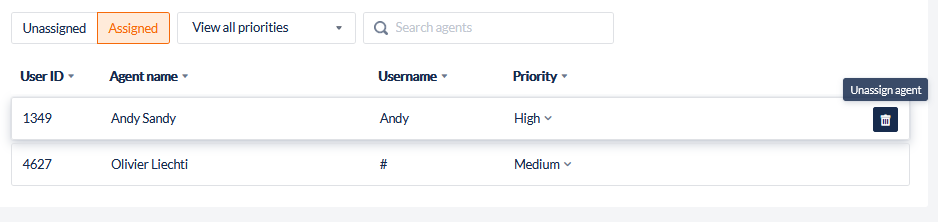
3. Agents
-
To assign agents to a campaign, select Unassigned to show all agents that can be assigned to the campaign
-
Next to the agent to be assigned, select a priority from Low to High to assign
-
To unassign agents from a campaign, select Assigned to show all agents currently assigned to the campaign
-
Next to the agent to be removed, click the Unassign agent icon
4. Data Fields
See Campaign Data Fields for more information
5. Wrap Codes
This dialog allows you to edit the list of wrap codes that an agent can access when wrapping an interaction with a contact for the selected campaign or to create a new wrap code.
-
Click Edit next to Wrap Codes in the configuration menu
-
Click the Unassigned button to show all wrap codes available to be assigned.
-
Select the wrap code from the list or by the search function and click the Assign wrap code icon or button at the top of the page
-
To remove a wrap code, click the Assigned button to show all assigned wrap codes and click the Unassign wrap code icon next to the wrap code
Creating a new wrap code from a campaign
-
Click the Create new wrap code button at the top right of the Wrap Codes page in a campaign.
-
Enter a Title for the wrap code, this is what will be displayed to agents and in reporting.
-
Select the action for this wrap code: Complete, Contact, or Sale.
Wrap codes created from a campaign will be saved in the Wrap code pool and assigned to the current campaign.
6. Script Builder
See Scripts for more information
7. Transfers
See Transfers for more information
8. Leads to Dial
This section allows you to select which, if any, of the lists that have been loaded for this campaign, will be dialled. By adjusting this selection you could, for example, temporarily remove old lists from dialling and dial only new lists for a period. Then you could add back the old lists at a later stage.
See Leads & Lists for more information
9. Dialler
See Dialler Settings for more information
10. Quality Assurance
See Quality Assurance for more information