
Overview
The Scripts configuration allows a User to create campaign-specific scripts which:
-
dictate what the Agent says to the Contact
-
determine what customer data is displayed to the Agent
-
determine what data is gathered from the Contact.
The campaign script dictates what the agent says to the contact, what data is collected, and what information is displayed on the screen in front of the agent.
Where to find the Scripts module
-
Open the Workspace.
-
Select a campaign in the Campaigns module
-
Select Scripts from the configuration menu in the campaign.
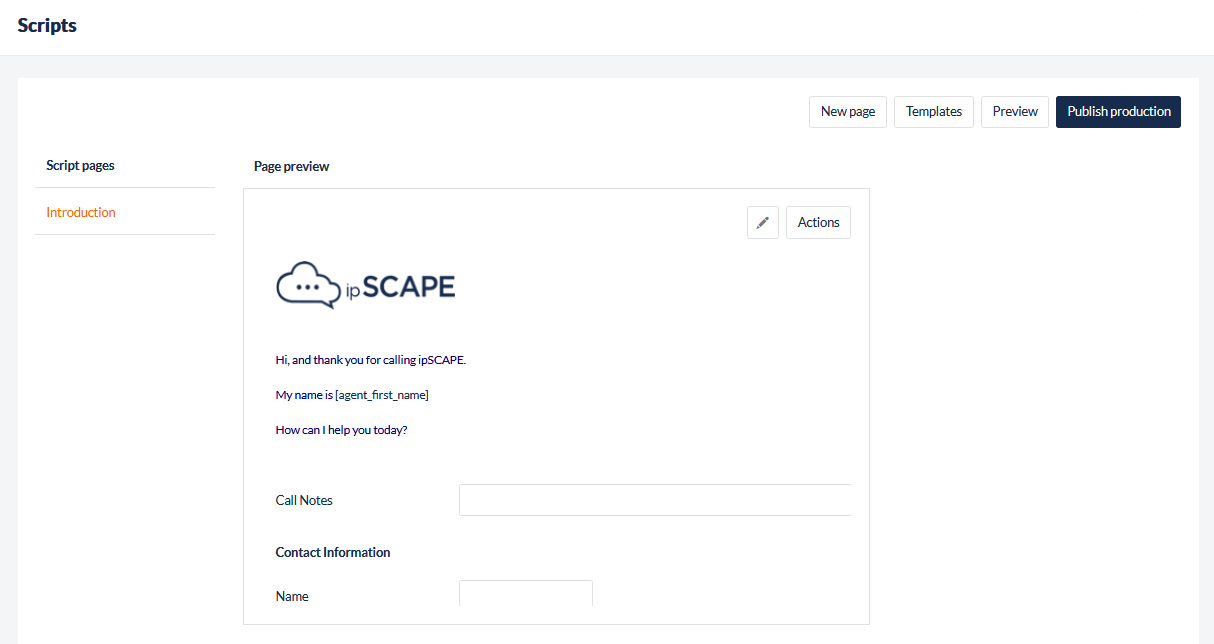
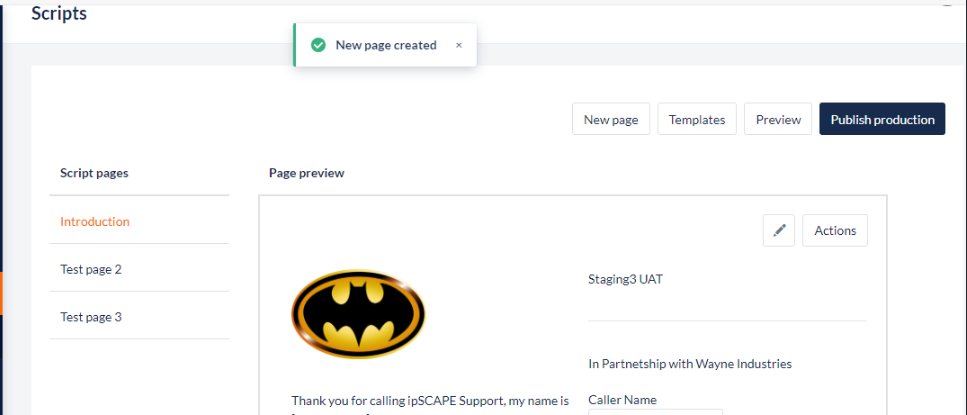
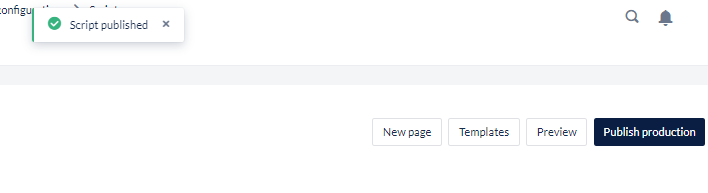
When a new campaign is created, a default first page called "Introduction" is created on the left. All other pages contained in the campaign script are listed below the default page. Click on a page name to see a preview of that page, and you will see three buttons in the top right corner:
-
Click Delete to remove the page. You will be prompted to confirm the deletion process.
By default, the Introduction page can not be deleted, however, can be renamed by editing the page.
-
Click Edit Script to open the Page Editor.
-
Click Actions to open the Page Actions List where you can add a link from one page in the script to another.
There are four other options across the top of the page:
-
New Page which adds a new page to the script
When a new page is created, you will receive a notification informing you that a new page has been created.
-
Templates to use a pre-built Script template
-
Preview to view a display of the script before publishing to the campaign.
-
Production Publish when a Script has been created or updated and wish to commit the new script to the selected campaign.
1. Page Editor
This feature allows a User to build the pages for your campaign script.
-
Select the page to Preview
-
Press the Edit Script icon
-
Select the column layout from the Edit Tools to add a section to the page. Multiple sections can be added to a page with options for single, double and triple column layouts
-
Click to add a field(s) required from the Standard Fields section on the left to add to the script and drag-and-drop the field to reposition in the desired position
-
Update any configurations for the field such as labels, default text, validation and formatting
-
Press save when completed
Each page is constructed one object at a time vertically from the top to the bottom of the page unless you have applied a multi-columnar layout section.
Each object can be dragged and dropped to rearrange the sequence of objects on the page at any time.
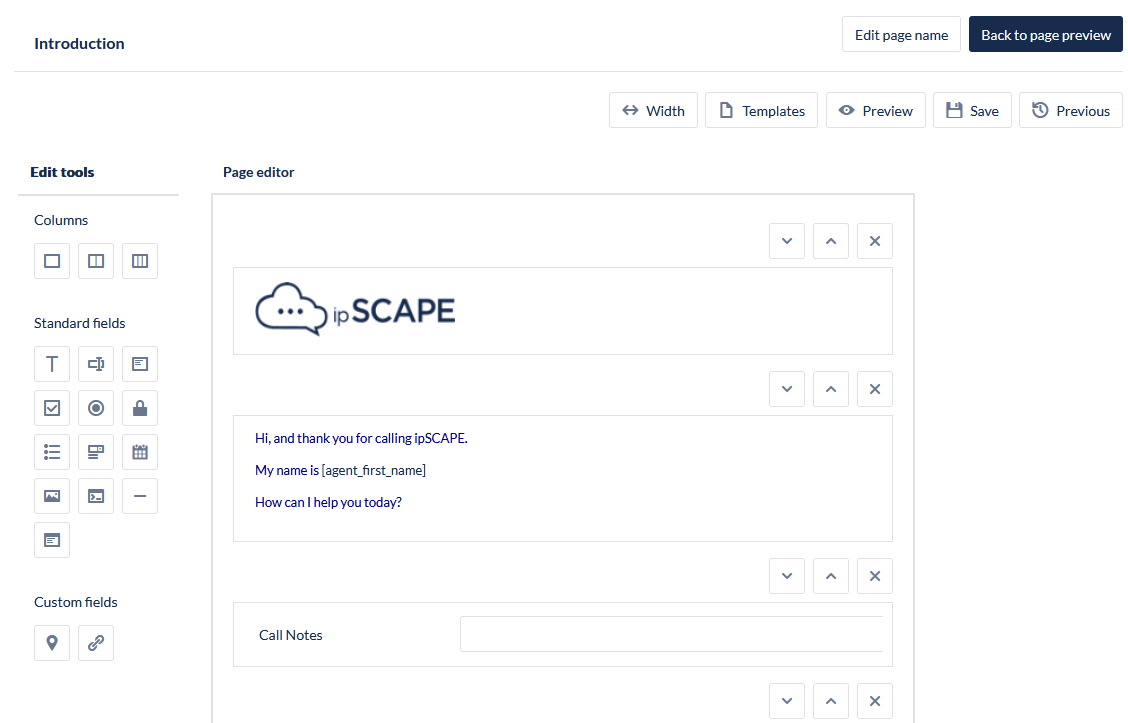
These icons are available in the header of the Page Editor:
-
Edit page name to update the Script page name. In the dialog, enter the updated page name and click Save
-
Back to page preview to return to the Campaign script preview page.
|
Icon |
Description |
|---|---|

|
Width
|

|
Templates
|
|
|
Preview
|

|
Save
Save Current Page - Click this button to save a new version of the script page.
Save Template - Click this button to add the script page to the display of Page Templates.
|

|
Previous
|
Objects Menu
The following objects are available in the menu at the left of the Page Editor.
-
Click on a menu item to place that object onto the page.
-
The following options are available when the mouse cursor is hovered over the field object:
-
Change Settings: Update the field configuration settings. The settings available differ between different field types

-
Delete: Click to delete the script field widget from the script

-
|
Script Object |
Description |
|---|---|
|
Layout Sections
|
|

|
One Column
|

|
Two Equal Columns
|

|
Three Equal Columns
|
|
Standard Fields |
|

|
Plain Text
Example Use the Plain Text object to provide instructions to your agents about what to say, or do, next in the script. |

|
Single Line Input
Example Use Case:
|

|
Multi-line Input
Example Use Case:
|

|
Check Box
Example Use Case:
|

|
Radio Button
Example Use Case:
|

|
Password
|

|
List Box
Example Use Case:
|

|
Drop Down
Example Use Case:
|

|
Date Picker
|

|
Image
|

|
HTML Text
|

|
Horizontal Line
|

|
iFrame
|
|
Custom Fields |
|

|
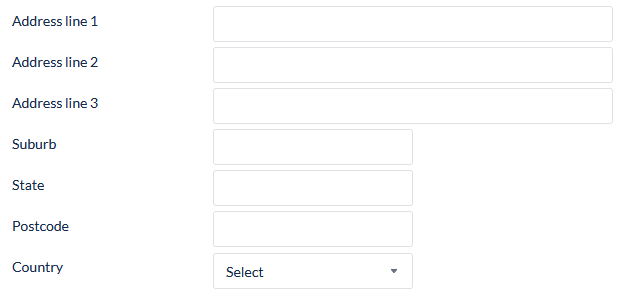
Address
|

|
URL Control
|
Value and style settings must be set for each object the following table describes the Value Settings available. These can vary depending on the Field Object.
|
Value setting |
Description |
|---|---|
|
Label |
The label describes the function of the object to the User. |
|
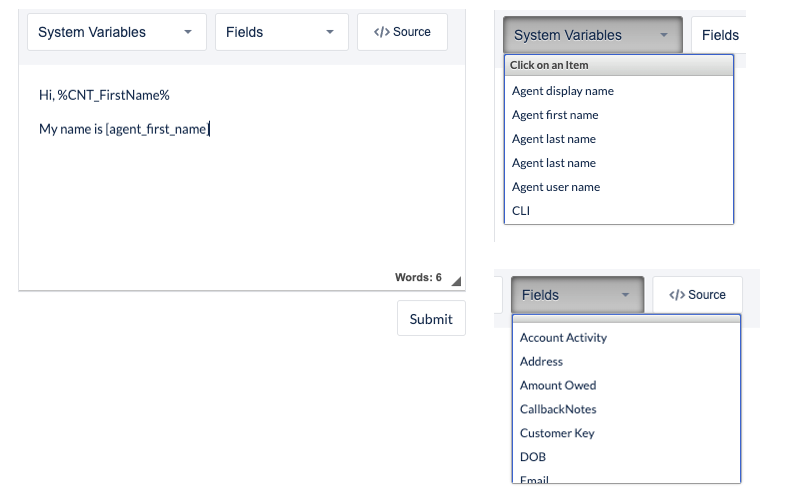
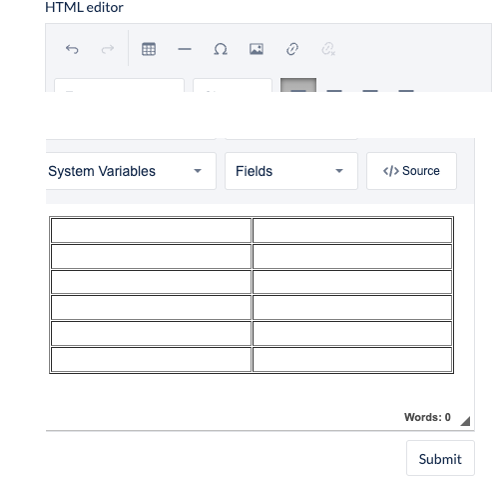
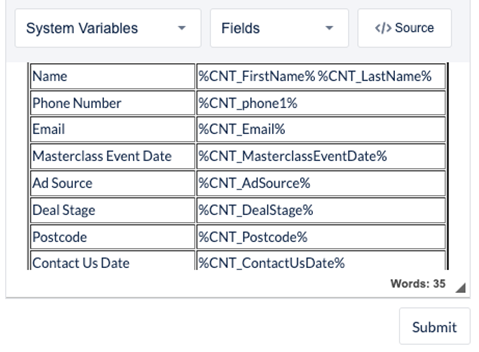
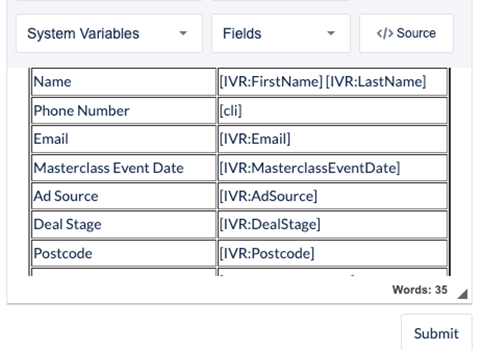
System Variables |
Choose a system variable to add to the Object Label, if appropriate.
|
|
Fields |
Choose a custom data field to add to the Object Label |
|
Default Value |
If an object accepts text entry by the agent, you can set a default value here. |
|
Required |
Do you require the object to have a value? If so, the agent cannot leave this page of the script until a value has been entered or selected. |
|
Validation |
Do you need the input data to be validated? If so, select from the following methods:
|
|
Description |
The description expands on the Label to assist the agent to understand the function of the object. |
|
Input Field |
Choose a field from the campaign data fields to be displayed on the script. |
|
Output Field |
Choose an Activity Data Field into which any captured data will be written. Alternatively select the same campaign data field as you used for input, in which case the value that the agent enters will overwrite the displayed field value. |
|
Custom Processing URL |
Enter the address and parameters for the custom processing.
|
|
On Exit/On Entry |
Select whether the custom processing or validation is performed when the agent clicks in or tabs to the field (On Entry) or when they click on or tab to another field (On Exit). |
|
Phone Value Format |
This feature is available for URL Control and iFrame script objects.
|
|
Style setting |
Description |
|---|---|
|
Font |
Select the font to be used for this object. |
|
Style |
Enable Bold, Italic, and Underline as required. |
|
Size |
Select the Font Size for the label. |
|
Text Colour |
Set the Text colour individually for the Label, Value, and Description. |
|
Text Background |
Set the Text Background colour individually for the Label, Value, and Description. |
|
Input Field Width |
The default width for the Value Display is 150px. |
|
Label Width |
The default width for the Object Label is 200px. |
2. Add a New Page
This feature allows you to add a new page to the campaign script.
When making changes to multi-page scripts, each page will need to be Production Published
Where to find this feature
-
Open the Workspace.
-
Select Scripts from the Campaigns menu.
-
If required, select the campaign to be updated from the drop-down selection list.
-
Click New Page to open the Add New Page dialog.
-
Enter the new page parameters as described in the following table.
-
Click Save to close the dialog.
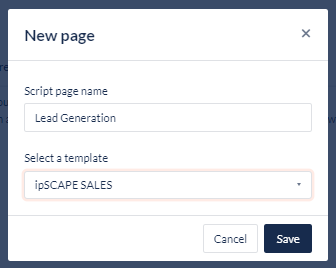
|
Field |
Description |
|---|---|
|
Title |
Add a meaningful title, one that helps you to identify the page's role and place in the script. |
|
Select a template |
Nominate a blank page or select from one of the templates previously created based on existing pages. |
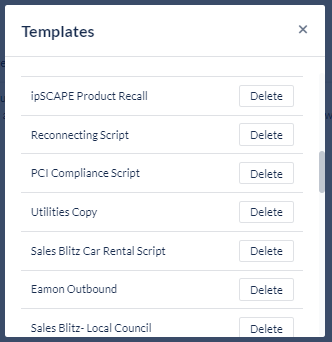
3. Templates
This feature allows you to view or delete an existing script page template.
Where can this feature be found
-
From the Campaign, select Scripts to open the Script Preview
-
Click Templates to open the Page Templates dialog.
Each template that you have previously created from a script page is displayed here.
To delete a template, click Delete. You are prompted to confirm the deletion process.
4. Production Publish
This feature allows publishing script pages making them available to Agents on the Campaign.
Where can this feature be found
-
From the Campaign, select Scripts to open the Script Preview
-
Click Publish Production to publish the scripts
-
A confirmation will be displayed when successful:
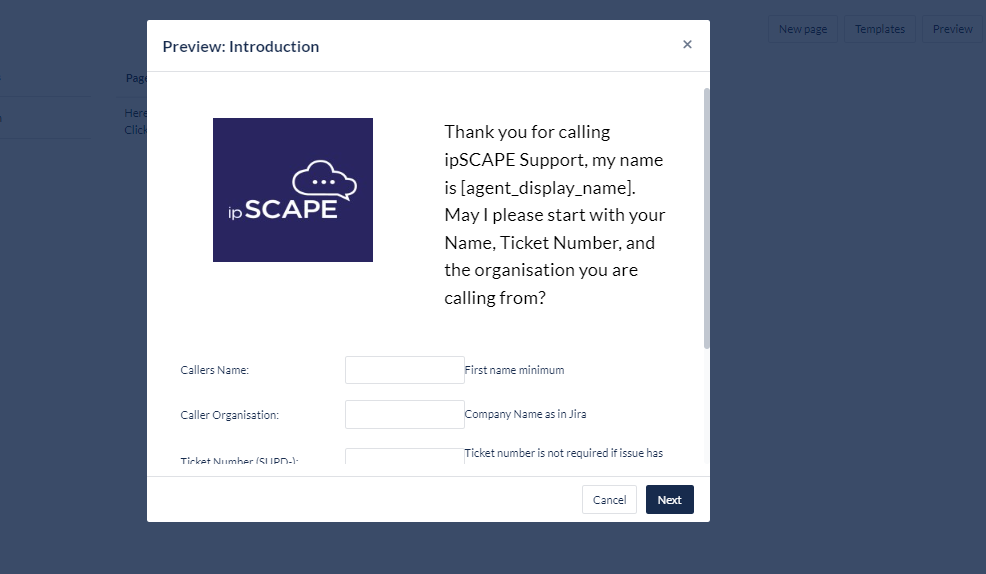
5. Preview Publish
This feature allows you to preview your script pages and the actions that link them, and necessary adjustments before you commit to publishing the script.
Where can this feature be found?
-
From the Campaign, select Scripts to open the Script Preview
-
Click Preview Publish to open the Preview dialog
The first page is presented and can be interacted with as an Agent would; the objects it contains and use the Next menu to navigate through each branch of the script to the last page(s).
6. Actions
Each individual script page has its own actions list, which represents the navigation options the agent has on each page to move through the flow of the script pages.
A list of actions associated with the selected script page is displayed in the following columns:
|
Column |
Contents |
|---|---|
|
Sequence Number |
The sequence number for the action. |
|
Title |
The name of the action. |
|
Output field |
The name of the data field used to save a data string into the customer's data record, where required. |
|
Output Value |
The value that will be written to the Output Field. |
|
Go to Page |
The title of the next page to which the agent will navigate or Branch on Value. |
Add New Action
-
From the Campaign, select Scripts to open the Script Preview
-
Select the page to be edited.
-
Click Actions to open the Page Actions List.
-
Click Add New Action to open the Add New Action dialog.
-
Set the action parameters as described in the Action Details table.
-
Click Save to close the dialog and return to the Page Actions List.
-
Click Back to Script Designer to close the list when you have created actions to link all the script pages.
-
Click Production Publish.
7. Branch on Value
This feature gives you the ability to create a branch in your script based on an activity or contact field value and using branching rules set by you.
-
Click the Go to Page selection list.
-
Select Branch on Value. The Add Rule section appears with a default page destination and one branching rule.
-
Set the branching rules as described in the following table.
-
Click the Add New Rule icon for each rule you need to add to the action.
-
Click the Delete Rule icon to remove a rule from the action.
Branching Rule Parameters
The rules are evaluated in the order they appear.
|
Field |
What you should do |
|---|---|
|
Variable |
This is the Activity or Contact data field who's value will be evaluated. |
|
Operator |
This determines how the evaluation of the value will operate.
|
|
Value |
This is the value in the data field that must be matched to end the evaluation and execute the Go to Page action. Note If you have selected 'In' for the operator, you are saying the variable must match one member of a set of values.
|
|
Go to Page |
This is the destination page if the rule action is executed.
|
8. Number Formatting in Script Objects
In iFrame and URL Control, if the number format is critical in the formation of a URL (i.e. parentheses, leading zeros, or hyphens should be included or excluded) then you can specify what format is used.
Why specify the number format used?
It is entirely possible that the phone numbers entered into a contact field via the lead list, or into an activity field via the agent script, will be in multiple formats. Some databases will not accept multiple number formats, and a query using an 'incorrect' number format might fail even when there is a record matching the supplied number. The Phone Value Format setting, available in the iFrame and URL Control script objects, allows you to stipulate which number format will be used when the query is sent to the remote database.
Which formats can I specify?
You can now select from the following phone number formats:
|
Format |
Australia |
Indonesia |
Singapore |
USA |
UK |
|---|---|---|---|---|---|
|
Pass Through |
No formatting applied, so the formatting used to enter the number is retained. |
||||
|
E.164 |
+61289992222 |
+622125505555 |
+6568364100 |
+16132381040 |
+442073794334 |
|
E.164
|
61289992222 |
622125505555 |
6568364100 |
16132381040 |
442073794334 |
|
Compressed
|
0289992222 |
2125505555 |
68364100 |
6132381040 |
02073794334 |
|
International |
+61 2 8999 2222 |
+62 21 25505555 |
+65 6836 4100 |
+1 613-238-1040 |
+44 20 7379 4334 |
9. Advanced Scripting
9.1 Script URL Control
The URL Control object allows you to create a link between the script page the agent is using during an interaction and an external location such as a Customer Relationship Management (CRM) system so that the agent can navigate to that external location by a click on the link. The link is created from a combination of the base URL and any parameters you define in the URL Control that can identify the details being sought.
If the number format is critical in the formation of a URL (i.e. parentheses, leading zeros, or hyphens should be included or excluded) then you can set the number format in both the URL Control and iFrame script objects.
Below these three scenarios are explained
-
Scenario One - Link the agent to a CRM using a System Variable
-
Scenario Two - Link the agent to a membership database using an Activity Data Field
-
Scenario Three - Link the agent to a CRM using a Contact Data Field
Scenario One - Link the agent to a CRM using a System Variable
You have a CRM database, (e.g. acme.customers) and an inbound caller to the contact centre can be identified in the CRM by their phone number. While interacting with the caller, the agent clicks on the URL Control linked to the CRM database. The URL Control passes the phone number to the specified URL, the CRM database is opened in a new browser tab, and the relevant customer's details are displayed to the agent.
The agent may be required, at least once in each session, to login to the CRM using their user name and password.
Prerequisites
-
The external location must exist and have a valid URL.
-
The external location must allow a query from the contact centre.
Steps in Script Editor
-
Locate and select the script page you wish to edit.
-
Click Edit Script.
-
Select the Single Column Layout Field.
-
Click the URL Control icon to place the control onto the script page.
-
Click the Change Settings icon to open the Value and Style Settings dialog.
-
Alter the default object name "URL1" to "CRM Query".
-
Enter a valid URL address for the external location. e.g. http://ACME.customers.com".
-
In the first text entry field, enter "Customer Number".
-
In the second text entry field, enter "[CLI]".
CLI is a system variable used by the contact centre. See System Variables. -
Click the Add icon to save that mapping.
-
Select "International" as the Number Format applied to telephone numbers.
See Number Formatting in Script Objects for more information regarding this setting.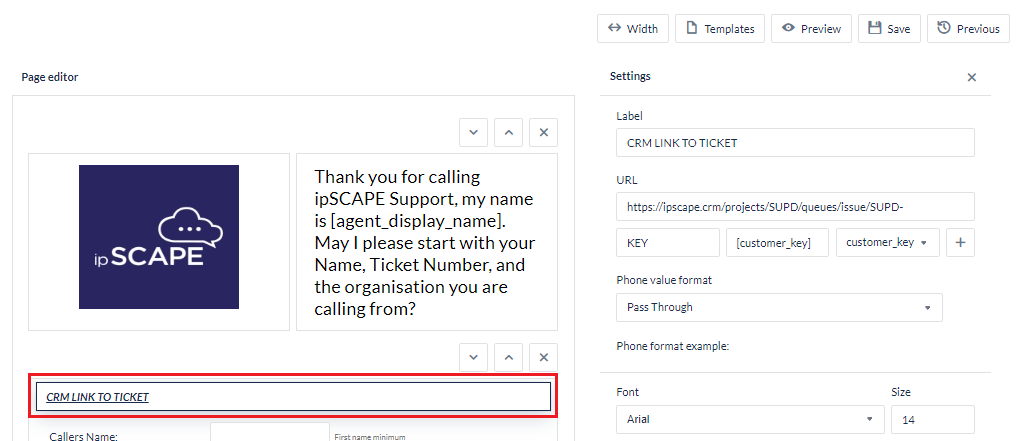
-
Click the Save icon and then on Save Current Page.
-
Click Back to Script Designer.
-
At this time, you should test the link you have created. To do this, click Preview Publish and use the script page as though you were an agent talking to a contact.
-
When you are satisfied with how the script page is functioning, click Production Publish.
Scenario Two - Link the agent to a membership database using an Activity Data Field
For example, you have a membership database, "acme.members.com", and a member is identified by a unique membership ID. You create an activity field for Membership ID, and you include that field in the campaign script. When interacting with a caller, the agent determines the caller's membership ID, (e.g. AD1357908) enters it into the activity field, and clicks on the URL Control linked to the membership database. The URL Control links the base URL with the value(s) of the data field(s), (e.g. https://acme.members.com/display/?Member_ID=AD1357908). The external location is opened and the relevant member's details are displayed to the agent. The agent can now establish that the caller's membership is current, expired, or suspended before proceeding with the support query.
The agent may be required, at least once in each session, to login to the database using their user name and password.
Prerequisites
-
The external location must exist and have a valid URL.
-
The external location must allow a query from the contact centre.
-
The "Membership ID" activity data field must exist.
-
"Membership ID" must be used on an earlier page than the URL Control so that any writing to the database has occurred before the URL Control accesses the value. A contact field does not have that requirement.
Steps in Script Editor
-
Ensure that an earlier script page exists that contains the "Membership_ID" activity data field.
This will allow the agent to enter the ID and save that value to the database before it is referenced by the URL Control. -
Locate and select the script page on which you wish to place the URL Control.
-
Click Edit Script.
-
Click the URL Control icon to place the control onto the script page.
-
Click the Change Settings icon to open the Value and Style Settings dialog.
-
Change the default object name, "URL1", to "Validate Membership".
-
Enter a valid URL address for the external location. e.g. http://ACME.members.com".
-
In the first text entry field, enter "Member ID".
-
From the drop-down selection list, select "Membership_ID".
-
Click the Add icon to save that mapping.
-
Select "International" as the Number Format applied to telephone numbers.
See Number Formatting in Script Objects for more information regarding this setting. -
Click on the Save icon and then on Save Current Page.
-
Click on Back to Script Designer.
-
At this time, you should test the link you have created. To do this, click Preview Publish and use the script page as though you were an agent talking to a contact.
-
When you are satisfied with how the script page is functioning, click Production Publish.
Scenario Three - Link the agent to a CRM using a Contact Data Field
You have a CRM database, (e.g. acme.customers) and a lead can be identified in the CRM by their "Customer ID". When the predictive dialler connects the lead to the agent, the agent clicks on the URL Control linked to the CRM database. The URL Control passes the value of the customer ID to the specified URL, the CRM database is opened in a new browser tab, and the relevant customer's details are displayed to the agent and a record of the interaction is added to the customer history.
Note
The agent may be required, at least once in each session, to login to the CRM using their user name and password.
Prerequisites
-
The external location must exist and have a valid URL.
-
The external location must allow a query from the contact centre.
-
The "Customer ID" contact data field must exist and must be populated.
Steps in Script Editor
-
Locate and select the script page you wish to edit.
-
Click Edit Script.
-
Select the Single Column Layout Field.
-
Click the URL Control icon to place the control onto the script page.
-
Click the Change Settings icon to open the Value and Style Settings dialog.
-
Alter the default object name "URL1" to "Update CRM".
-
Enter a valid URL address for the external location. e.g. http://ACME.customers.com".
-
In the first text entry field, enter "Customer ID".
-
From the drop-down selection list, select "Customer_ID".
-
Click the Add icon to save that mapping.
-
Select "International" as the Number Format applied to telephone numbers.
See Number Formatting in Script Objects for more information regarding this setting. -
Click the Save icon and then on Save Current Page.
-
Click Back to Script Designer.
-
At this time, you should test the link you have created. To do this, click Preview Publish and use the script page as though you were an agent talking to a contact.
-
When you are satisfied with how the script page is functioning, click Production Publish.
9.2 Custom Processing in a Script
Custom Processing is another validation method that can be applied to a single line input field, one that is performed outside of the Cloud Contact Centre.
Where this feature can be found
-
Open the Workspace.
-
Select Scripts from the Campaigns menu.
-
Select the page to be edited.
-
Click Edit Script to open the Page Editor dialog.
-
Click on the Single Line Input Field icon to add one to the script page.
-
Click the Change Settings icon for that object.
When performing custom processing to a single line input field, enter into its Value Settings dialog the full URL of the external script that will perform the process, including any required parameters. Parameters that need to be read from the database are enclosed in square brackets.
For example, to send a member name to http://xyz.com in order to get the associated member class: https://xyz.com?member_name=[memb_name]&required_field=class
Input fields whose value is required to be sent to an external script should be processed on an earlier page of the script to ensure that the most recent value is provided as input to this process, which typically occurs when one page is closed and a new one is opened.
Frequent Flyer Scenario
On an earlier script page, the contact has supplied an airline frequent flyer membership number to the agent, who has entered the number into an Activity Field called "memb_no". On the opening of the current page, the agent sees the results of the process: the name of the frequent flyer, the number of points accumulated, and the membership class, all of which the agent can incorporate into the campaign script.
"Mr Jones, I can see that you have accumulated 11,359 frequent flyer points and are a gold class member, so let me see how we can best use those points in your booking today..."
Output Data
|
Field Name |
Value |
|---|---|
|
Frequent Flyer Name: |
Davy Jones |
|
Accumulated Points: |
11,359 |
|
Membership Class: |
Gold |
Object Settings
In order to make this happen, the Script Designer will have placed three script objects on the page and entered the following data into their respective value settings dialogs:
Object Type: Single Line Input
Label:Frequent Flyer Name
Custom Processing URL: https://frequentflyerclub.com?memb_no=[654321]&required_field=memb_name
On Entry is selected.

Object Type: Single Line Input
Label:Accumulated Points
Custom Processing URL: https://frequentflyerclub.com?memb_no=[654321]&required_field=memb_points
On Entry is selected.

Object Type: Single Line Input
Label:Membership Class
Custom Processing URL: https://frequentflyerclub.com?memb_no=[654321]&required_field=memb_class
On Entry is selected.