
Overview
The Configuration module allows you to create and maintain voice, email, and chat campaigns.
-
Open the Workspace
-
Select Configuration from the Campaigns menu
-
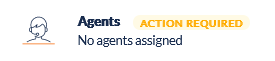
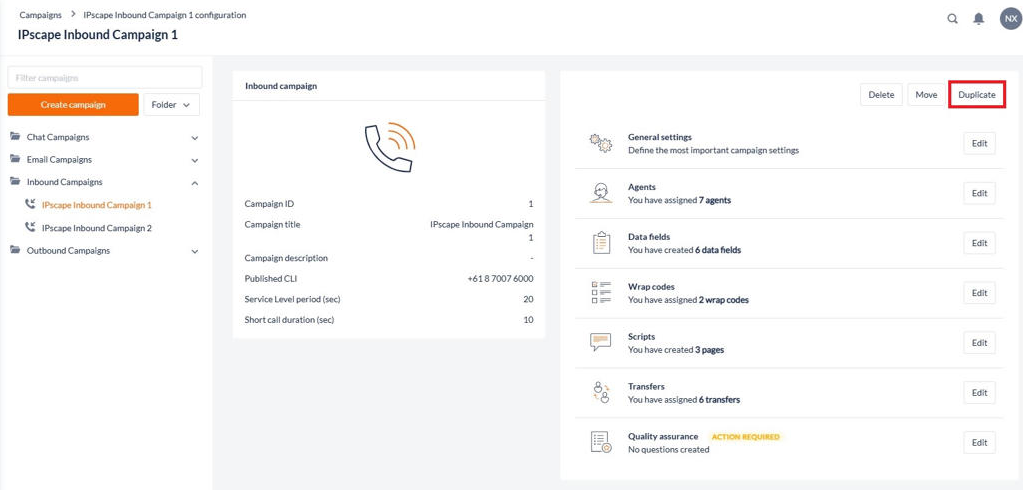
Where action is required on a campaign configuration, an alert will appear next to it in the overview screen:
-
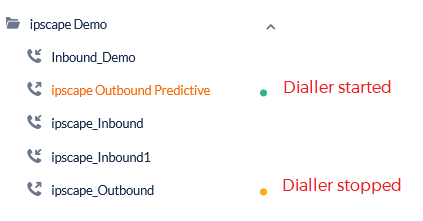
When the dialer is stopped or started on an Outbound campaign, it will be indicated by the coloured icon next to the campaign title:
1. Campaign Folders
This feature allows you to create and maintain Campaign Groups that assist you to separate and organise campaigns.
Create a Campaign Folder
-
From the Workspace.
-
Select Configuration from the Campaigns menu.
-
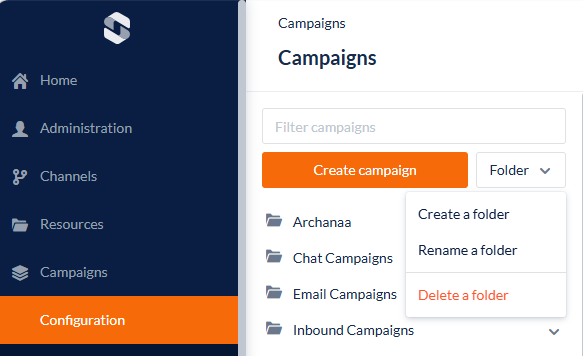
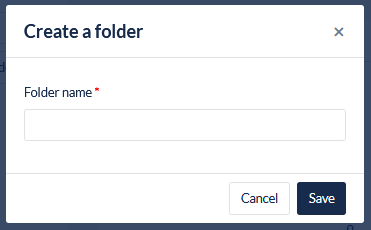
To create a new folder group, click Create a folder from the Folder drop-down. The Create a folder dialog opens.
-
Enter a meaningful title for the folder.
-
Click Save.
Rename a Campaign Folder
-
From the Workspace.
-
Select Configuration from the Campaigns menu.
-
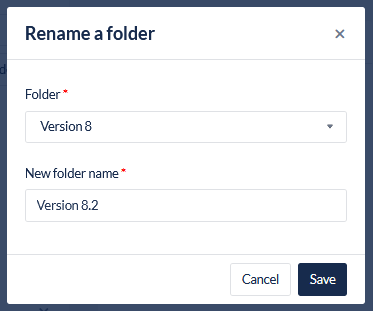
To rename a folder group, click Rename a folder from the Folder drop-down. The Rename a folder dialog opens.
-
Select the folder to rename from the dropdown
-
Enter a new title for the folder.
-
Click Save.
Remove a Campaign Folder
-
From the Workspace.
-
Select Configuration from the Campaigns menu.
-
Click Delete a folder from the drop-down to open the Delete folder dialog window.
-
Select the folder to delete from the drop-down
-
Click Delete to permanently remove the folder or Cancel to go back to the Campaign module
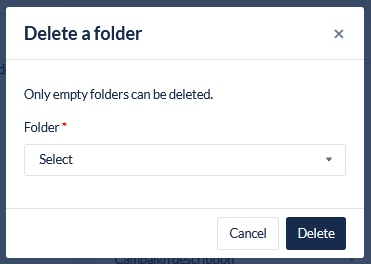
Only Campaign Folders which are empty with no assigned campaigns can be deleted. To remove a Campaign Folder, ensure any assigned Campaigns have first been removed.
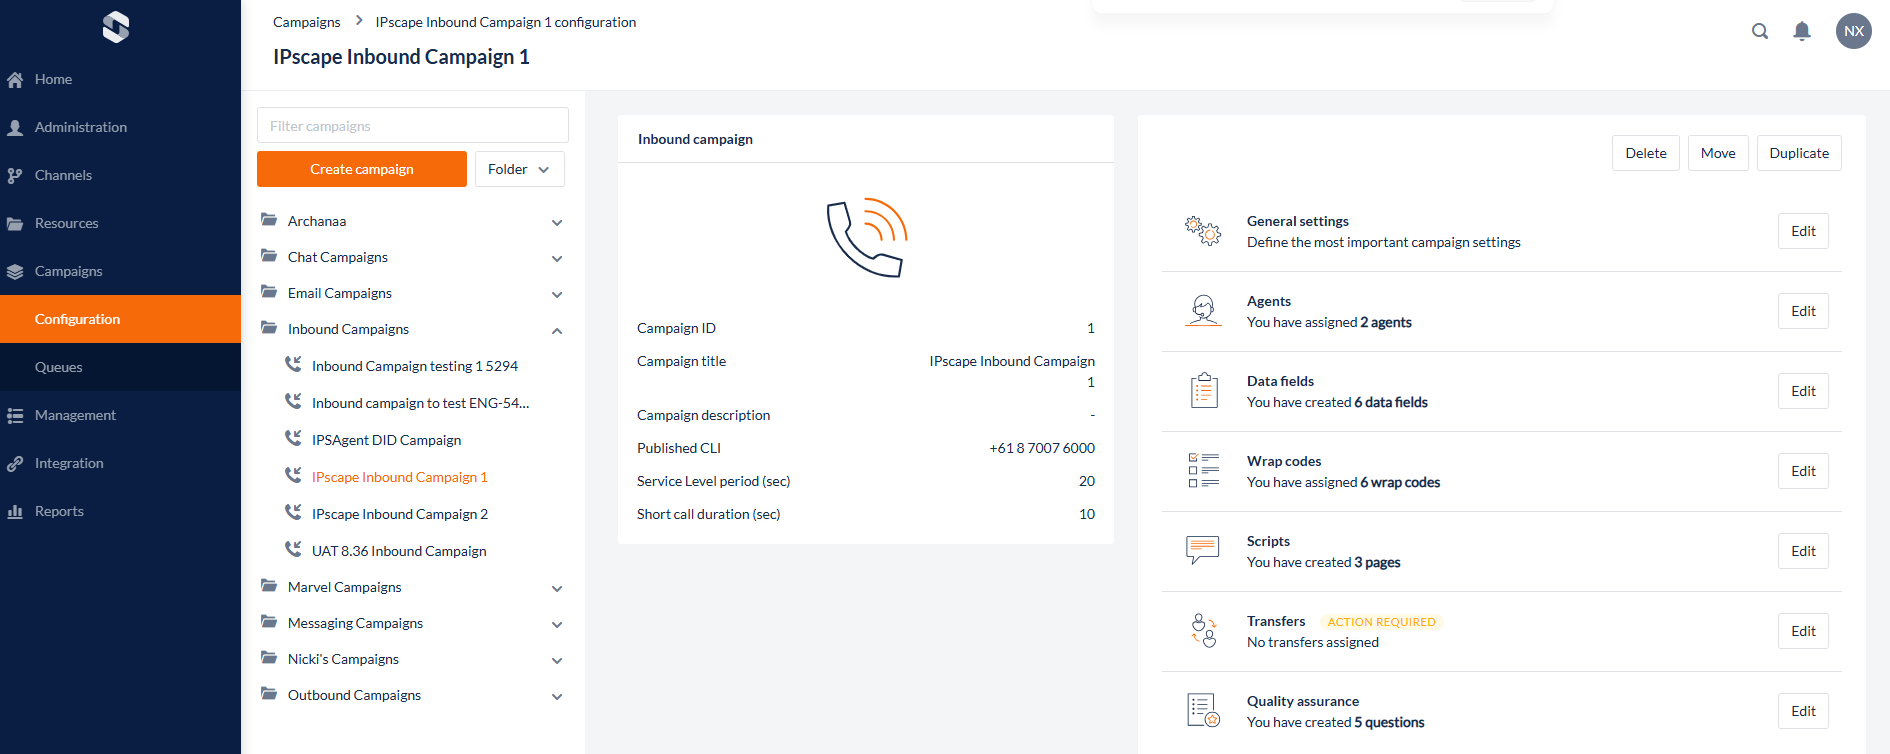
2. Create a Campaign
This feature is used to determine the type of campaign to be created.
-
Open the Workspace.
-
Select Configuration from the Campaigns menu.
-
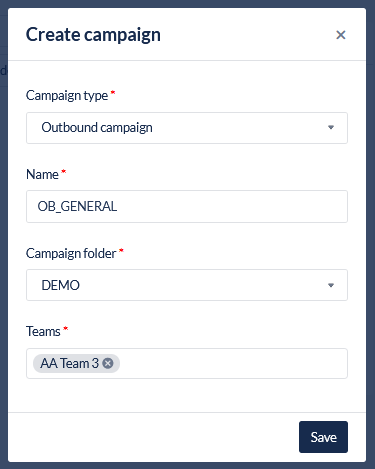
Click Create Campaign to open the create campaign dialog window:
-
Select the type of Campaign you would like to create from the drop down. Find more information about the configurations for each type of campaign from the links below:
Inbound Campaign
Outbound Campaign
Email Campaign
Chat Campaign
Messaging Campaign -
Give the campaign a meaningful name to be identified
-
Assign the new campaign to a Folder and Team(s)
-
Click Create. The Campaign Configuration wizard opens.
Folders and Teams will need to be created first in order to show in these settings during new Campaign configuration.
3. Duplicate a Campaign
When you duplicate a campaign, an exact copy of the campaign is created. The copy inherits all the configuration settings of the original. You are then able to give the copy a new name and allocate it to a new folder.
-
Open the Workspace.
-
Select Configuration from the Campaigns menu.
-
Select the campaign you would like to copy and click Duplicate. The Clone Campaign dialog opens.
-
Enter the title of the new campaign and select the campaign Group (folder).
-
Select the desired Duplicate Options and click Clone.
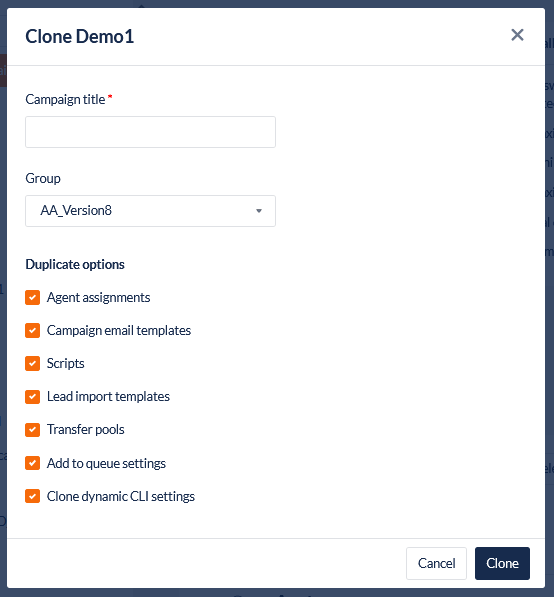
When a Campaign is duplicated, the Teams from the original Campaign will also be brought across. You will need to amend the Teams as required.
4. Add to Queue Setting
This feature allows you to connect wrap codes assigned to the campaign to another campaign. Add to Queue is available for Inbound, Outbound, and Chat campaigns.
-
Open the Workspace.
-
Select Configuration from the Campaigns menu.
-
Select the campaign to be edited. The Campaign Details are displayed for that campaign. Click Edit next to Wrap Codes
-
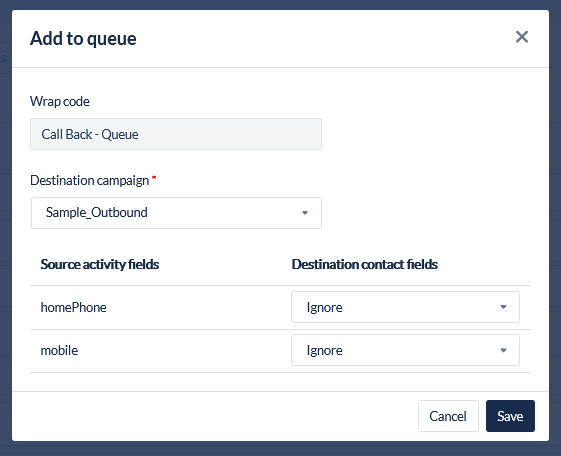
Locate the wrap code you would like to use to connect to another queue and click to add.

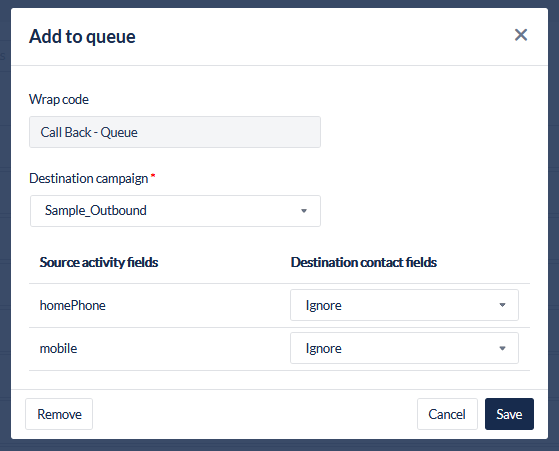
Create the connection between selected wrap codes and an outbound campaign
-
Select the Wrap Code that will trigger the contact to be added to a campaign queue
-
Select the destination campaign that the contact will join
-
Where required, select which Activity Fields will be matched to the outbound campaign Contact Fields by selecting from the drop-down selection list either the target field name or Ignore.
-
Click Save. Repeat steps 1-4 for every wrap code in the campaign that you wish to connect with an outbound campaign callback queue.
-
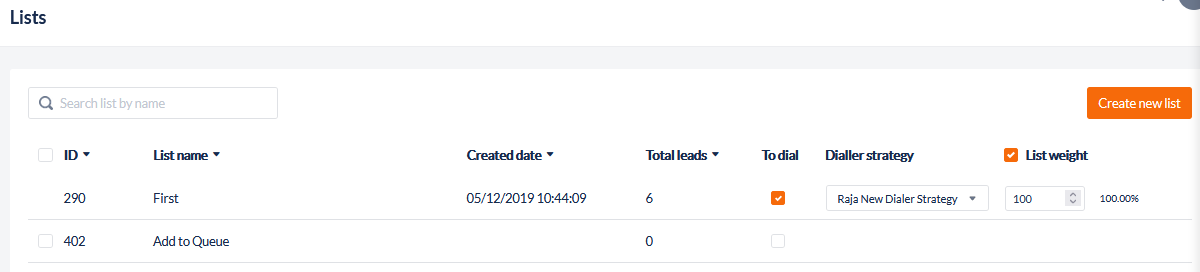
Open the campaign the contact will join, for example, Sample_Outbound,
-
Locate Leads to dial and click Edit lists, and select "Add to Queue" as a List to Dial with an associated dialler strategy.
-
Start the outbound campaign.
View, edit, and delete Add to Queue settings
-
Select the campaign to be edited. The Campaign Details are displayed.
-
Click Edit next to Wrap Codes
-
Select the Wrap Code from the list. The current settings are displayed.

-
To edit the settings, click the edit icon next to the assigned queue name to open the Add to Queue settings. Make the required changes, and click Save.
-
To remove the Add to Queue Setting, click Remove.
-
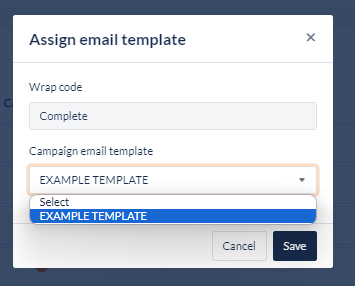
5. Send Email from Wrap Code
This feature allows you to connect wrap codes assigned to the campaign to trigger an Email to be sent from the Toolbar.
-
Open the Workspace.
-
Select the campaign to be edited. The Campaign Details are displayed for that campaign. Click Edit next to Wrap Codes
-
Locate the wrap code you would like to use to send an Email and click the Checkbox under Send email to enable

-
Once checked, the User will be presented a screen to select the Email Template to assign. See the following section for how to add an Email Template to a Campaign.
-
Click Save. To change the Email Template selected, click the pencil icon to assign another template
6. Add an Email Template to a Campaign
This feature allows you to associate one or more email templates with a campaign.
An email template can be associated with any type of campaign.
Where to find this feature
-
Open the Workspace.
-
Select Configuration from the Campaigns menu.
-
Select the campaign to be edited. The Campaign Details are displayed for that campaign.
Email Templates for Campaign is available for Inbound, Outbound, Email, and Chat campaigns. -
Click the Edit next to General Settings in the campaign details display.
-
Locate the Emails section
-
Enter the email channel from the drop-down
-
Click the checkbox to enable agents to send free-format email replies. If this is not checked, agents will only be able to send emails based on pre-defined email templates.
-
Select an appropriate template to be used by the campaign.
-
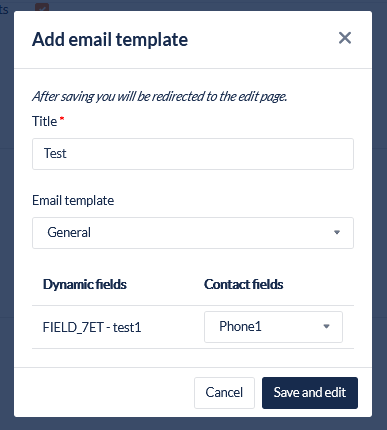
Click Add email template and the Add email template dialog opens.
|
Field Name |
What you should do |
|---|---|
|
Title |
Enter the title of the Email Template. The name does not have to match the name of the Email Template itself, and should be given a name that is more meaningful within the context of the campaign. |
|
Email Template |
Select one of the pre-defined Email Templates. As soon as a template is selected, an additional section for mapping of fields opens at the bottom of the dialog box. |
|
Dynamic Fields & Contact Fields |
This can be used to map the fields defined in the template against data fields defined in the campaign. |
When you click Save and edit, a dialog box showing the email template opens, and you can edit any of its fields to change their default values, within this campaign.
|
Field Name |
What you should do |
|---|---|
|
Allow Agents to modify |
Click the checkbox to enable an agent to modify the email details, (e.g. Subject, Sender Name, CC, BCC, and Reply To) when about to send the email. |
See Add or Edit Email Template for a description of how to edit the template to meet the requirements of this campaign.
The template itself is not changed during this process.