
Overview
The Email Templates module allows a user to create and maintain the templates used for emails sent from the contact centre.
What are Email Templates?
Email Templates are the mechanism by which a user can predefine standard emails to be sent by the system or by an agent. Email Templates are used in much the same way as mail-merge documents are used - the template includes references to user data (fields) which are populated with values whenever an email is generated from the template.
Emails generated with a template can typically be edited by the agent before they are sent unless such editing is forbidden (e.g. to ensure consistent wording of sent emails) or when no user interaction is involved in the generation of the email (e.g. when sending an automatically-generated report).
An Email Template can contain both static and/or dynamic content.
A user can determine whether agents can modify emails generated via email templates or not. See the campaign details for each type for instructions for adding an email template to Inbound, Outbound, or Email campaign types.
Email Templates Display
This feature allows Workspace Administrators to navigate the list of Email Templates from the Resources menu.
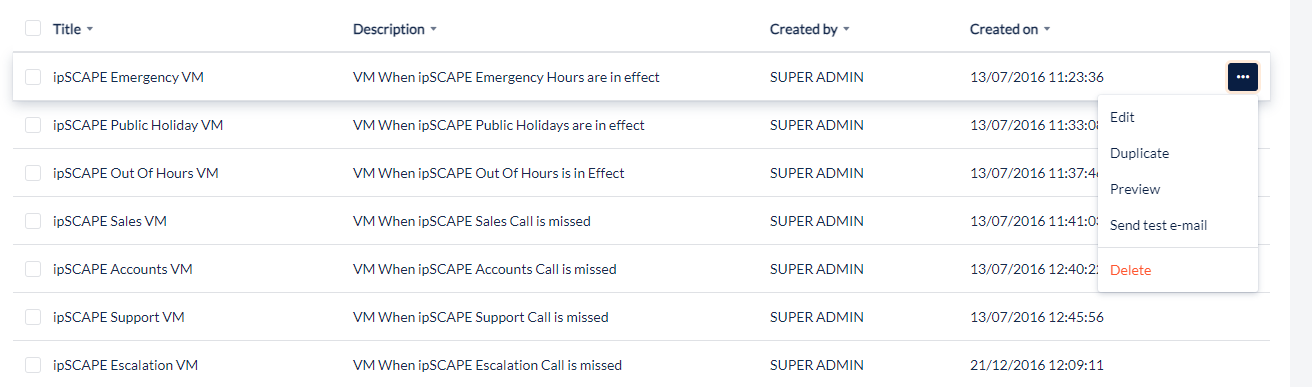
A list of Email Templates is displayed, and each template has the following details:
|
Column |
Contents |
|---|---|
|
Title |
On the top line, the name that has been assigned to this email template is displayed.
|
|
Default Subject |
The Default Subject line for the email template. |
|
Created by |
The name of the user who created the email template. |
|
Created On |
The date and time when the email template was created. |
1. Add or Edit Email template
This feature allows Workspace Administrators to create new or edit existing email templates.
-
Open the Workspace.
-
Select Email Templates from the Resources menu.
-
To add a new template, click the Create new email template button in the header row. The Add Email Template dialog opens.
-
To edit an existing template, locate and click the template to be edited
-
If creating a new template, enter the Title, and click Save.
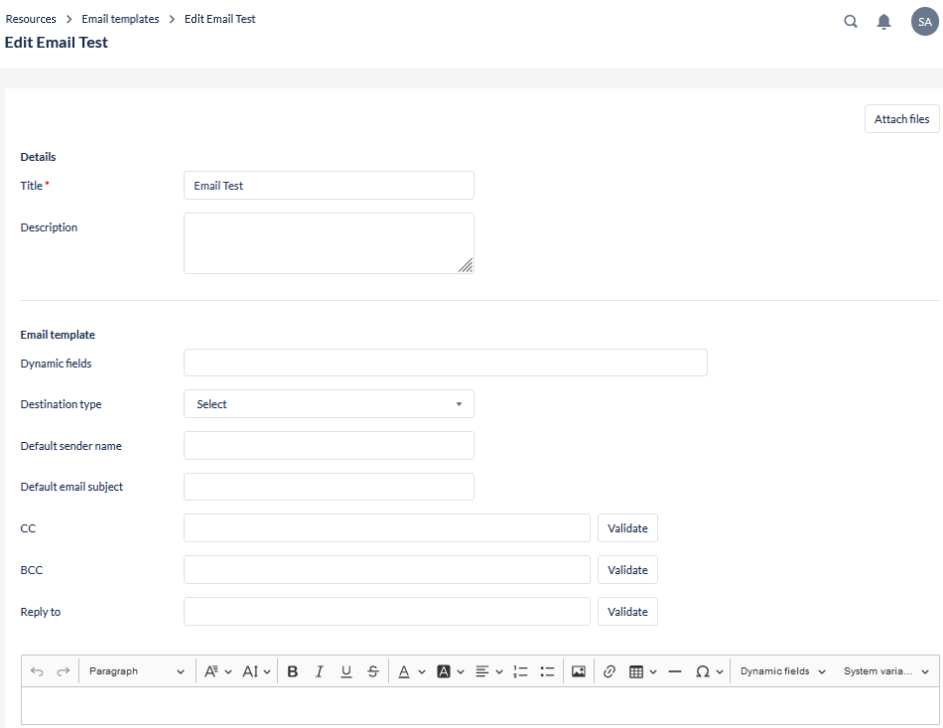
The Edit Email Template dialog opens, which allows a user to manually enter all the required details of an Email Template.
Dynamic Fields
Dynamic Fields can link to the Data Fields created within a campaign. These Data Fields capture specific information that Agents input manually during inbound calls or receive automatically from Leads during outbound calls. Examples include ‘First Name’, ‘Last Name’, ‘Phone Number’, ‘Account Number', and 'Email Address’.
Start typing the name of the Dynamic Field, if the field does not yet exist, complete the name of the field and press Enter to add the new field. A new field will be created and will be given a system-generated ID, which will be the primary means used to reference the field.
To delete a Dynamic Field, click the X next to the field name.
Fields
|
Field Name |
Description |
|---|---|
|
Destination type |
Select the type of destination to which emails generated from this template will be sent. Two choices are available: Field: Typically used to send an email to a contact, for example to request they fill out a post-contact survey. If this option is selected, then the field which will contain the destination email address also needs to be selected. Fixed Email Address: Typically used to send a notification to an internal email address, for example to send a notification email to the order fulfilment department after a sale has been made. If this option is selected, then the destination email address also needs to be specified. |
|
Default Sender name |
Enter the default sender name for the emails generated from this template. This name will be able to be edited before any generated email is sent. Depending on the way the email channel is defined, this setting may not be effective, or may be ignored. |
|
Default Email Subject |
Enter the default subject line for the emails generated from this template. This subject line will be able to be edited before any generated email is sent, or when the email template is assigned to a campaign. |
|
CC |
Enter one, or more, email addresses to which emails generated from this template will be copied. If multiple email addresses are entered, they should be separated by either a comma " , " or a semicolon " ; ". Click Validate to verify the email address is a valid format |
|
BCC |
Enter one, or more, email addresses to which emails generated from this template will be blind copied. If multiple email addresses are entered, they should be separated by either a comma " , " or a semicolon " ; ". Click Validate to verify the email address is a valid format |
|
Reply To |
Enter one, or more, "Reply To" email addresses that will be included in emails generated from this template. If the recipient of one of those emails subsequently replies to it, his reply will be sent to the relevant "Reply To" email address. Click Validate to verify the email address is a valid format |
HTML Editor Sub-section
Using the various edit controls that are provided, a user can edit and format the email content as required.
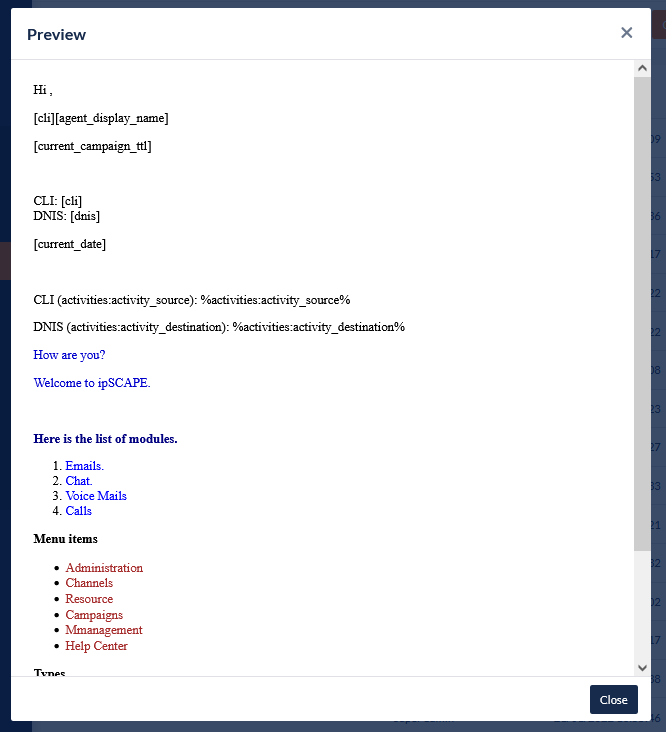
To include a System Variable in the text of the mail, click System Variable and select the variable of interest. If a required system variable is not displayed, type the variable name to display it. The complete list can be found below. Its ID will be inserted, between square brackets, into the body of the email. This ID will be replaced with the relevant field content when an email is generated from this template.
|
System Variables |
|
|---|---|
|
agent_first_name |
|
|
agent_last_name |
|
|
agent_user_name |
|
|
agent_display_name |
|
|
agent_email |
|
|
customer_key |
|
|
contact_name |
|
|
contact_email |
|
|
current_campaign_tt |
|
|
lead_id |
|
|
cli |
|
|
dnis |
|
|
agent_interaction_id |
|
|
current_date |
|
|
current_time |
|
|
activity_id |
|
|
current_data_label |
|
|
organisation_title |
|
|
organisation_url |
|
To include a Dynamic Field in the text of the email, click Dynamic Fields and select the field of interest. Its ID will be inserted, between '%' characters, into the body of the email. This ID will be replaced with the relevant field content when an email is generated from this template.
To include an "IVR" field in the text of the email, the data label that has been specified to the IVR field can be used and inserted between '%' characters e.g. %ivr:PIN_NUMBER% where PIN_NUMBER is a prompt in the Workflow IVR for the Customer to enter. This field will be replaced with the relevant field content when an email is generated from this template.
|
Dynamic Fields |
|
|---|---|
|
activities:activity_source |
|
|
activities:activity_destination |
|
|
activities:activity_start_dt |
|
|
activities:activity_end_dt |
|
|
activities:queue_entry_dt |
|
|
activities:activity_id |
|
2. Duplicate Email
This feature allows a user to create a copy of an already existing template within the workspace.
-
Open the Workspace.
-
Select Email Templates from the Resources menu.
-
Locate the template to be copied and click “Duplicate”
-
A new dialogue will open to name the duplicate. The default will be
[Template name copy] -
The page will reload with a confirmation that the email template has been duplicated and ready for editing

-
Users can either save the page with the new changes or cancel to reverse the changes made from the last copied or saved version.
3. Preview Email
This feature allows a user to examine the layout of the email content prior to its use in a campaign. Where to find this feature:
-
Open the Workspace.
-
Select Email Templates from the Resources menu.
-
Locate the template to be previewed and click the Overflow icon to expand the menu.
-
Click the Preview to open the email preview window.
4. Send Test Email
Send Test Email gives users a chance to see how the selected email template looks when an email is created based on it.
-
Open the Workspace.
-
Select Email Templates from the Resources menu.
-
Select the Options icon to expand the menu.
-
Select Send test e-mail to open the Test Email dialog
Enter the following details for the test email:
|
Field Name |
Description |
|---|---|
|
Email Subject |
Enter a subject for the email. |
|
To |
Enter a valid email address to receive the test email |
|
CC, BCC & Reply To |
Enter if required. |
When satisfied with the email details, click Send Test.
Activity ID in email templates
It is possible to add the Activity ID in an email when a customer leaves a voicemail. The Activity ID can be fetched for further processing, using the API.
The variable to be used in the email template is %activities:activity_id% and will transform into the actual Activity ID in the sent email.