
Overview
A chat campaign involves contact centre agents receiving chat requests from contacts via a web channel, and engaging in a chat session.
Contacts, when requesting to chat, may be asked to supply answers to a short pre-chat survey. The survey answers provide basic information about the contact and the reason for their request.
Chat session transcripts can be viewed in Chats.
1. Add or Edit Chat Campaign
-
Open the Workspace
-
Select Configuration from the Campaigns menu
-
To add a new campaign:
-
Click Create Campaign
-
Select Chat campaign from the drop-down selection list
-
Click Create. The Campaign Configuration wizard opens
-
-
To edit an existing campaign:
-
Select the campaign you wish to edit
-
Click Edit next to General Settings
-
-
-
Enter the Campaign Details as described in the tables below
-
Click Next to progress through the wizard when creating a new campaign, or click Save for any changes to an existing campaign
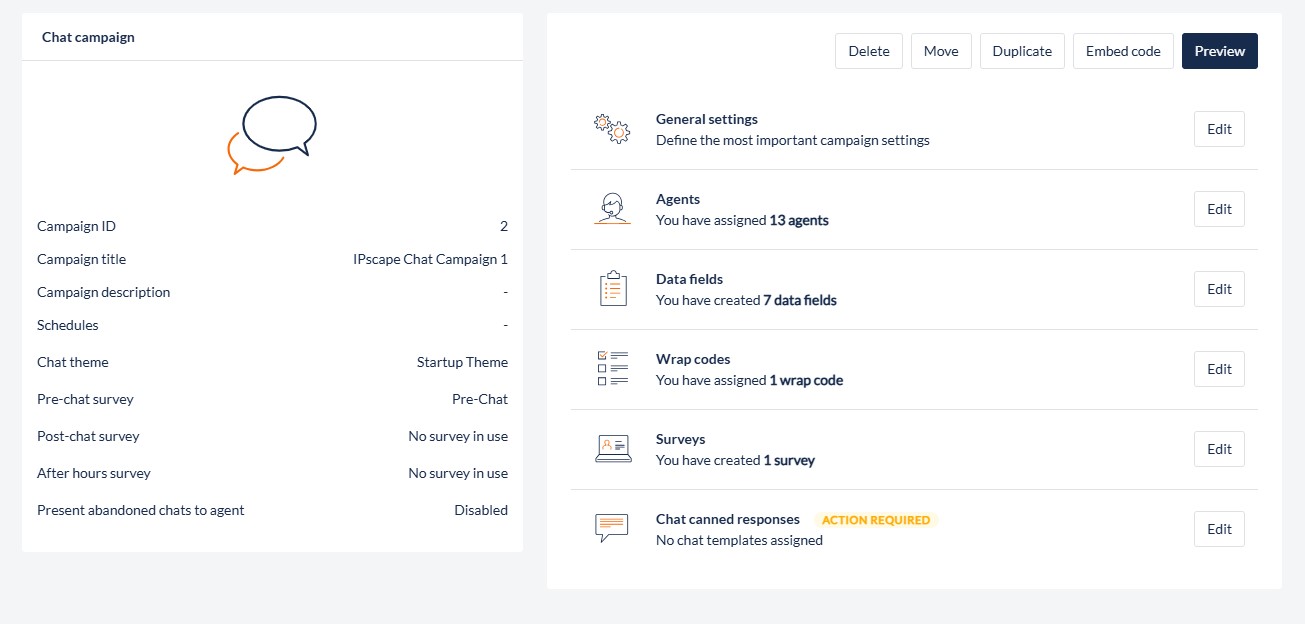
2. View Chat Campaign Details
Chat Campaign Details is a snapshot view of a contact centre chat campaign.
Where to find this feature
-
Open the Workspace.
-
Select Configuration from the Campaigns menu.
-
Select the chat campaign to be viewed.
The Campaign Details are displayed for that campaign.
The Campaign Details Display gives a summary view of the key settings for a particular campaign.
3. Chat Campaign Configuration
General Settings
To configure the general settings for the Chat campaign, click the Edit button on the campaign details page next to General Settings.
|
Field Name |
What you should do |
|---|---|
|
Campaign Title |
Enter a meaningful name for the campaign. |
|
Campaign Description |
Enter the description of the campaign. |
|
Campaign Folder |
Select a Campaign Folder from the drop down selection list. |
|
Teams |
Select the teams assigned to the campaign |
|
Schedule |
Select the operational hours calendar from the drop down selection list. |
|
Chat Theme |
Select a theme from the drop down selection list. Themes are defined in Resources > Chat Themes.
|
|
Surveys |
|
|
Pre-chat Survey |
When a chat campaign is created, a default survey named Pre-Chat is created.
|
|
Post-chat Survey |
Select a Survey from the drop down selection list. Surveys are defined in Surveys from the campaign details page |
|
After-hours Survey |
Select a Survey from the drop down selection list. Surveys are defined in Surveys from the campaign details page. |
|
Present Abandoned Chats to Agent |
Click in the checkbox to enable/disable this feature. The default setting is disabled. If disabled:
If enabled:
|
|
Timezone Settings |
|
|
Region |
Select the appropriate region for the campaign. This setting populates the timezone drop down list box below with the available time zones for that region. |
|
Timezone |
Select the appropriate timezone for the campaign. This setting is applied to check whether the contact centre is operational when a chat request is received.
|
|
Date display format |
Multiple formats are supported, reflecting the main date formatting conventions used around the world.
|
|
Emails |
|
|
Email Channel |
Select the email channel from the drop-down. Organisation default email channel is selected by default |
|
Email Templates |
Click Add email template to add an email template to the campaign |
|
Service Level |
|
|
Service Level Period |
This setting will dictate how chat response times are reported. |
|
Response Time Threshold |
After the agent has started chatting with customer, if they do not respond to the customer inside this duration, the customer name is highlighted and an orange bar becomes visible.
|
|
Security Settings |
|
|
Restrict URLs |
Click in the checkbox to increase the security for the Chat Request link on your website.
|
3. Add Chat Canned Responses to a Campaign
Below the main Campaign Details display, select the Chat Canned Responses which allows you to view, add and delete chat canned responses that will be accessible for use by agents in the campaign.
-
Open the Workspace.
-
Select Configuration from the Campaigns menu.
-
Select the chat campaign to be viewed.
The Campaign Details are displayed for that campaign. -
Click Edit next to Chat canned responses. Go to the Unassigned tab.
-
Select one or more appropriate templates to be used by the campaign.
-
Click Assign.
To remove a template from the campaign, go to the Assigned tab, hover over the row with the response to remove and click on the Delete icon on the right. This only removes the canned response from the campaign; the response itself is not deleted from the list of chat templates.
Any configured chat canned responses are shown in the following list, which has these columns:
|
Column |
Contents |
|---|---|
|
Snippet |
The name of the canned response used like a shortcut key |
|
Canned Response |
The canned response details |
4. Chat Surveys
The Chat Survey is where Users can create the Pre-chat, Post-chat and After-hours survey presentation for end-users to obtain specific information. See Chat Surveys for a guide.
5. Using the Chat Request Widget
The Chat Request Widget is used to provide the ability for contacts to request a chat session from a remote web page.
-
Open the Workspace.
-
Select Configuration from the Campaigns menu.
-
Select the chat campaign to be viewed.
The Campaign Details are displayed for that campaign. -
Click Embed Code.
-
Copy the generated code and paste it into your web page before the closing body tag.
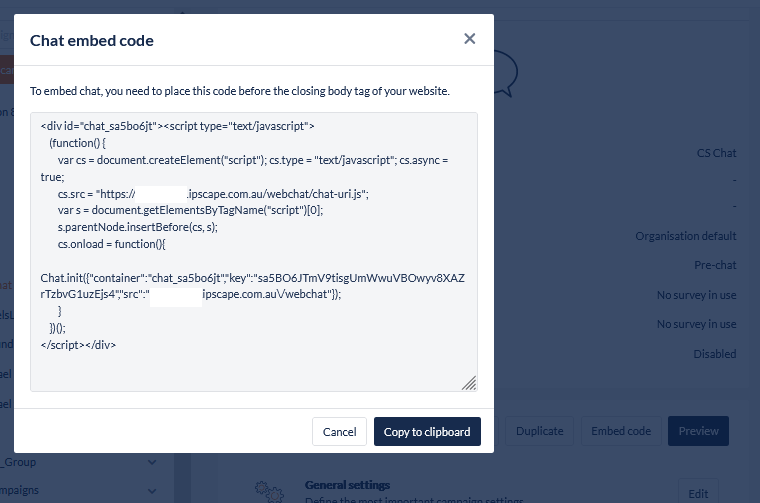
The basic HTML code that you generate within the workspace will be similar to the following:
Simple Widget Code
|
However, if you intend to place the Chat Request Widget onto a page into which a contact might be logged in such as a web portal, it is possible to use the contact's login data to populate the pre-chat survey for the chat request.
In this example, Name and Email have been used but you can use any data that is available from your portal so long as the Pre-chat Survey in your Chat Campaign has a field in which to accept that data.
To do this, add an extra line (see line 12: userData) to your widget code into which you have added your portal's field names as follows:
Widget Code with userData
|
If you need to change the stack order of the Chat window you can add a 'z-index' shown below in line 13:
Widget Code with z-index
|