
Overview
The toolbar is a discrete software module into which agents log in via their internet browser, and subsequently establish a telephone connection. Here is a screenshot highlighting the basic functionality:
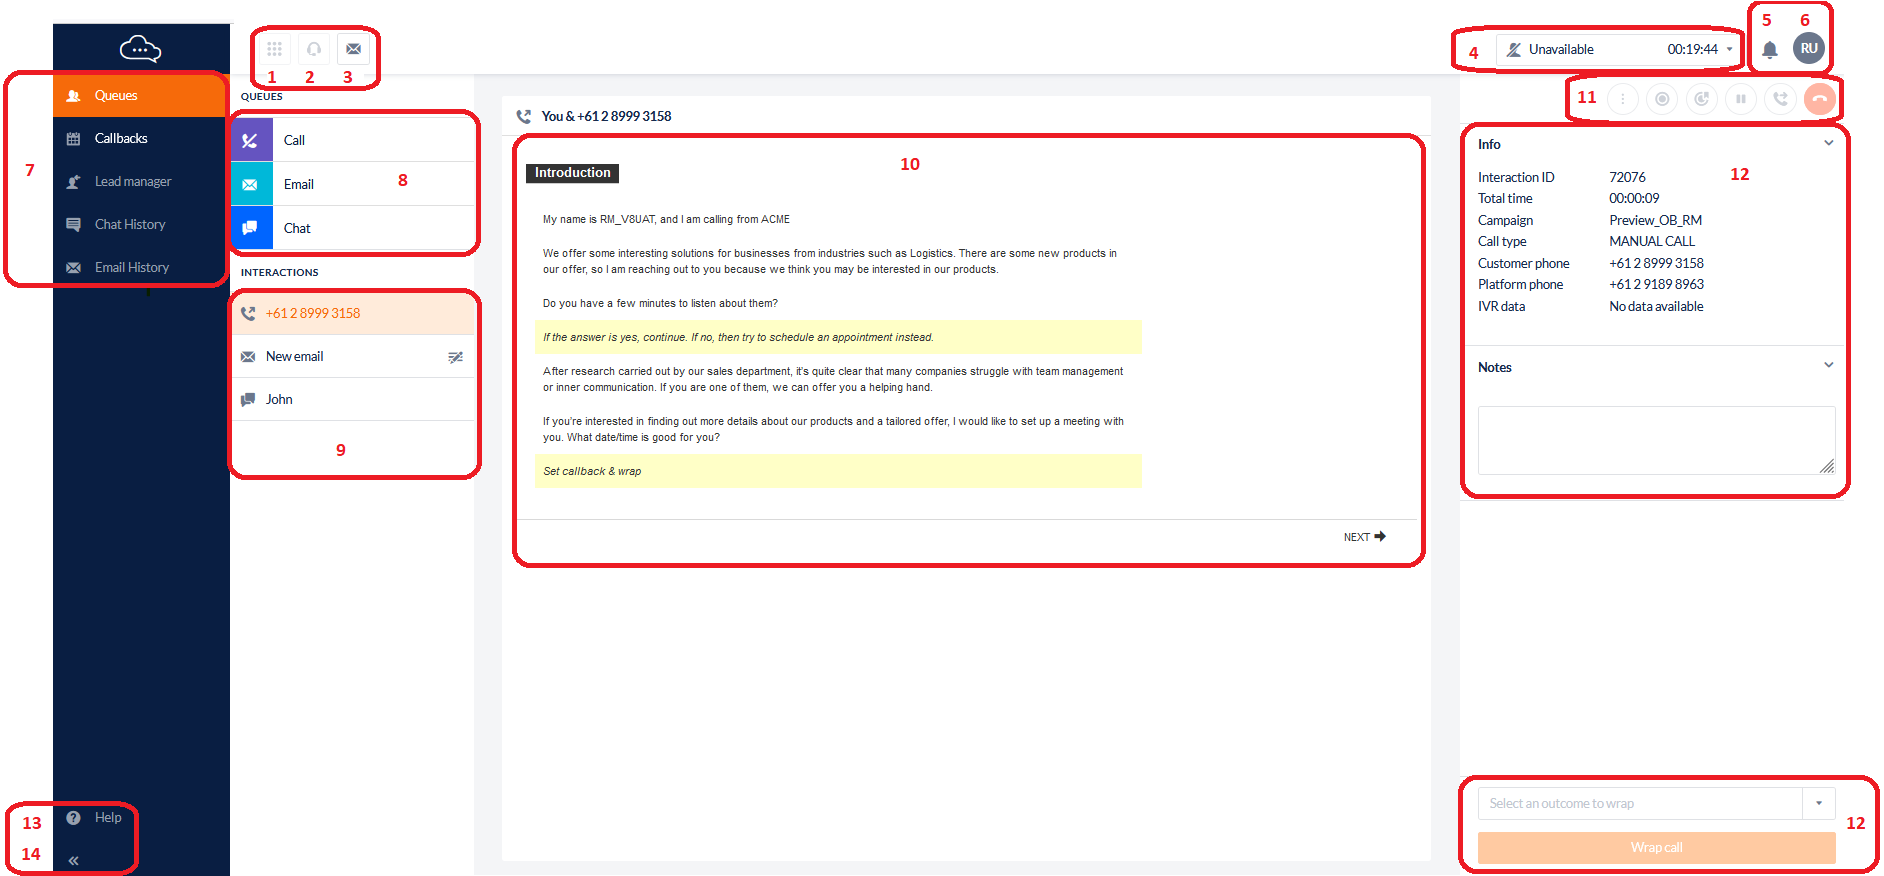
-
Manual Call (including Dial Pad)
-
Agent Call - Conduct a call with another available agent
-
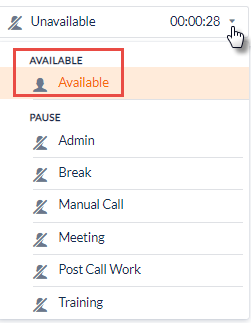
Agent Status (Pause / Available)
-
Notifications
-
Agent Menu
-
Side panel:
-
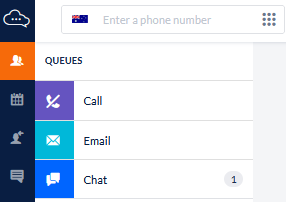
Queues - displays the main interaction & queues screen
-
Callbacks - view any scheduled callbacks
-
Lead Manager - opens a display of leads associated with a particular campaign and an agent can find and select a lead to be the next contact.
-
Chat History - view previous chat interactions for your assigned team(s)
-
Email History - view previous email interactions for your assigned team(s)
-
-
Queues - the types of queues displayed are configured by your Administrator and can include:
-
Interactions - displays the current active interactions for the agent.
-
Script Area
-
Help - Link to the Knowledge Hub resources
-
Collapse & Expand the side panel
1. Logging in
-
Navigate to your http://www.<yourorganisation>.com.au/toolbar
-
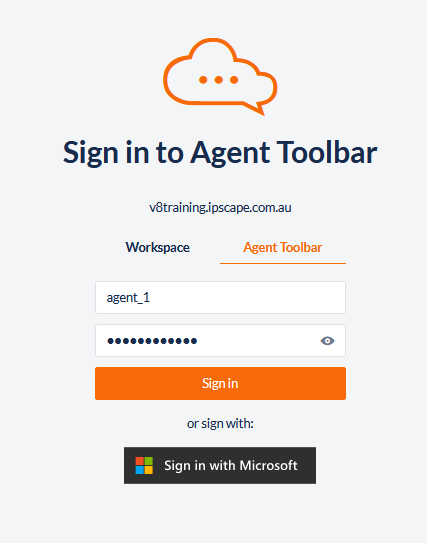
Enter your agent username & password & select Sign in, or
-
Click Sign in with Microsoft, if SSO is enabled by your administrator
-
If Multi-factor Authentication is enabled by an Administrator, expand the following sections to view more information about these options:
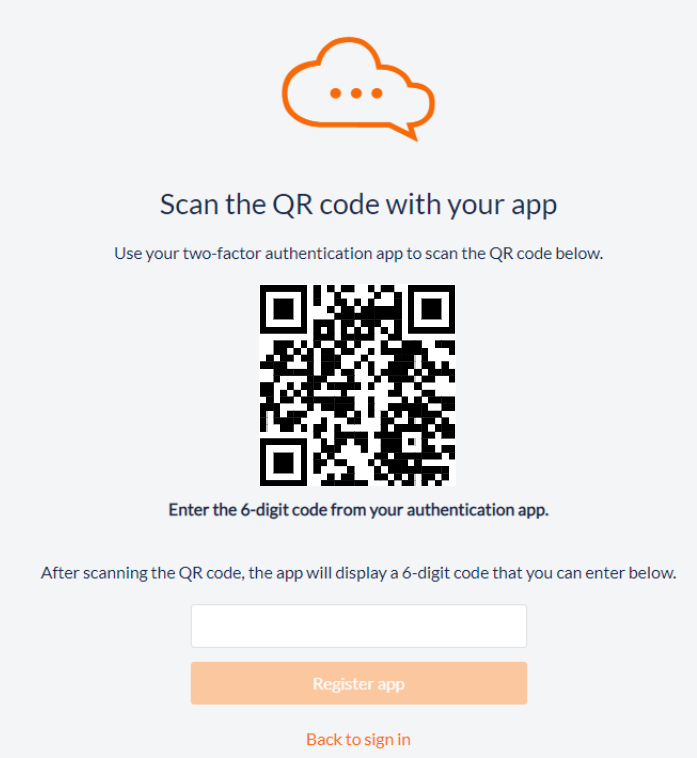
Time-based One-time Password (TOTP)
Time-based one-time password (TOTP) is a algorithm which generates a one-time password (OTP) that uses the current time as a source of uniqueness.
Once enabled, an Agent will be presented the following screen for the first time to configure the two-factor authentication in their chosen Authentication application:
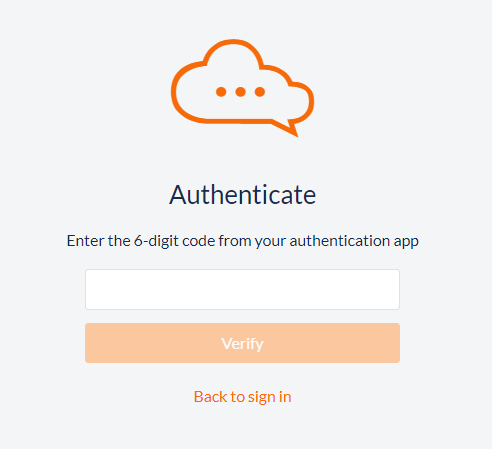
Once the application has been successfully registered, from then on the Agent will be presented the following screen to Authenticate their access when logging in to the Toolbar:
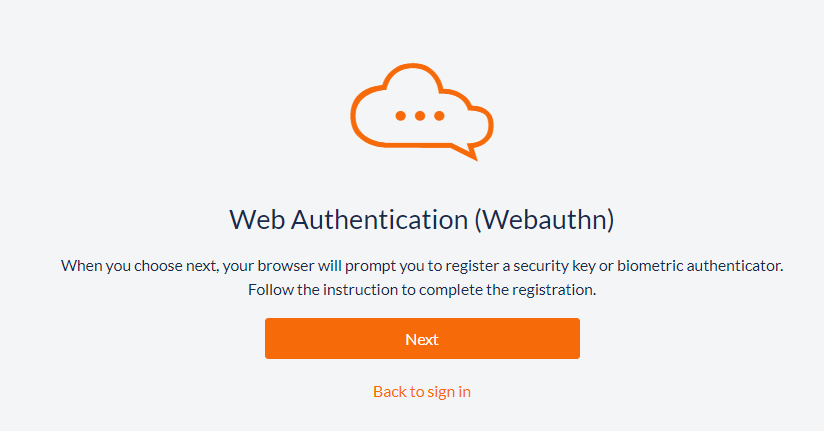
Web Authentication (WebAuthn)
The Web Authentication API (also known as WebAuthn) is a specification written by the W3C and FIDO, with the participation of Google, Mozilla, Microsoft, Yubico, and others. The API allows servers to register and authenticate users using public key cryptography by integrating with built-in device authenticators such as Windows Hello.
Once enabled, the Agent will be presented the following screen the first time to configure the two-factor authentication:
When moving to Next, the Users' credentials are verified where they will be required to enter their device password, PIN or biometrics:
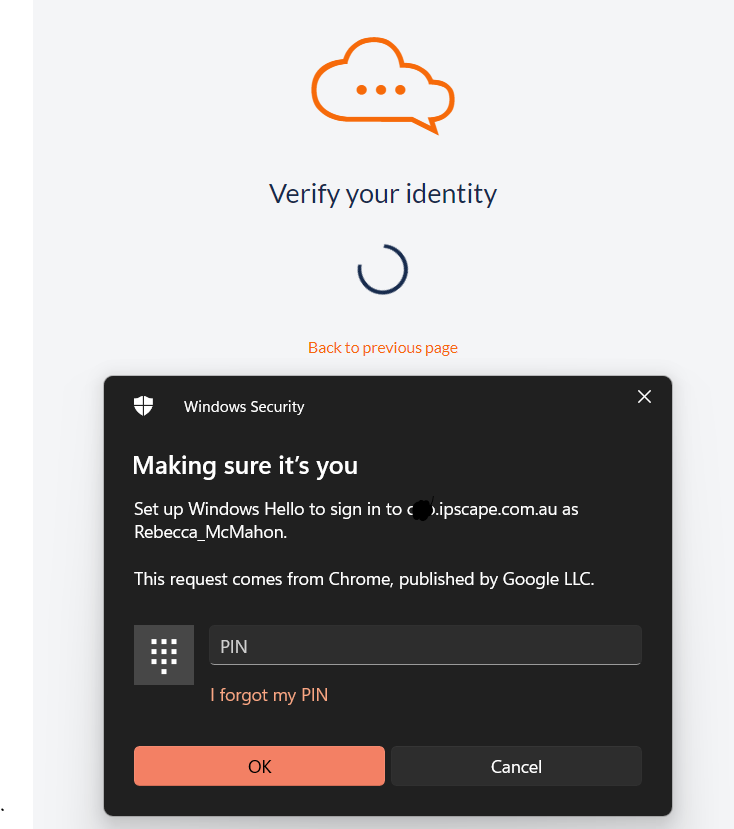
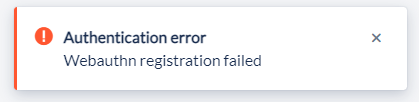
Note: This will timeout after approximately 60-seconds and the following error will be displayed. The User will need to return to the previous screen to restart the verification:
-
When logged in to the Agent Toolbar the Agent will be presented with this screen to select the voice connectivity mode:
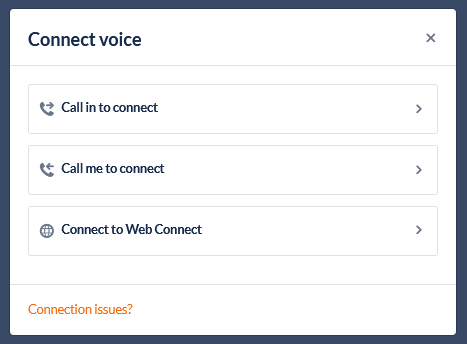
Connection Modes
Expand the sections below for more information on each connection type:
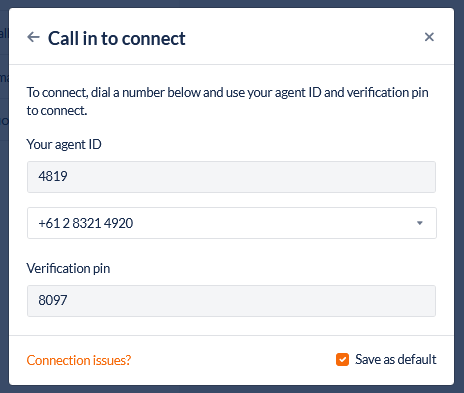
Call in to Connect (Persistent Connection only)
The Call in to Connect method lets Agents dial a nominated phone number in IPscape using the phone they wish to use as their voice path. They would have to enter their Agent ID and the Verification Pin displayed to establish the voice connection.
As this is a Persistent Voice Connection, this single voice call remains open for the duration of their session. If the voice connection is lost, the Agent will need to re-establish it, see Troubleshooting Lost Voice Connection for more information.
-
Click Call in to connect from the Connect Voice window to open the call-in details
-
The call-in details will include your agent ID, a dropdown to select the available dial-in numbers, and the verification PIN
-
Call the number selected from the dropdown and follow the prompts to enter the agent ID and verification PIN
-
Once the connection is established the connection window can be closed.
-
When you are ready to take customer calls, change the status to an Available state
-
When a call comes through you will hear a beep and you will be connected to the customer
Your voice path will remain open for the duration of your login If the voice connection is lost, a Voice Disconnected alert will briefly display in the agent toolbar window, and Connect Voice will appear next to the Call queue - click this to re-establish the connection.
Call me to Connect
The Call me to connect method lets Agents login via the Agent Toolbar and enter the phone number they wish to use as their voice path.
They can either connect via a Persistent or a Non-Persistent connection depending on their need.

-
Click Call me to connect from the Connect Voice window to open the connection details
-
The details will include:
-
the number or extension to call to establish the voice connection
-
a selection for how the calls are to be received (persistent or non-persistent)
-
a checkbox to save the selection as the default
-
-
Press ‘Connect’ to log in
-
Your phone will now ring - answer the call (it is the system calling you to establish a connection)
-
When you are ready to take customer calls, change the status to an Available state
-
If a Persistent Connection was selected, when a call comes through you will hear a beep and you will be connected to the customer
-
If a Non-Persistent Connection was selected, the phone will ring and need to be answered to establish the call with the customer.
-
For a Persistent Connection, your voice path will remain open for the duration of your login. If the voice connection is lost, a Voice Disconnected alert will briefly display in the agent toolbar window, and Connect Voice will appear next to the Call queue - click this to re-establish the connection.
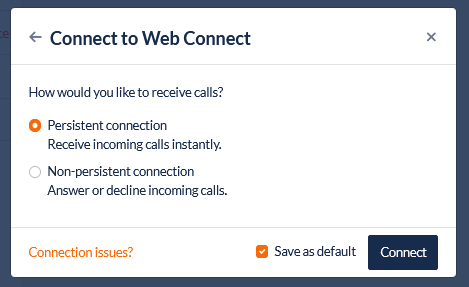
Web Connect
IPscape's Web Connect facilitates calls directly through the web browser without the need for a soft-phone, desk phone, or plug-ins.
Web Connect allows the agents to have an on net connection to IPscape with a browser using the WebRTC technology and can be used to login for all instances of IPscape through the Agent toolbar or through your CRM using the CTI adaptor.
-
Click Web Connect from the Connect Voice window to open the connectivity selection
-
The options are:
-
Persistent Connection - Voice connection remains established for the duration of the login and receive incoming calls instantly
-
Non-persistent Connection - Voice connection is only established when an inbound call is offered and answered, or an outbound call is made
-
-
Press ‘Connect’ to log in
-
Web Connect will launch on a new browser tab
-
If Persistent Connection is selected the browser tab will launch with an incoming call to answer to establish the connection

-
If Non-Persistent Connection is selected the browser tab will launch in a Waiting state and will change to the above when a call is offered or made

-
-
Once the Web Connect tab has opened according to the connectivity selected in the last step you can return to the Agent Toolbar
-
When you are ready to take customer calls, change the status to an Available state
-
If a Persistent Connection was selected, when a call comes through you will hear a beep in the headset and you will be connected to the customer
-
If a Non-Persistent Connection was selected, the phone will ring and need to be answered in the Web Connect tab or from the pop-up notification to establish the call with the customer.
-
The Web Connect softphone tab must be left open for the duration of the login. If the browser tab is closed the agent voice connectivity will be lost and you will need to in to restart the connection.
See Web Connect for more information about using this feature.
See our guide to troubleshoot Lost Voice Connection
2. Logging out
-
When you are ready to log out, change the status to a Pause state
-
Hang up your phone
-
For Web Connect - Close the Web Connect tab and select Leave if prompted with an alert
-
-
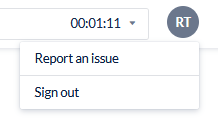
From the menu on the right side of the screen click the menu avatar and then click ‘Sign Out’:
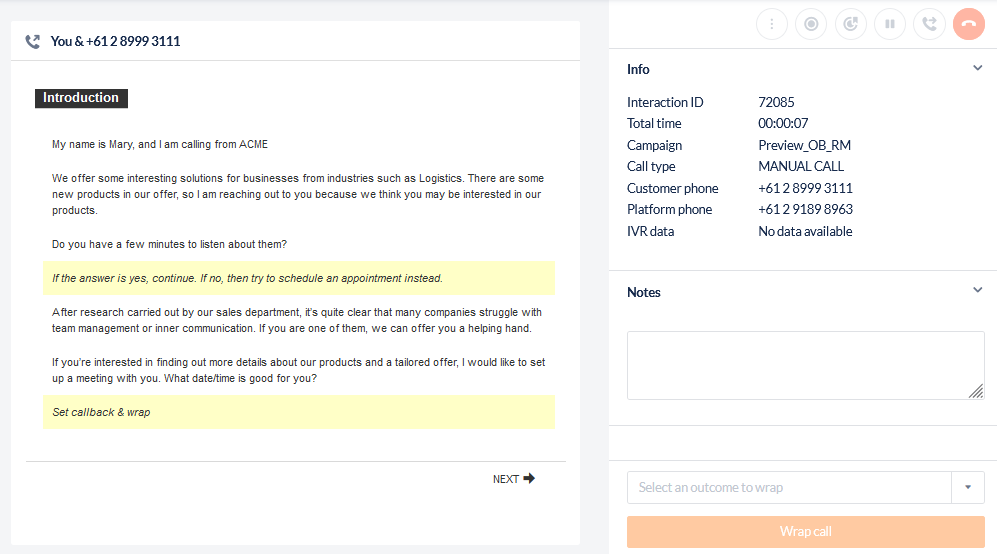
3. Taking Calls
-
When you are ready to take inbound calls or make outbound dialer calls, change the status to an Available state
-
When a call is presented, you will either hear a beep in your headset or your phone will ring to be answered by the agent depending on the connectivity mode selected when logging in
-
A script will appear in the middle section of the Agent Toolbar
-
Information about the call will appear on the right-hand side of the Agent Toolbar including a section for including notes to be stored with the call.
If the call is being transferred, any notes that need to be passed to the next agent need to be entered in the Transfer Notes. See Transferring calls for more information. -
When the call is finished:
-
Select your status for the next call. For example, if there is after call work, select the pause status from the dropdown, then,
-
Select an Outcome from the dropdown at the bottom of the information section and click Wrap Call
-
Call Controls
The live interaction controls appear in the top right of the Agent Toolbar:

-
Stop / Start call recording: A notification will briefly display the recording status and the colour of the icon will be orange when the recording is in progress and grey when it is stopped. The visibility of this feature is configured by the administrator.


-
Tag Call Recording: This will tag the call recording for

-
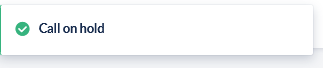
Toggle call hold: Place the call on hold or retrieve a call from hold. A notification will briefly display when toggled and the colour of the icon changes to orange to indicate a call on hold.

-
Transfer call: Opens the Transfer call dialog. See Transferring calls for more information.
-
Hang up call: Terminate the interaction on the toolbar.
More Call Options
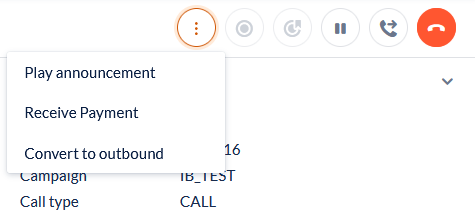
-
Receive Payment
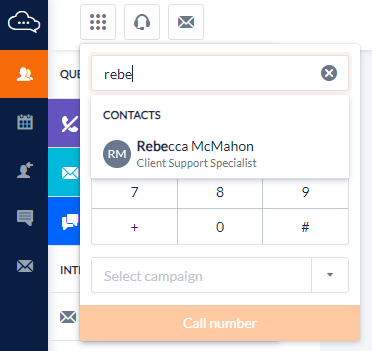
4. Making a Manual Outbound Call
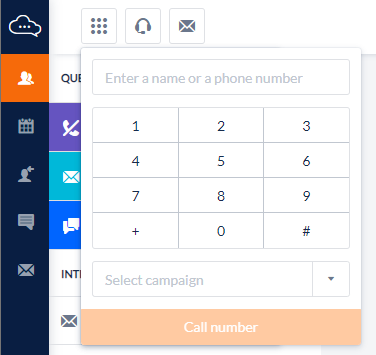
-
To make an outbound call, change your status to a Unavailable/Pause state
-
Enter the phone number in the phone text box using your keyboard or the on-screen dial pad
-
If the Microsoft Azure contact directory is enabled by a Workspace Administrator, a contact can be searched by entering their name. A contact from Azure requires a phone number configured with the account to be available to dial; contacts without an associated phone number will display but not be able to be selected to dial
-
-
Select a campaign that this call should be recorded under from the drop-down menu
-
Click Call number to make the call
-
A script will appear in the middle section of the Agent Toolbar
-
Information about the call will appear on the right-hand side of the Agent Toolbar including a section for including notes to be stored with the call. Note that the Call Type for this type of call displays as Manual Call:
-
When the call is finished:
-
Select your status for the next call. For example, if there is after call work, select the pause status from the dropdown, then,
-
Select an Outcome from the dropdown at the bottom of the information section and click Wrap Call
-
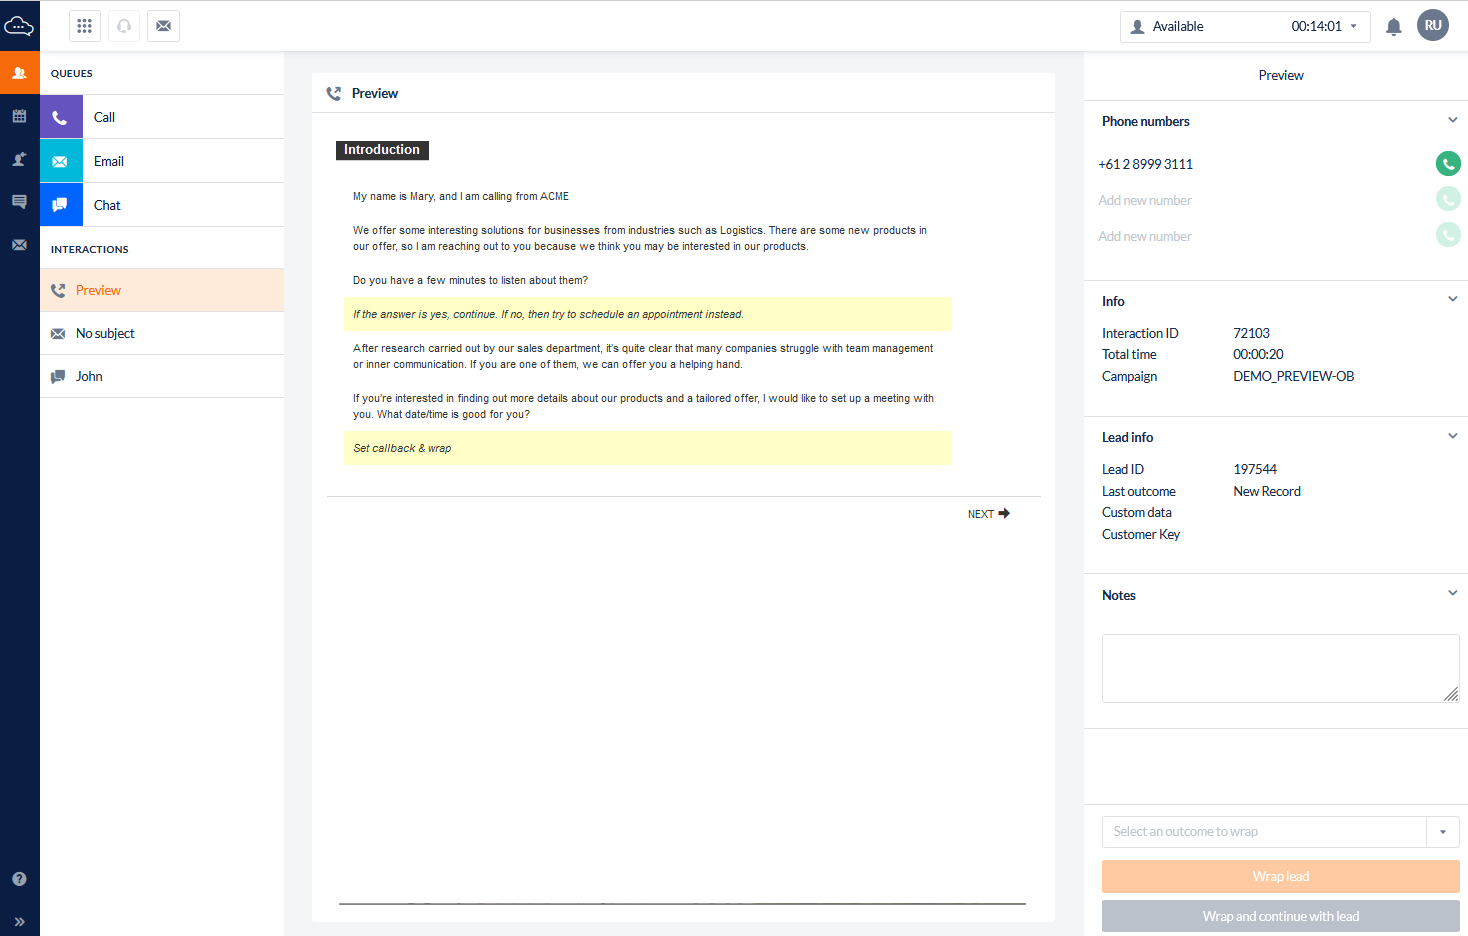
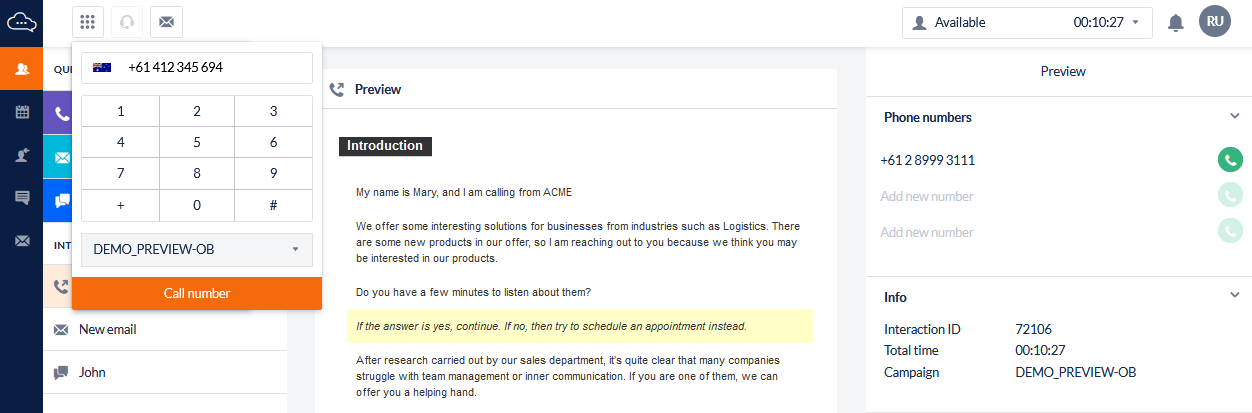
5. Making a Preview Outbound Call
Preview outbound calls may be presented based on the campaign configuration set by your administrator.
-
When you are ready to make outbound preview calls, change the status to an Available state
-
If leads are available for the campaign a new record will present on the Agent Toolbar:
-
A script will appear in the middle section of the Agent Toolbar
-
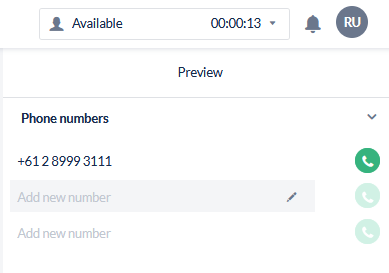
The phone numbers available to dial will display in the top of the right-hand side panel of the Agent Toolbar
-
Information about the call and lead will appear on the right-hand side of the Agent Toolbar including a section for including notes to be stored with the call.
-
Editing phone numbers on a Preview Outbound Lead
If this feature is enabled by your administrator, when the Preview lead is presented on the Agent Toolbar the agent will have the ability to edit or add to the lead phone numbers if required.
-
To add a lead phone number, click Add new number when the mouse cursor is over the field
-
To edit a lead phone number, click on the number in the list to edit the record
-
To cancel the change, click the
icon
-
To submit the change, click the
icon
-
To remove a phone number, click to edit the number, remove the contents and then click
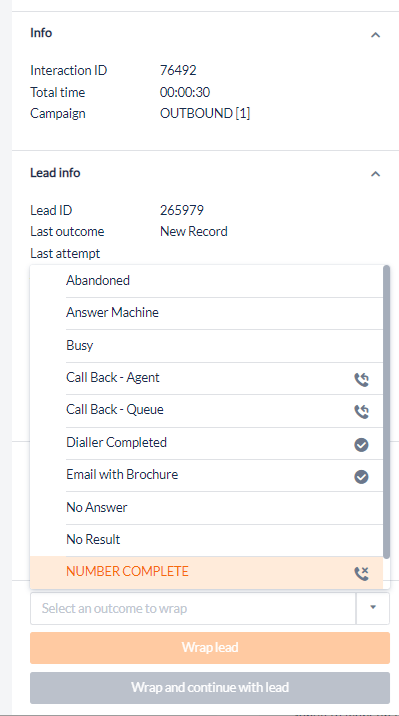
Complete an individual phone number on an Outbound Lead
If configured by your administrator, an individual phone number on a Lead can be completed without completing the entire Lead with the use of a Wrap Code. When choosing the assigned wrap code ‘Complete Phone Number’ it will complete only the phone number called for that interaction without any change to the call-back date and time for the Lead.
A ‘Complete Phone Number’ wrap code will be indicated with the following icon:

When the call is finished:
-
Select your status for the next call. For example, if there is after call work, select the pause status from the dropdown, then,
-
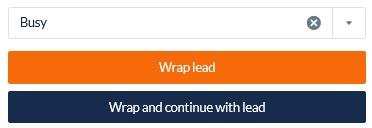
Select an 'Complete Phone Number” Outcome from the dropdown at the bottom of the information section and select from one of the following:
-
Wrap Lead to move to the next call or Lead
-
Wrap and continue with Lead to wrap the call with an outcome however continue to work on the lead on the Agent Toolbar to call another phone number on the Lead.
-
Making a Manual Call on a Preview Outbound Lead
If this feature is enabled by your administrator, when the Preview lead is presented on the Agent Toolbar the agent will have the ability to conduct a Manual Outbound call which will be related to the lead currently on the Agent Toolbar.
-
Much like a making a regular Manual Outbound Call, click the Manual Dialler icon while a Preview lead is presented from the top banner to open the dial pad.
-
Enter the number to be dialed
-
As the lead is already assigned to a campaign the campaign selection is set automatically and will not be able to be changed.
-
Once ready to make the call, click Call Number
Wrapping a Preview Outbound Call
When the call is finished:
-
Select your status for the next call. For example, if there is after call work, select the pause status from the dropdown, then,
-
Select an Outcome from the dropdown at the bottom of the information section and select from one of the following:
-
Wrap Lead to move to the next call or lead
-
Wrap and continue with Lead to wrap the call with an outcome however continue to work on the lead on the Agent Toolbar to call another phone number on the lead, for example.
-
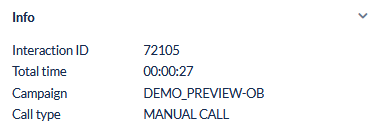
6. View Call Information
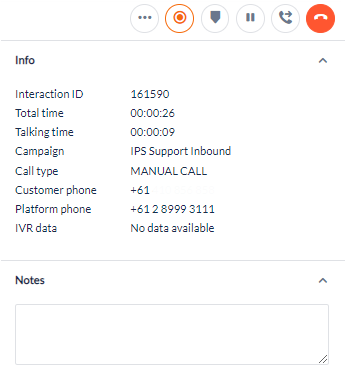
When you take a call, information about the caller will be displayed depending on the type of interaction. Please see details in the table below:
|
Field name |
Description |
|---|---|
|
Interaction ID |
The unique identifying number for the interaction |
|
Email thread ID |
The unique identifying number for the thread of emails. A thread ID can be related to multiple interaction ID’s. |
|
Total Time |
Shows a timer (hh:mm:ss) of the total sum of call time for the interaction. |
|
Talking / Wrapping/Chatting Time |
Shows a timer (hh:mm:ss) of the current state of the interaction. This will change depending on the current activity state:
|
|
Campaign |
The name of the campaign associated with the interaction, where applicable |
|
Call Type
|
The type of interaction:
|
|
Customer phone
|
The phone number of the caller |
|
Platform phone
|
The number used by the system to take the call |
|
IVR Data
|
This is the value of the Workflow Parameter set in the voice channel settings |
|
IVR Text
|
This is the name of the Voice Channel set in the voice channel settings |
|
Time in queue
|
In a voice campaign, the duration (in minutes) between when the contact left the IVR and when the agent accepted the call In a chat campaign, the duration (in minutes) between when the contact submitted their pre-chat survey answers and when the agent started the chat session |
|
Last Attempt
|
The timestamp (dd/mm/yyyy hh:mm:ss) recorded for the last attempt |
|
Last Outcome
|
The wrap code that was applied to the last interaction or the dialler outcome for the last attempt
|
|
Lead ID
|
The unique identifying number for the lead being contacted |
|
Number Attempts
|
The number of times the system has tried to connect with this lead |
|
Pre-chat survey fields
|
The information submitted by the contact after completing the pre-chat survey |
7. Transferring Calls
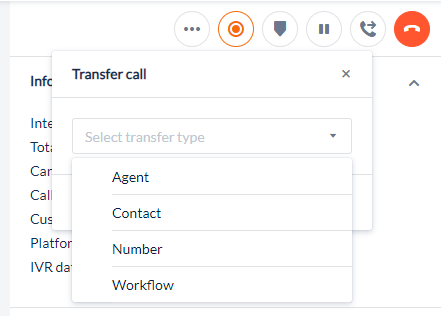
-
To transfer a call, click on the ‘Transfer’ icon
-
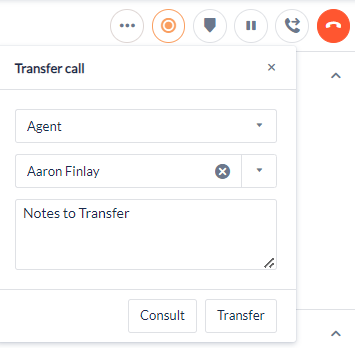
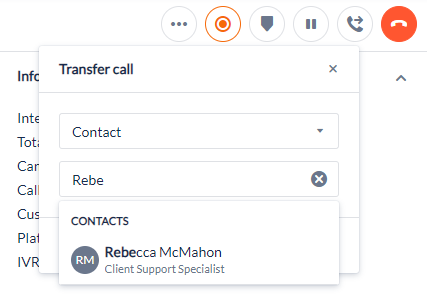
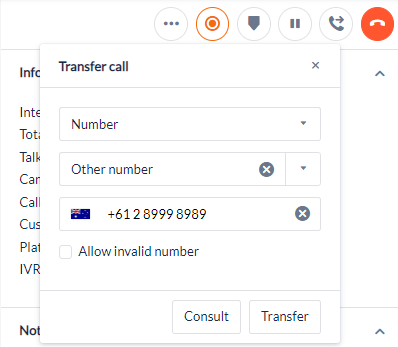
Select Transfer Type:
-
Agent -
-
Next, select the agent to transfer (Only available agents will appear in the list)
-
Enter any notes to be sent with the transfer to the receiving agent
-
-
Contact - If the Microsoft Azure contact directory is enabled by a Workspace Administrator, a contact can be searched by entering their name. A contact from Azure requires a phone number configured with the account to be available to dial; contacts without an associated phone number will display but not be able to be selected to dial.
-
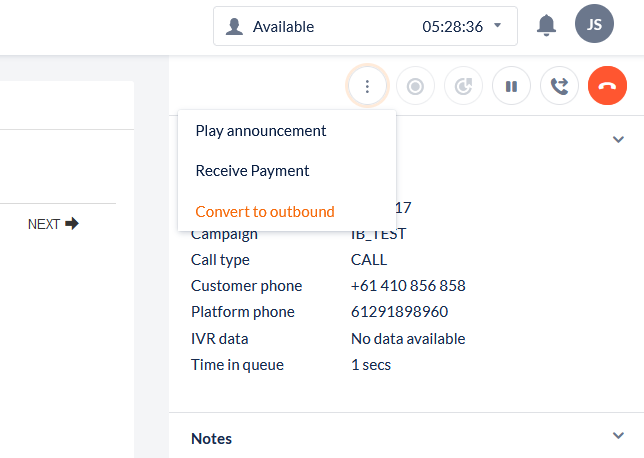
Convert to Outbound - Can be used to convert an Inbound call to an Outbound campaign to update a lead
-
Number -
-
Select a transfer number from the transfer pool, or
-
Select Other number to enter a number manually
-
-
Workflow - Transfer – This allows you to transfer the customer directly to an existing workflow
-
Workflow - Assisted transfer - Assisted transfer button allows the Agent to transfer to a workflow & remain in the queue with the caller to guide through a Workflow/IVR and announce the call to the next receiving agent

-
8. Create a Conference Call
During the interaction, you may need to include a colleague or supervisor in the interaction. To assist you, the Campaign Manager has created a list of possible transfer destinations.
-
Select the Transfer Info tab
-
Select the Transfer Type from the drop-down selection list. The choices are Phone, Agent, or Workflow.
-
Select the Transfer Destination you wish to include in the conference call.
-
Click Consult.
-
Converse with your colleague; meanwhile, the contact hears On-hold Music. To switch between the lines, click the caller in the transfer window. The active line will be indicated by an outline and the transfer destination will show a “hangup“ icon

-
When you are ready to create the conference call, click Merge Lines.
-
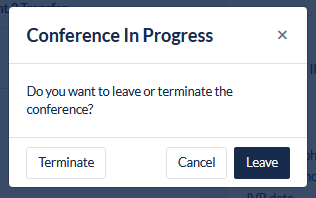
Once the conference call is connected, any party can leave at any time by terminating their line. When the call is terminated in the toolbar the agent will be asked if they are leaving or ending the entire call for all parties:
When the call is currently connected as a conference call, it is not possible to receive or process any payments.
9. Play an Announcement
During the interaction, you may be required to play a pre-recorded sound file to the contact. To assist you, the campaign manager has made a list of sound files available.
-
With an interaction active on the toolbar, select Play Announcement from the Options menu .
If no sound files have been assigned to the current campaign as announcements, the Announcement tab will not be visible on the Agent Toolbar.
-
Select the announcement from the drop-down selection list.
-
Click Play Announcement. When the sound file finishes playing you will be able to resume your conversation with the contact.
10. Convert to Outbound
This feature can be used to convert an Inbound call to an Outbound campaign to update an existing lead.
-
With an interaction active on the toolbar, Select Convert to Outbound from the Options menu
Depending on the Organisation setting, the agent view for available outbound campaigns would differ. See Call Settings for more information.
-
In the Convert to Outbound window, search for the lead by entering the phone number listed on the lead and the IPscape campaign they are assigned to
-
Click Search Leads to display a list of leads matching the criteria.
-
Select the correct lead and click Convert
11. Agent Assist
This feature enables Agents requiring assistance to notify a manager (Workspace User) from within the Toolbar.
For more information on using this feature, please see: Agent Assist
The Agent Assist feature must be enabled for the Toolbar to be available for Agents.
To enable this feature, please reach out to our Service Desk team or your Account Manager to discuss enabling the feature.
12. Manage an Email Interaction
Send Email
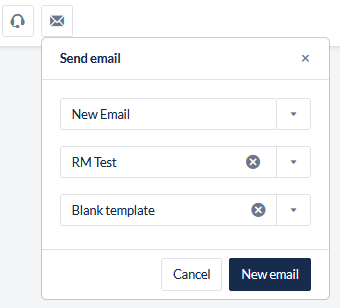
Send email gives an agent the ability to send an email from the toolbar if this is enabled by the system administrator.
-
Click on the Send Email icon at the top of the toolbar to open the dialog
-
Select the Campaign from the drop-down list and the Email Template
-
Click New Email to open the email composer in the script area
-
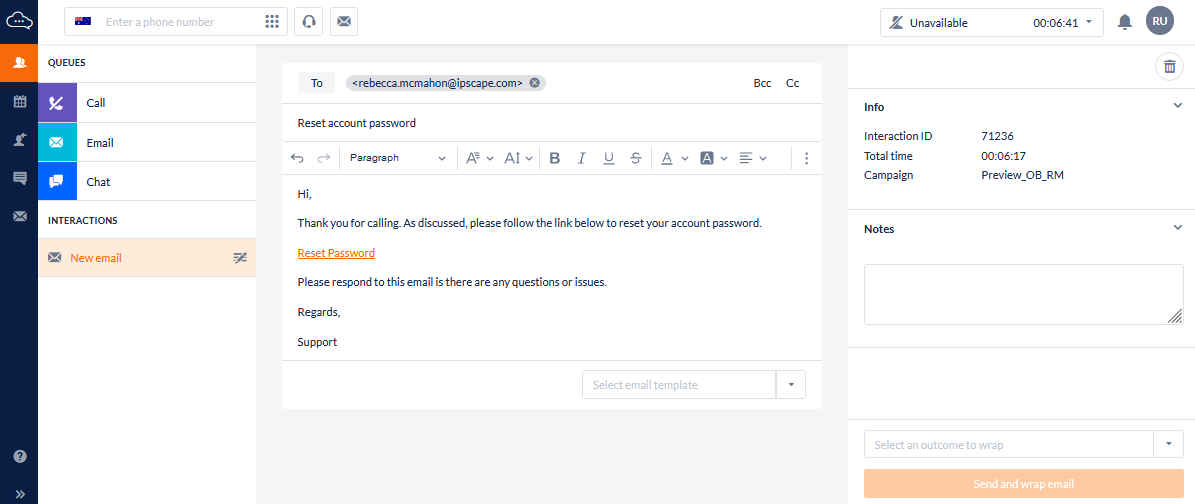
Compose the email by including at least one recipient, a subject, and an email body if a blank template is selected. A template can also be edited in the body or a different template selected from the drop-down list
-
If Azure is enabled, agents can search for contacts within their organisation in the To, Cc and Bcc fields by typing in the contact’s name.
-
-
Add any notes in the info panel, select an outcome from the drop-down
-
Once the email is ready to send, click the Send and wrap email button
-
To discard the draft, click the Delete icon in the top right, select an outcome and click Discard and Wrap Email
Queued Emails
Queued emails are visible to any agent assigned to an email campaign.
-
Click on the Email Queue icon on the toolbar to open the next email in the queue. The email opens in the centre script area toolbar.
-
Previous emails can be seen below in the thread view
Wrapping an email interaction
-
Once the email is ready to send, choose an outcome from the drop-down list of available wrap codes.
-
If you are ready for voice interaction, ensure the agent status is Available, click on Send & wrap email.
-
If you are not ready for a voice interaction or wish to respond to a chat request or another email, select a pause state from the drop-down of available pause states and click Send & wrap email
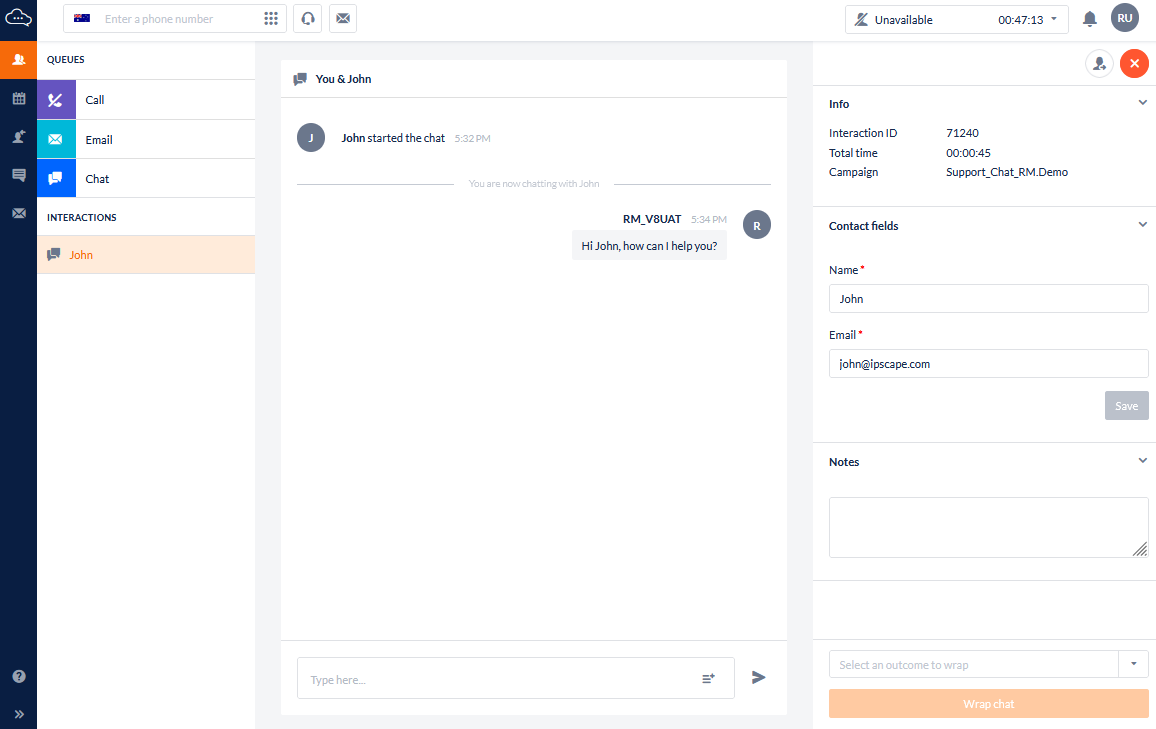
13. Manage a Chat Interaction
Chat is a feature available to you that allows you to respond to a chat request. Chat requests are visible to any agent assigned to a chat campaign.
-
Click the Chat icon on the toolbar. The Chat Panel opens in the Toolbar.
You can have up to five concurrent chat sessions, as specified in your agent profile -
For each active chat session, a tab with the contact's name is visible in the Chat Panel. Use these tabs to move between chat sessions.
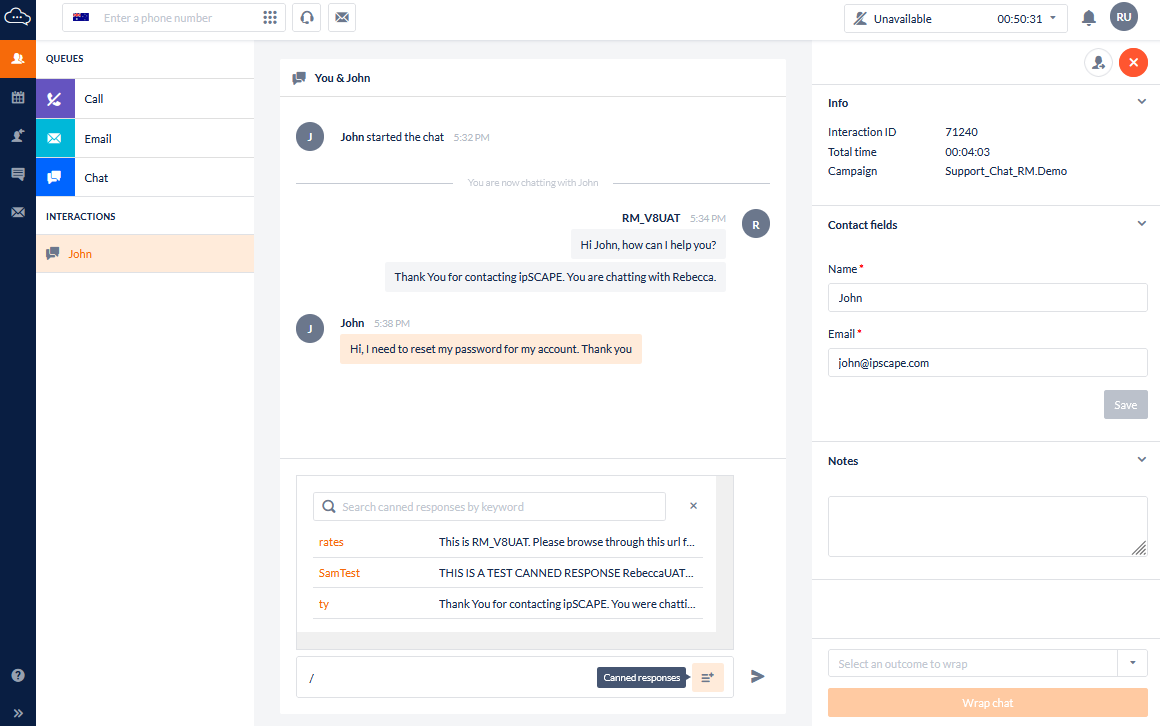
Using a chat canned response in a chat session
Chat canned response (previously known as Chat Templates) are examples of preconfigured text that an agent will need to use regularly and therefore should not have to repeatedly type.
There are several ways that a canned response can be used within a chat session:
-
Using a snippet
The agent enters a forward slash ( / ) followed by a text snippet followed by a space into the text entry box and the template text is substituted.
e.g. Full Company Name. The agent enters the snippet - /ACME which is converted to The ACME Corporation Pty Limited ACN 22 555 903 134 -
Using the Add to Text icon
The agent searches for the text with the canned responses icon and then clicks to add template text into the chat session where it can be modified to suit the session if required.
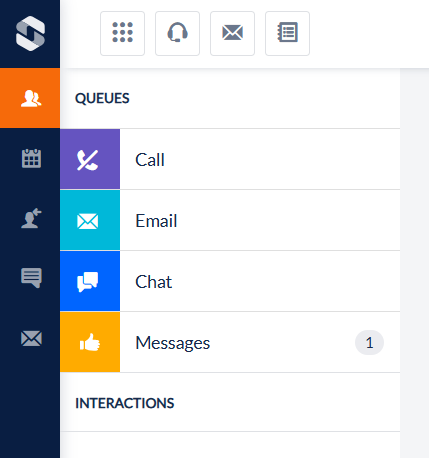
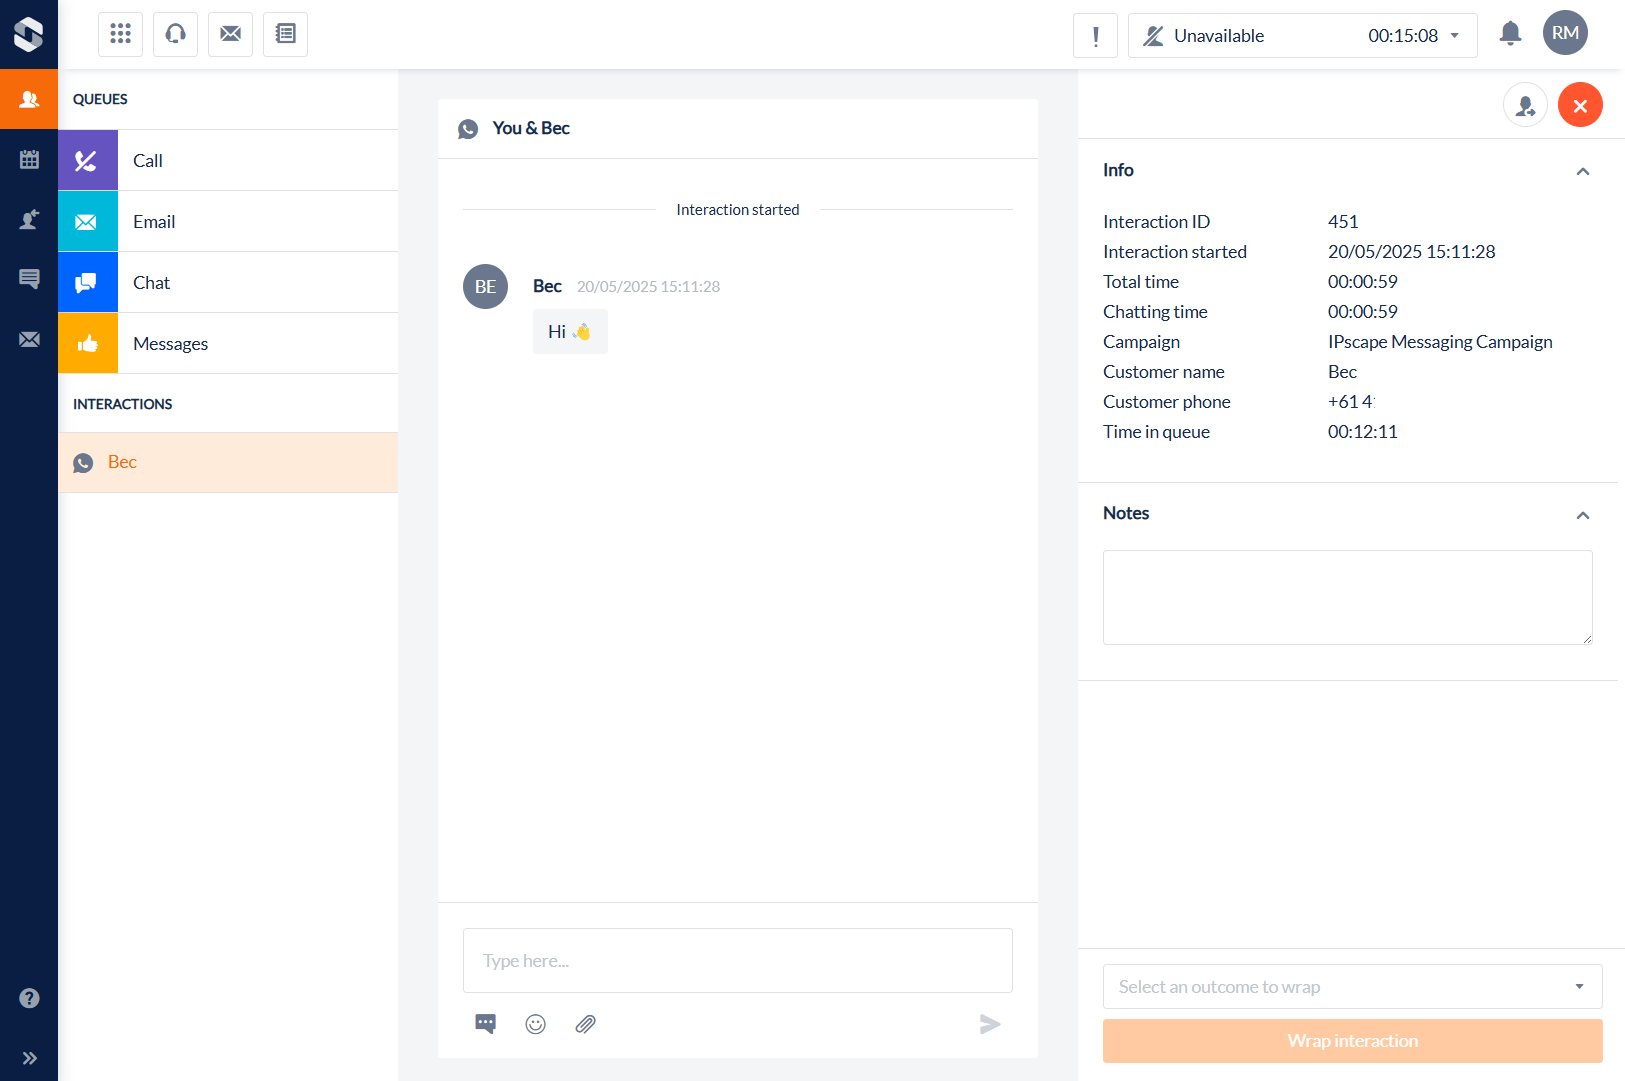
14. Manage a Message Interaction
Messages is a feature available to you that allows you to respond to a social media message such as WhatsApp. Messages are visible to any agent assigned to a messages campaign.
-
Click the Messages icon on the toolbar to open the next interaction in the queue which will display in the centre script area of the Toolbar.
-
The number displayed indicates the total number of interactions currently in the queue across the messages campaigns assigned.
-
You can have up to five concurrent messages sessions, as specified in the Workspace configuration by your administrator.
-
For each active message session, a tab with the contact's name is visible in the Interactions list. Use these tabs to move between interactions.
-
Information about the Interaction is displayed on the right of the transcript including details such as the Interaction ID, duration, Campaign and the Customer phone number with their name if it is available.
Using a canned response in a messaging session
Canned response (previously known as Chat Templates) are examples of preconfigured text that an agent will need to use regularly and therefore should not have to repeatedly type.
There are several ways that a canned response can be used within an interaction:
-
Using a snippet
The agent enters a forward slash ( / ) followed by a text snippet followed by a space into the text entry box and the template text is substituted.
e.g. Full Company Name. The agent enters the snippet - /ACME which is converted to The ACME Corporation Pty Limited ACN 22 555 903 134 -
Using the Add to Text icon
The agent searches for the text with the canned responses icon and then clicks to add template text into the message session where it can be modified to suit the session if required.
Attachments
If enabled by your Administrator, attachments can be sent to and received during a messages interaction. To include an attachment, click the paperclip icon to chose either to upload from the IPscape system library or from the local device :
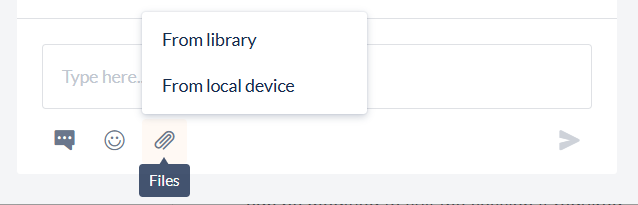
Currently WhatsApp supports the sending of the following file types:
-
Image:
-
.jpeg
-
.png
(post-processing size limit of 5 MB)
-
-
Video:
-
.mp4
-
.3gpp
(Only H.264 video codec and AAC audio codec is supported with a single audio stream, post-processing size limit of 16 MB)
-
-
Document: any valid document MIME type (post-processing size limit of 100 MB)
-
Audio:
-
.aac
-
.mp4
-
.amr
-
.mpeg
-
.ogg + codecs=opus
(post-processing size limit of 16 MB, base audio/.ogg not supported)
-
-
Sticker:
-
.webp
(post-processing size limit of 100 KB)
-
View Previous Conversations
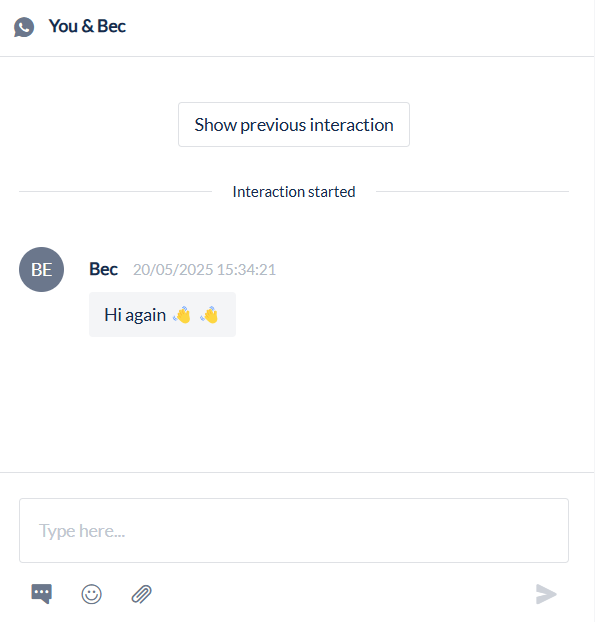
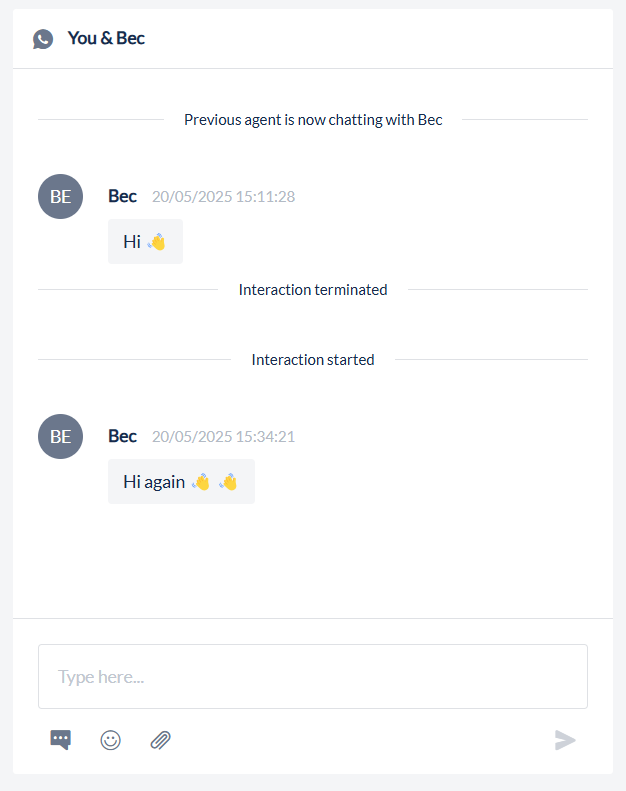
If the customer has previously messaged the contact centre, in the panel, there will be a button at the top showing “Show previous conversation”, you can click on this to show the previous conversation to get context on the customers full experience.
|
|
|
15. Process a Payment (PaySCAPE)
The Payment Card Industry Data Security Standard (PCI DSS) provides security for credit card transactions.
PaySCAPE is a payment solution which enables call centre Agents to process payment transactions with credit card information over the phone in a secure, PCI DSS compliant manner.
PaySCAPE integrates with a third-party payment provider to complete the payment and provides features such as:
-
Capturing card details to process payments immediately or tokenise the card for future billing
-
Reduces the risk of accepting card payments over the phone- call recordings are automatically paused and sensitive information is masked to protect customer payment data
Processing PaySCAPE Pay credit card transactions over the phone.
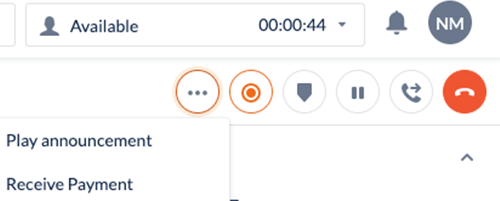
-
Select three dots (top right) → Receive Payment
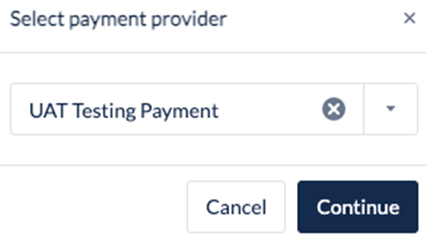
-
Select the Payment Provider from the dropdown list

-
Click Continue
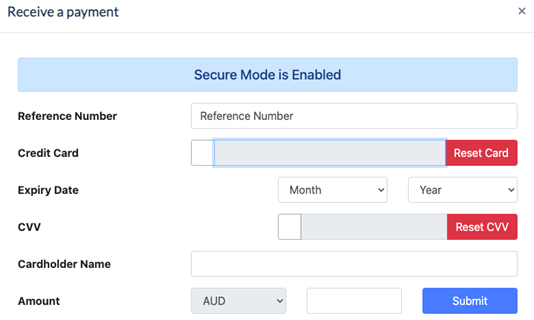
-
Manually enter the reference number if required
-
Move the mouse to credit card payment & once it is highlighted in blue, instruct the caller to enter their credit card details using the number pad on their phone
-
As the caller enters their phone number, you will see the digits being entered as asterisks (*), you will hear the same single digit & only the last 4 digits will display
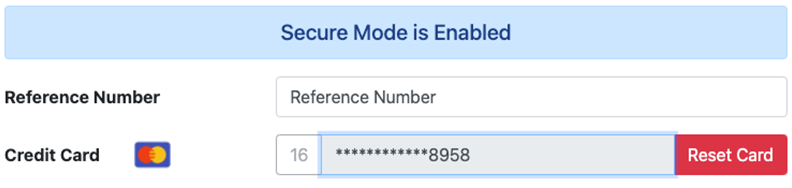
-
If the caller enters their card number incorrectly, select Reset Card, which will clear the credit card contents, and then instruct the caller to re-enter, ensuring that the blue box is highlighted around the Credit Card box
-
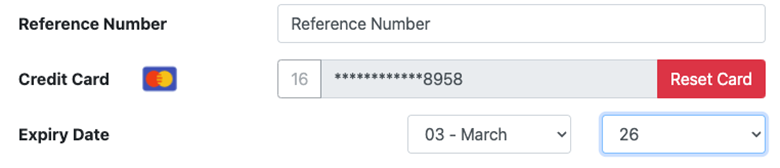
Once credit card is entered, ask the caller for their expiry date & using the dropdown menus
-
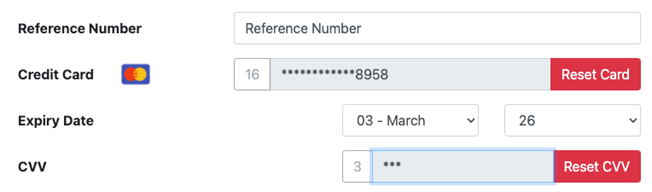
Select the CVV box, and when it is highlighted in blue, instruct the caller to enter their 3 digit CVV using the number pad on their phone
-
As the caller enters their CVV, you will see the digits being entered as asterisks (*), you will hear the same single digit
-
If the caller enters their CVV incorrectly, select Reset CVV, which will clear the CVV contents, and then instruct the caller to re-enter, ensuring that the blue box is highlighted around the CVV box
-
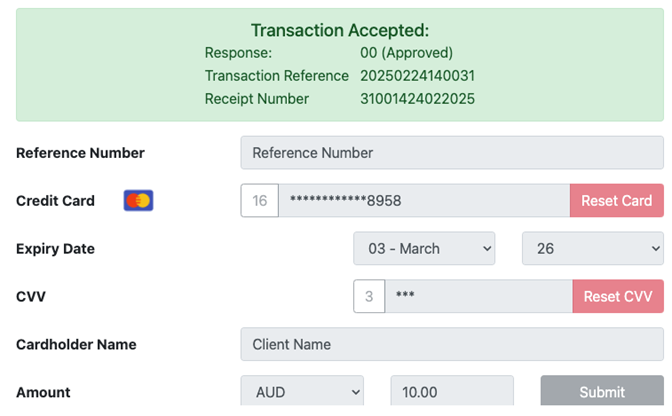
Ask the caller for the cardholder name & enter manually
-
Enter the amount & select Submit
-
You will receive a confirmation that the transaction was accepted with Reference & Receipt Number
-
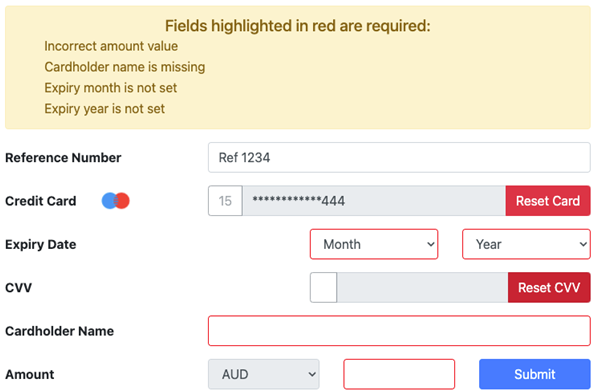
If you try to submit a payment with missing fields, you’ll be advised which fields are missing & they will be highlighted in red
-
If a transaction is rejected, you’ll receive a notification advising what the issue is