1. Dialler Settings
Dialler Window
The dialler window controls when the dialler is operating for this campaign.
|
Field |
Description |
|---|---|
|
Region |
The time zone region for the campaign. Typically, this is the region in which the contact centre is operating. |
|
Time zone |
The time zone for the campaign. Typically, this is the time zone in which the contact centre is operating. |
|
Run for 24 hrs |
Click the checkbox to enable the dialler to run 24 hours.
|
|
Start Time |
The time, in the campaign time zone, when the dialler starts dialling under this campaign. This control is not visible if Run for 24 hrs is enabled. |
|
End Time |
The time, in the campaign time zone, when the dialler stops dialling under this campaign. This control is not visible if Run for 24 hrs is enabled. |
It is possible to run a campaign over midnight, by setting the Start Time to be greater than the End Time. For example, a campaign that runs for six hours starting at 10:00 pm would have a Start Time of 10:00 pm and an End Time of 4:00 am
Call Time Window
The Call Time Window controls when the dialler is allowed to dial contacts - in the contact's time zone. This can be used to ensure that, whatever time zone and period the Dialler Window is set to, the dialler does not call a contact at a time that is inconvenient or disturbing to them, such as the middle of the night.
|
Field |
Description |
|---|---|
|
Region |
The default contact time zone region for the campaign. Normally, this is defined for a lead when it is imported but, if this is not done, this default is used. |
|
Time zone |
The default contact time zone for the campaign. Normally, this is defined for a lead when it is imported but, if this is not done, this default is used. |
|
Run for 24 hrs |
Click the checkbox to enable the dialler to run 24 hours.
|
|
Earliest Call Time |
The earliest time, in the contact's time zone, when the dialler calls them under this campaign. This control is not visible if Run for 24 hrs is enabled. |
|
Latest Call Time |
The latest time, in the contact's time zone, when the dialler calls them under this campaign. This control is not visible if Run for 24 hrs is enabled. |
Unlike the Dialler Window, the Contact Call Time Window must fall wholly within one day so the Earliest Call Time must always be less than the Latest Call Time.
Time Zone Conventions
Fields in the time zone drop-down lists are those used in the IANA Time Zone Database. The IANA convention refers to time zones using a concatenation of the region and the local time zone description, separated by a '/' character. For example, "Australia/Sydney".
Outbound Settings
It is best practice to stop and start the campaign after applying changes to these settings. Ongoing lead call will not be counted if the restart occurred while the call is in progress.
|
Field |
Description |
|---|---|
|
Current Filter |
Select the Filter to be used with the campaign from the drop down selection list. Only filters created for the campaign are displayed. The selected filter restricts which calls are made from the list of contact phone numbers. |
|
Default dialler strategy |
The default strategy that will be used for this campaign. These are set up in Resources > Dialler Strategies When multiple lists are enabled to dial on a campaign, this default strategy will be selected automatically. |
|
Dial Order |
Select the order in which the Dialler prioritises leads, choosing from:
Callbacks cannot be prioritised when using Date Only dial orders
|
|
Complete After |
Select the total number of dial attempts that are allowed (irrespective of outcome) before the lead is flagged as Completed. The default setting is 10. This setting will override the dialler strategy settings used to work a lead list in a campaign. This may prevent callbacks from being dialled. Please take care with this setting. |
|
Allow Callbacks to Unassigned Agents |
By default, agent callbacks are only dialled if the agent is assigned to this campaign. However, by clicking in this check box you can override this setting, allowing the dialler to dial agent callbacks whenever they are due |
|
Allow agents to complete leads |
Click the checkbox to enable agents to manually complete leads in the Agent Toolbar. When a lead is completed it is removed from its list and is no longer called. |
Dialler Settings
It is best practice to stop and start the campaign after applying or making changes to these settings.
|
Field |
Description |
|---|---|
|
Dialler Mode |
Choose the Dial Mode which can be either Preview Mode or Predictive Mode.
See Dial Mode for more information. |
|
Auto Preview Timeout (Preview mode only) |
Set the length of time a preview screen-pop is displayed before the Dialler automatically dials the first number presented (Phone1). To disable this feature where its use is inappropriate, set the value to 0. Even with this feature enabled, the agent is able to manually initiate dialling of any of the presented numbers before the timeout period has elapsed, if required. |
|
Enable phone number(s) (Predictive mode only) |
Click one or more of the numbered check boxes to enable/disable dialling of their associated phone number(s) - Phone 1, 2 or 3. A contacts list can contain up to 3 phone numbers for each contact, such as home, work, and mobile numbers. These checkboxes allow you to configure the dialler to call one or more of these numbers. If more than one number is enabled, the numbers are called in the order of their definition - Phone 1, then Phone 2, then Phone 3. Only one number is called at a time, and the progression to the next number in the sequence only occurs if the first number dialled is not answered. The default setting is Phone 1, 2, and 3 are enabled. |
|
Minimum Dial Ratio (Predictive mode only) |
Enter a number that represents the minimum ratio of calls to available agents. e.g. a setting of 1.5 means that the Dialler makes no less than three calls for every two available agents. The value of this setting must be greater than 0, and may not be greater than 5. The default setting is 1. |
|
Maximum Dial Ratio (Predictive mode only) |
Enter a number that represents the maximum ratio of calls to available agents. The value of this setting must be greater than, or equal to, the setting for the Minimum Dial Ratio, and may not be greater than 5. The default setting is 1.5. |
|
Maximum Dialling Lines (Predictive mode only) |
Set this to indicate (to the nearest multiple of five) how many outgoing lines are available for the campaign to use. To disable this feature where its use is inappropriate, set the value to 0. The default setting is 0. |
|
Abandoned Message (Predictive mode only) |
Select the soundfile that a contact hears when no agent is available to be assigned to a call. If no soundfile is selected, no message is played. |
|
Dial Ratio Calculation (Predictive mode only) |
Select Feedback or Direct Mode. In Feedback mode, the Abandon Rate is used to moderate the Current Dial Ratio, whereas, in Direct Mode it is solely determined by the success of recent dial attempts. The default setting is Feedback. |
|
Dial Ratio Scale Factor (Predictive mode only) |
The Scale Factor moderates the Dial Ratio Calculation in Direct Mode only (selected under Dial Ratio Calculation above). Select from 50%, 75%, 100%, 125%, or 150%. The default setting is 100%. |
|
Answering Machine Detection (Predictive mode only) |
Click the check box to enable this feature. Answering Machine Detection (AMD) is a technology that allows the contact centre dialler to screen out the number of calls made to answer machines.
Consult your local statutory telecommunications regulator about the use of Answering Machine Detection (AMD) before using it with predictive dialling. The default setting is Off. |
|
Auto disable AMD (Predictive mode only) |
This setting relates to the Answering Machine ‘Complete After’ setting in the dialler strategy. The default limit for answer machine is 3 attempts and then it completes, if Auto disable AMD is set, on the final attempt the call will be presented to an agent regardless of whether the dialler believes it is an answer machine or not. |
|
AMD Hangup Message (Predictive mode only) |
Select the message that is recorded on the answering machine to explain that a call has been abandoned because an answering machine has been detected. If no soundfile is selected, no message is played. |
|
Assumed AMD False Positive Rate (Predictive mode only) |
Set the percentage of calls that are to be assumed to have been abandoned because the AMD process erroneously classified a call as being answered by an answering machine. Answer Machine Detection (AMD) is not an exact science and can cause false positives, where the dialler incorrectly guesses a real person as an answering machine and hangs up the call. The effect of this is that the customer effectively gets a silent call. This value is used by the Predictive Dialler when adjusting the dial ratio to attempt to ensure the maximum allowable abandon rate is not breached. The default setting is 30%. |
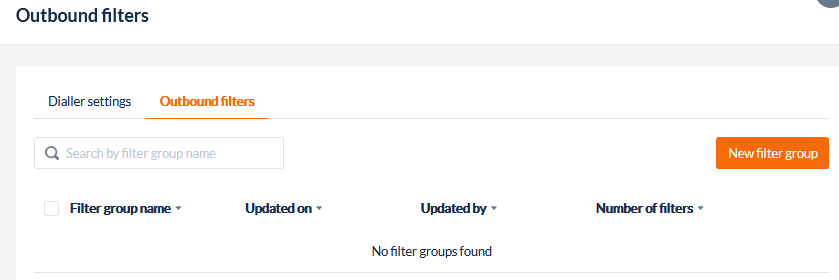
2. Outbound filters
Outbound Filters can be created to filter which leads are dialled in the lists assigned to an outbound campaign. Only a single filter can be applied to an outbound campaign at a time, however, that filter can contain multiple conditions.
-
Select the campaign from the Configuration page and Edit the Dialler Settings
-
Select the Outbound filters tab to show the filters for the campaign or to add new filters
-
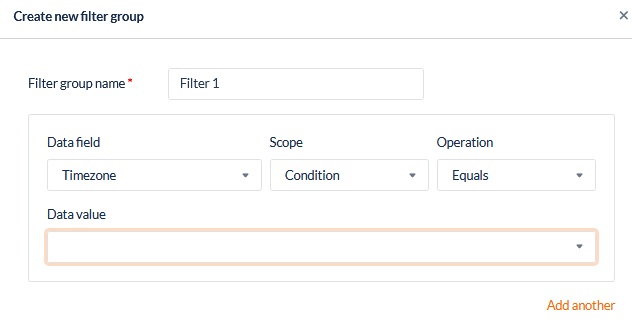
Click New filter group to add a new filter & name the filter (for example WA Public Hol)
-
Select the data field you wish to filter on (in this example we are using State) from the drop-down menu
-
Select the filter scope from Condition or Range
-
Select the Operation from the drop-down
-
Click Add another to add another data field filter to the group or click Save
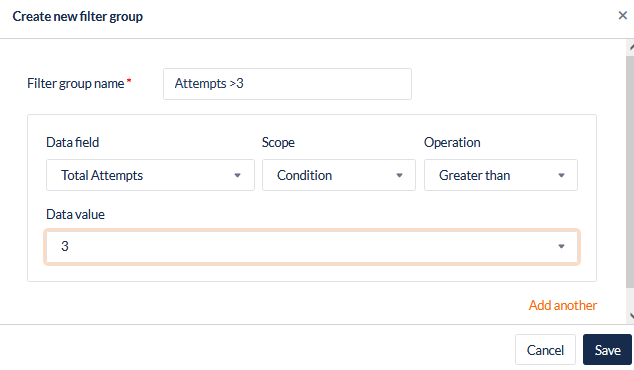
Example - Filter Based on Dial Attempts
-
Select the campaign from the Configuration page and Edit the Dialler Settings
-
Select the Outbound filters tab to show the filters for the campaign
-
Click New filter group to add a new filter & name the filter (for example Attempts >3)
-
Select Total Attempts from the data field drop-down
-
Set the scope as Condition and the Operation is Greater Than and Select “3”” from the data value selection & Save
3. Dial Mode
It is best practice to stop and start the campaign after applying or making changes to these settings.
Predictive Mode
A predictive dialler dials a list of telephone numbers and connects calls to agents. Predictive diallers use statistical algorithms to minimize the time that agents spend waiting between conversations and the occurrence of someone answering when no agent is available.
When dialling numbers one at a time, there are two sources of delay.
-
Only a fraction of calls are answered. So, if 1 out of 3 calls are answered, a predictive dialler might dial 3 lines every time an agent becomes available.
-
Even calls that are answered take some time to be picked up. If it typically takes 10 seconds for someone to pick up, and conversations typically last 90 seconds, a predictive dialler might start dialling at 80 seconds.
An adaptive predictive dialler is continually updating predictive dialling probabilities and monitoring nuisance ratios for performance and compliance with legislation.
For example, if the Dialler Abandon Rate % (set in the organisation Predictive Dialler Settings) is approaching its pre-set limit, the dialler will reduce the dial ratio to the minimum setting (set in outbound campaign Dialler Settings).
Preview Mode
Preview dialling enables agents to first view the available information about the contact and decide when to place the call. In addition to the information about the contact, agents may also view all the history of the contact with the contact centre. After viewing the information about the contact, the agent requests the system to make the call.
For example, preview dialling is useful in debt collection campaigns to allow agents to view information about the customer and define a strategy before starting to talk to them. The system delivers preview calls to agents automatically.
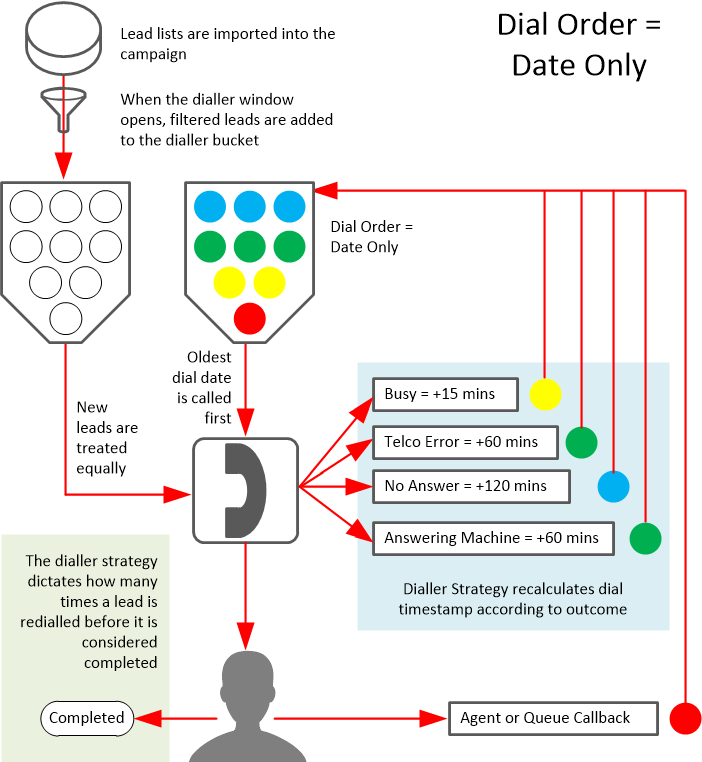
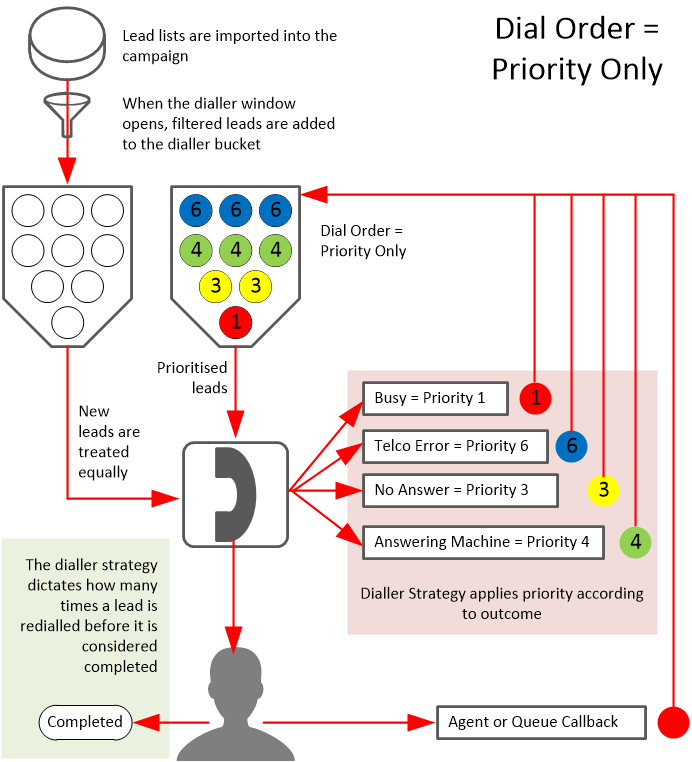
4. How the Dialler Works
In an outbound voice campaign, it is the dialler that is responsible for connecting available agents to leads.
Agent - An agent is the contact centre employee tasked with conducting the interaction with the contact on behalf of the campaign.
Lead - A lead is a potential contact, whose details: name, phone number, timezone etc. have been imported into the contact centre for use in the campaign.
List - Leads are organised into lists, which can contain many thousands of lead records. Each lead record must contain at least one valid phone number at which the lead can be contacted.
Call Outcome - Whenever a lead is dialled but is not completed, it is assigned an outcome code, e.g. Callback, No Answer, Busy, Answering Machine, Telco Error.
Dial Timestamp - At the time a lead is imported, it is given a dial timestamp for use by the dialler. Initially, the dial timestamp is the time of the importation process.
Whenever a lead is dialled but is not completed, the lead is returned to the reservoir with a new dial timestamp.
Dialler Strategy - A dialler strategy is configured as a contact centre resource and can be used by one or more campaigns. The strategy is applied to an individual list used in the campaign.
-
Different call outcomes are given a recycle time. For example, if the No Answer outcome has a recycle time of 15 minutes, then the dial timestamp is incremented by 15 minutes.
-
Call outcomes are assigned a priority. For example, Callbacks might be priority one, No Answers might be priority two, and all other outcomes given a priority between 3-8.
Dialler Bucket - When an outbound campaign is started, all leads that are due to be dialled are added to the dialler bucket.
Lead Filter - When leads are entered into the Dialler Bucket, a filter can be applied, e.g. only dial leads whose numbers have an NSW or ACT prefix so leads in all other locations are not added to the dialler bucket.
Dialler Window and Contact Call Time Window - Each outbound voice campaign has a defined window when the dialler can operate. In addition, a campaign is assigned a Contact Call Time Window which dictates when the dialler is allowed to dial leads in the lead's time zone.
Dial Order - The dialler selects the lead to be dialled first based on a campaign setting, the Dial Order.
|
Dial Order Setting |
How this affects the dialler |
|---|---|
|
Priority Only |
Priority one leads are dialled first, then priority two leads and so on, with no reference to the dial timestamp. |
|
Date Only |
Leads with the earliest dial timestamp are dialled first with no reference to priority. |
|
Priority then Date |
Leads with the highest priority are dialled first, with the dial timestamp used to further sort leads. |
|
Date then Priority |
Leads with the earliest dial timestamps are dialled first, with the priority used to sort leads with identical dates. |