
This feature allows you to edit the list of transfers that an Agent can access during an interaction with a contact for the selected campaign.
Transfers must be created first in Workspace Resources > Transfer Pool before they can be assigned to a campaign.
Transfer types include Transfer to Phone Number; Agent or Workflow.
See Resources > Transfer Pool for more information on creating a new Transfer.
If you assign an Agent Transfer to a campaign, these will be the only transfers allowed for Agent transfers.
If you wish for Agents to be able to transfer to any available Agent assigned to the campaign then you need to remove all transfers from the campaign for all available Agents to appear.
Assign a new Transfer to a Campaign
-
From the Workspace, navigate to the Campaign Configuration
-
Go to Transfers in the selected campaign
-
Click the Unassigned button to show all Transfers available to be assigned.
-
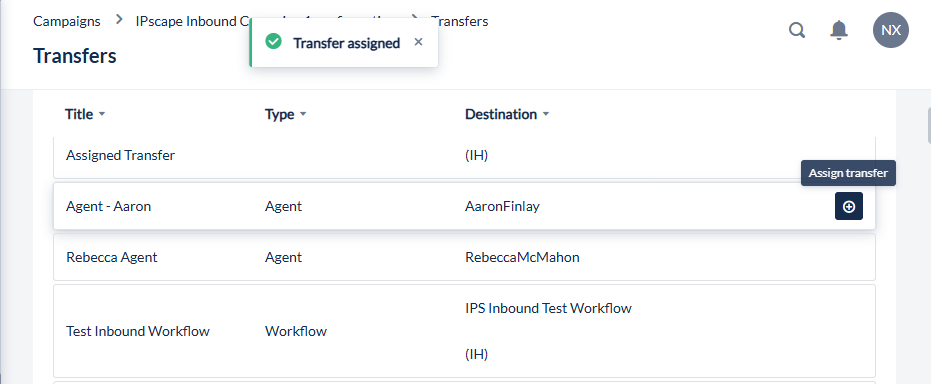
Locate the Transfer from the list or by the search function to assign and click the Assign transfer icon
-
Once assigned, a notification will display to confirm the assignment and the transfer will now appear in the Assigned list:
Remove an assigned Transfer from a Campaign
-
To remove a transfer, while on the same page as the previous section click the Assigned button to show all assigned transfers and click the Unassign transfer icon next to the wrap code
-
A notification will display to confirm the transfer has been unassigned from the campaign and the transfer will now appear in the Unassigned list:

If you assign transfer to a campaign, these will be the only transfers allowed for Agent transfers.
If you wish for Agents to be able to transfer to any available Agent assigned to the campaign then you need to remove all transfers from the campaign for all available Agents to appear.