WebRTC 'Click-to-Call' Channels
Overview
The WebRTC Channels module allows you to view the available WebRTC channels and manage their configuration and deployment. Once WebRTC calls enter the call centre, they are able to take advantage of all the other voice functionality such as Workflows, Campaign Management, Quality Assurance and more.
WebRTC Channels are voice capable channels enabling customer web-calls directly via WebRTC without plugins from a website or application.
This module allows the Administrator to create, view, edit and delete WebRTC channels.
Deployment of a WebRTC channel to a Website or mobile application is a configuration process that is done outside of the IPscape Workspace. That is, a technical stakeholder with access to your website or application configuration will be required to deploy the channel to the desired location (website or application).
WebRTC channels can be implemented onto a public-facing website. However, for security reasons we strongly recommend only displaying them for users who are logged into a web portal or application.
Why should you add a WebRTC Click-to-Call App Widget to your website?

1. View, Create, Edit and Delete a WebRTC Channel
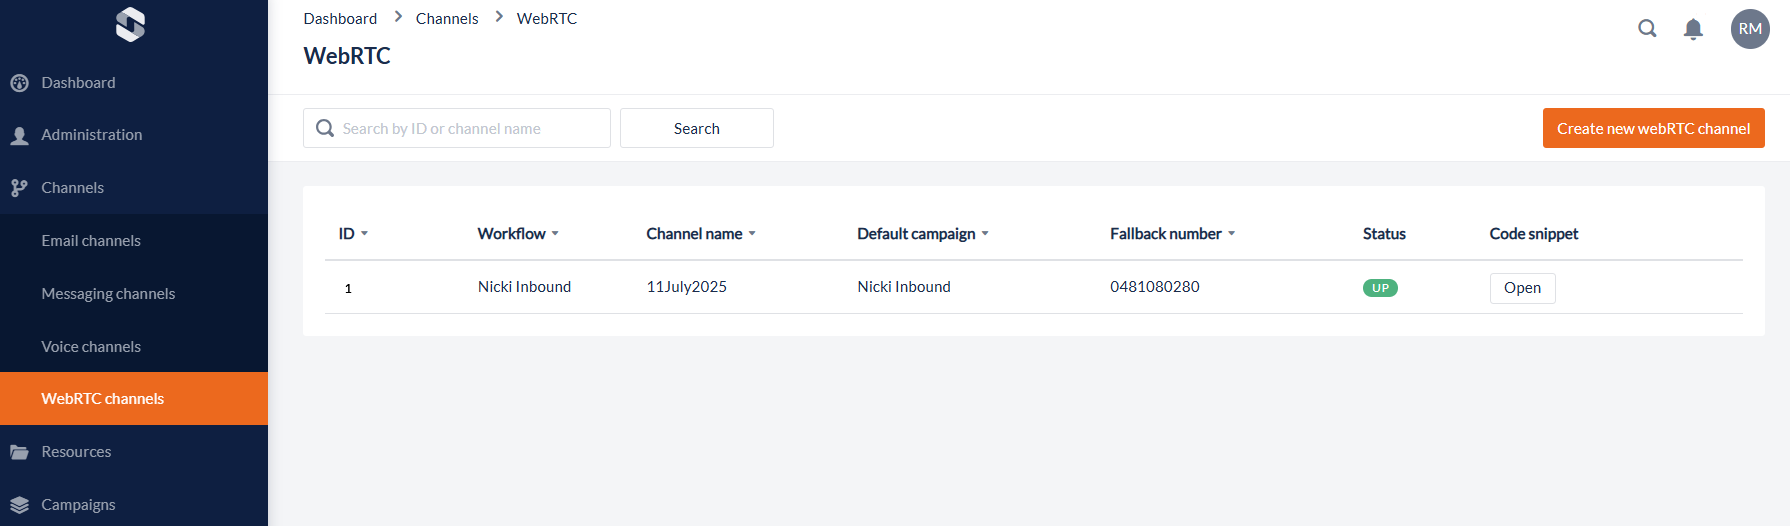
To access the module, log into the workspace and navigate to Workspace > Channels > WebRTC Channels in the sidebar menu.
If you are unable to see this module, speak to your System Administrator about User Role permissions or log a ticket with IPscape Support to enable this module.
Note that charges may apply to use this feature.
Once in the module, you should see a table of available WebRTC channels:
WebRTC Fields
Fields | Description |
|---|---|
ID | This is the ID of the WebRTC Channel in your environment. Used for reference purposes. |
Workflow | Select a Workflow from the drop-down list. Any inbound calls to this channel will then be sent to this workflow. This works in a similar fashion to regular inbound telephone calls. Note that if the contact does not have keypad functionality, it is advisable to only send WebRTC calls to workflows that to not have keypad requirements such as ‘Capture digits’. |
Channel Name | This is a customisable name for the channel such as a name for the webpage or application. |
Default Campaign | This assigns the call to a campaign before it actually reaches a campaign in the Workflow so that any abandoned calls can be attributed to that campaign in reporting. |
Status | Status displays the last known status of the channel. UP indicates that the last call attempt successfully connected. DOWN indicates the last attempt to this channel was unsuccessful. |
Code Snippet | The Code Snippet is the piece of code used to deploy the WebRTC to your website or application. |
Usage restriction | This field is only visible when creating or editing the WebRTC channel. It enables the user to restrict the deployment of the WebRTC channel to one or more specific URLs. It is strongly recommended to use this function. |
Creating a WebRTC Channel
To create a new WebRTC Channel, click the “Create New WebRTC Channel” button on the top right of the screen.
Editing a WebRTC Channel
To edit a WebRTC Channel, click the Ellipsis Button (far right when the cursor is hovered on an item) on the record you wish to edit and select ‘Edit'.
Deleting a WebRTC Channel
To delete a WebRTC Channel, click the Ellipsis Button (far right when the cursor is hovered on an item) on the record you wish to delete and select ‘Delete’.
2. Deploying a WebRTC Channel
To deploy the WebRTC Channel, you will need access to the location you wish to deploy the application. When you have access to this location, in SCAPE, navigate to Workspace > Channels > WebRTC, select your code snippet for the WebRTC channel you wish to deploy and paste it into the desired location.
Recommendations
For best-practise cyber security, is strongly recommended that organisations:
Utilise the ‘Usage Restriction' functionality to limit the location when the WebRTC channel can be deployed.
Deploy the WebRTC only to locations where customers have to be logged in to access the “Click-to-call” functionality provided by the WebRTC channel.
Customising the Button
The default button for Click-to-Call can be customised by changing the CSS in the code snippets <style> section.
The default button looks like this:
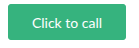
<button id="ipscape-click-to-call-btn" class="call" onclick="ipscapeClickToCall.toggleCall('663aa0a00df9')"></button>Following a break down of the different customisation options.
Init button style
The code for setting the init button CSS (Initialisation function). This will be applied to all states like on-call, connecting, disconnecting - if not, CSS is not overwritten in the specific CSS for the state.
The init text of the button can be changed by setting the content attribute.
/* Button state: Initial */
#ipscape-click-to-call-btn {
    cursor: pointer;
    width: 118px;
    height: 36px;
    border-radius: 3px;
    border: none;
    color: white;
    font-family: 'Lato', sans-serif;
    font-size: 14px;
    background-color: #36B37E;
}

#ipscape-click-to-call-btn:after {
    content: "Click to call";
}
On call button style
The on call text of the button can be changed by setting the content attribute.
/* Button state: On call */
body.ipscape-click-to-call-on-call #ipscape-click-to-call-btn {
    background-color: #FF5630;
}

body.ipscape-click-to-call-on-call #ipscape-click-to-call-btn:after {
    content: "End call";
}
Connecting button style
The connecting text of the button can be changed by setting the content attribute.
/* Button state: Connecting */
body.ipscape-click-to-call-connecting #ipscape-click-to-call-btn {
    background-color: #b6b6b6;
    cursor: wait;
    pointer-events: none;
}

body.ipscape-click-to-call-connecting #ipscape-click-to-call-btn:after {
    content: "Connecting"
}
Disconnecting button style
The disconnecting text of the button can be changed by setting the content attribute.
/* Button state: Disconnecting */
body.ipscape-click-to-call-disconnecting #ipscape-click-to-call-btn {
    background-color: #b6b6b6;
    cursor: wait;
    pointer-events: none;
}

body.ipscape-click-to-call-disconnecting #ipscape-click-to-call-btn:after {
    content: "Disconnecting"
}
Configuring customer Data as Caller ID.
In order to change the caller ID, the data attribute data-caller-id can be changed accordingly.
The default value set in the embedded code snippet is data-caller-id="click-to-call". When embedding the code snippet on the website this value can be changed to either a hard-coded value like support-page or depending on the used technology used on the website to a variable i.e $VARIABLE.
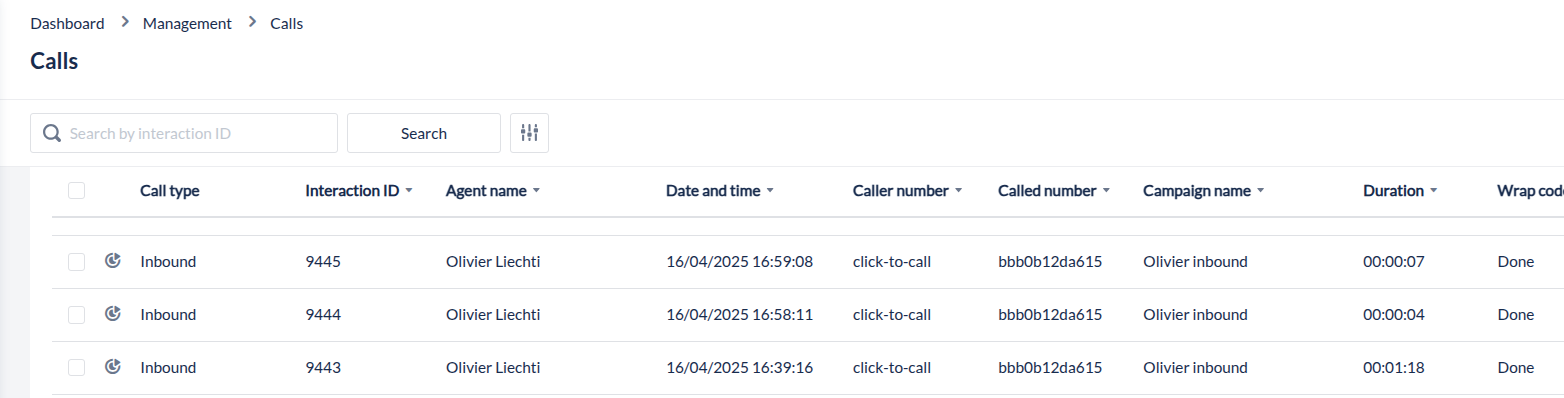
The value of data-caller-id will be used as the caller number in the Workspace Calls module to identify the source of the call: