Overview
Web services is a powerful tool that enables workspace users to connect a workflow to any REST API enabled database or service via the web service connector workflow object.
1. An Example Scenario
-
Feed information from ipSCAPE to an external database and then return the response from that database to the ipSCAPE IVR to:
-
determine how the call is routed, using the 'Branch on Value' workflow object, or
-
confirm details to the caller using the 'Say Text' workflow object
-
display returned information to the agent within the script area of the agent toolbar
-
-
Connect to ipSCAPE APIs to check real-time queue information such as:
-
expected wait time (EWT) for a specific campaign, and based on the result determine how the call is routed, using the 'Branch on Value' workflow object. For example, if EWT is less than 3 minutes allow the call to queue but if the EWT is greater than 3 minutes to an IVR that allows the caller to leave a voicemail or request a call-back
-
if there are agents currently available for a specific campaign and based on the result decide how and where the call is routed.
-
2. Add Workflow Object
-
Open the Workspace.
-
Select Workflows from the Resources menu.
-
Select a workflow from the list displayed (you can also create a new one).
-
Click the Preview icon next to your selected workflow. A schematic representation of the workflow is displayed.
-
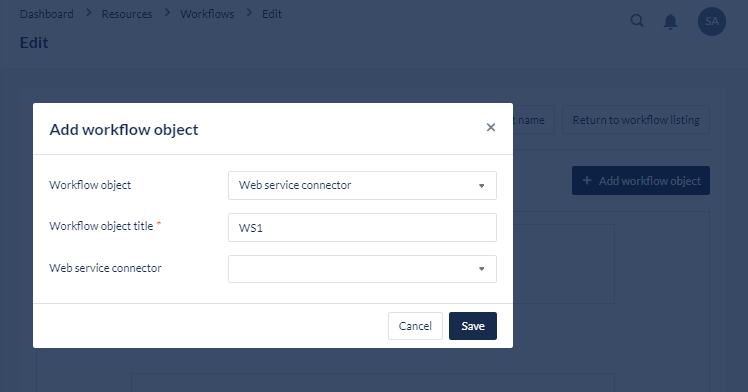
Click the Add New Object icon The New Workflow Object dialog opens.
-
Select Web Service Connector from the drop-down selection list.
The steps involved in creating a web service connector are as follows:
-
Create an API key to connect to the appropriate REST API enabled database or CRM
-
Create API authentication
-
Create a web service connector
-
Use web service connector workflow object in the workflow
As every API authentication, and the data you wish to extract, is different, we have used connecting to ipSCAPE APIs to check real-time queue status as an example of how to build and use a web service connector.
Copy your API Key
-
Select Integration – API Keys & highlight & copy the default API key
-
Note; there is no limit to the number of API keys that you can create that connect to different applications
Create API Authentication
-
Select Integration – Authentication Applications – Select the + key to add new
-
Name your API & add a description – Select ipSCAPE API from the drop-down list
-
Enter your workspace user name & password
-
Paste in the API key for your ipSCAPE instance copied earlier
-
Select Add
Before you can create the Web Service Connector that checks the real time status of a queue, you need to find out what your campaign ID numbers are. To find the Campaign ID, navigate to the Campaign Configuration in Workspace and the ID can be found in the URL when the campaign is opened:
Create Web Service Connector
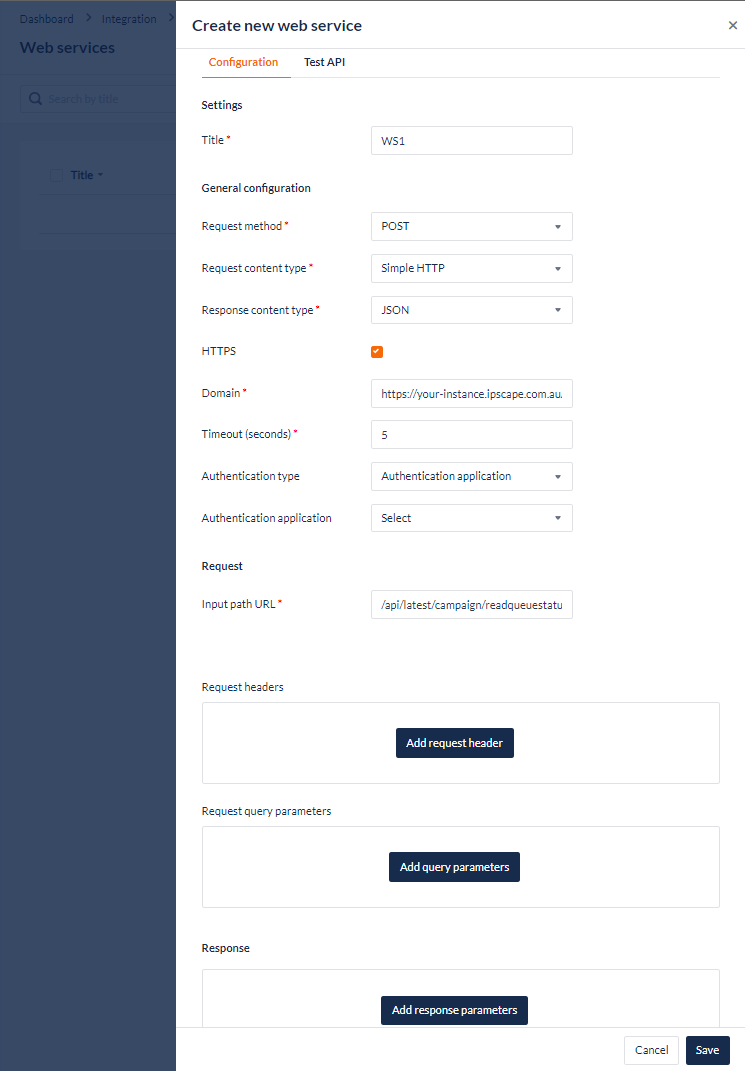
To create a new Web Service Connector:
-
Select Integration from the Workspace → Web Services
-
In the Configuration tab,
-
Settings :
-
Enter a title
-
-
General Configuration:
|
Field |
Description |
|---|---|
|
Request Method |
|
|
Request Content Type |
|
|
Response Content Type |
|
|
HTTPS |
Checkbox |
|
Domain |
|
|
Timeout (seconds) |
1 |
|
Authentication |
Select Authentication Application:
|
|
Authentication Application (only available when selected from Authentication) |
ipSCAPE API |
-
Request:
-
Input Path URL:
-
/api/latest/campaign/readqueuestatus
-
-
-
Request headers:
-
Header name:
-
Description:
-
Static value:
-
Required: checkbox
-
-
Request Query Params
-
Path:
-
Description:
-
Static Value:
-
Required: checkbox
-
-
Response
-
Description:
-
Path:
-
-
Select the Test API tab to test & click Send
-
If successful, you will receive a Response HTTP Code of 200
-
Click Save
Use Web Service Connector Workflow Object in Workflow
We will now create a simple workflow using the Check Logged In Agents web services connector we just created.
-
Select Resources – Workflows – Add new Workflow
-
Add Workflow Name & give description & Select Save
-
Modify your workflow & add the Web Service Connector workflow object using the web service connector called Check Available Agents you just created:
-
We can now use the 'Branch on Value' workflow object to determine how we treat our calls based on whether there are agents staffed or not
-
Add the Branch on Value (BOV) workflow object
-
Name the Workflow object title & the data label
-
Ensure the Data Field matches the Result parameter in your web service connector, eg; Data Field = %ivr:AvailableAgents%
-
Select + to add a BOV rule, for example:
-
Label 1 = Agents available - Operator = Greater than – Value = 0
-
Label 2 = No agents available – Operator = Equal – Value = 0
-
-
You can then add whichever call treatments you wish
-
In this example we see the call queueing when agents are available
-
Treatments for if no agents are available could include:
-
Route to another department
-
Route to an offnet number
-
Route to an IVR that offers voicemail or call-back
-
Play an announcement
-