
Overview
A message campaign involves contact centre agents receiving message requests from contacts via an asynchronous messaging channel, and engaging in a conversation.
Contacts, may come in from various social media messaging channels such as WhatsApp, Facebook Messenger, or through SMS. Currently IPscape only supports Whatsapp channels.
1. Add or Edit a Messaging Campaign
-
Open the Workspace
-
Select Configuration from the Campaigns menu
-
To add a new campaign:
-
Click Create Campaign
-
Select messaging campaign from the drop-down selection list
-
Click Create. The Campaign Configuration wizard opens
-
-
To edit an existing campaign:
-
Select the campaign you wish to edit
-
Click Edit next to General Settings
-
-
-
Enter the Campaign Details as described in the tables below
-
Click Next to progress through the wizard when creating a new campaign, or click Save for any changes to an existing campaign
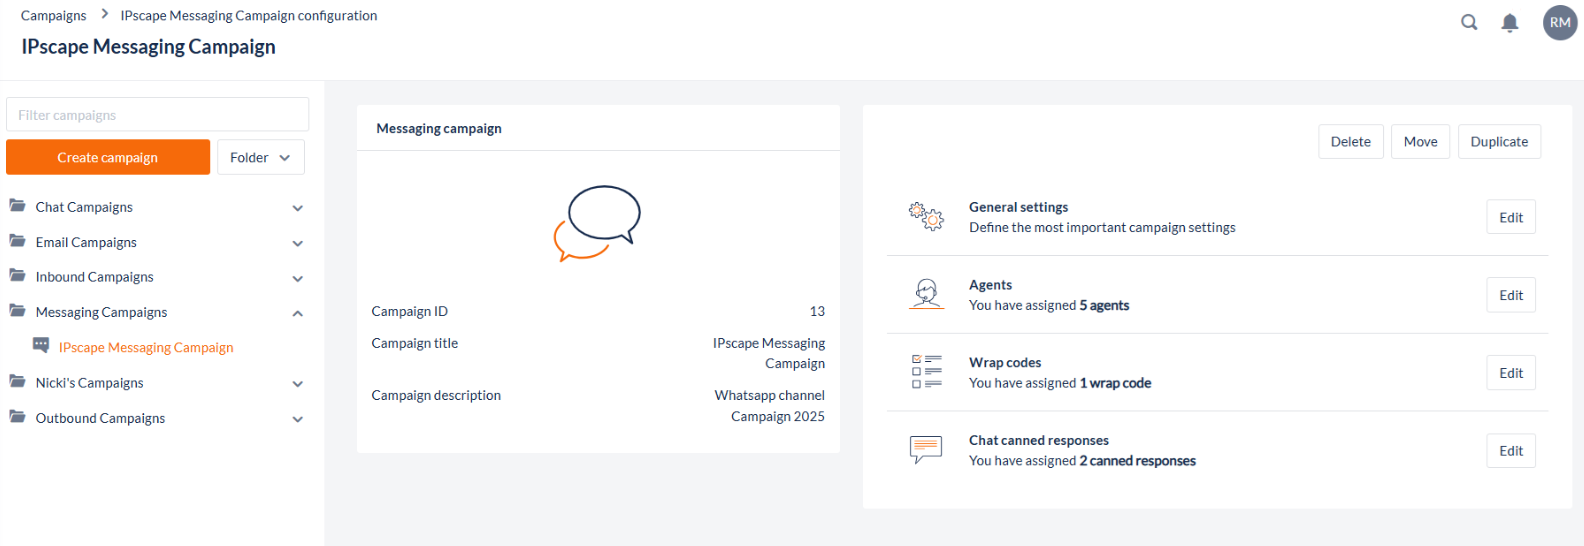
2. View Messaging Campaign Details
Messaging Campaign Details is a snapshot view of a contact centre message campaign.
Where to find this feature
-
Open the Workspace.
-
Select Configuration from the Campaigns menu.
-
Select the Messaging campaign to be viewed - the Campaign Details are displayed for that campaign.
The Campaign Details Display gives a summary view of the key settings for a particular campaign.
3. Messaging Campaign Configuration
General Settings
To configure the General Settings for the Messaging campaign, click the Edit button on the campaign details page next to General Settings.
|
Field Name |
Description |
|---|---|
|
Campaign Title |
Enter a meaningful name for the campaign. |
|
Campaign Description |
Enter the description of the campaign. |
|
Campaign Folder |
Select a Campaign Folder from the drop down selection list. |
|
Teams |
Select the teams assigned to the campaign |
|
Message Theme |
Select a theme from the drop down selection list. Themes are defined in Resources > message Themes.
|
|
File Sharing |
|
|
Allow Agents to send files |
This determines whether an Agent can send attachment files to the contact. If this enabled, you can determine whether the Agent can send from the contact centre library (See also: Files) or their local machine. Be advised that if the Messaging channel such as WhatsApp allows file sharing from the contact’s end, this is not configurable within IPscape. |
|
WhatsApp File Type |
Currently WhatsApp only supports the sending of the following file types:
|
|
Service Level |
|
|
Service Level Period |
This setting will dictate how message response times are reported. |
|
Response Time Threshold |
After the Agent has started messaging with contact, if they do not respond to the customer inside this duration, the customer name is highlighted and an orange bar becomes visible.
|
WhatsApp only allows freeform responses to customer messages that have been sent in the last 24 hours. After this window, Agents will have to use templates. These templates are configured on provisioning of the WhatsApp Account and integration and are not editable currently within the configuration module. If you wish to make changes to the templates used by Agents, you will need to log into your WhatsApp business account.
3. Add Messaging Canned Responses to a Campaign
Below the main Campaign Details display, select the Messaging Canned Responses which allows you to view, add and delete message canned responses that will be accessible for use by Agents in the campaign.
Canned responses must first be created in the Resources > Canned Responses module before they can be assigned to a Campaign.
-
Open the Workspace.
-
Select Configuration from the Campaigns menu.
-
Select the Messaging campaign to be viewed.
The Campaign Details are displayed for that campaign. -
Click Edit next to canned responses. Go to the Unassigned tab.
-
Select one or more appropriate templates to be used by the campaign.
-
Click Assign.
To remove a template from the campaign, go to the Assigned tab, hover over the row with the response to remove and click on the Delete icon on the right. This only removes the canned response from the campaign; the response itself is not deleted from the list of canned responses.
Any configured message canned responses are shown in the following list, which has these columns:
|
Column |
Contents |
|---|---|
|
Snippet |
The name of the canned response used like a shortcut key |
|
Canned Response |
The canned response details |