Overview
The Leads module allows a user to search, import, manage, display, and filter leads. Leads are individuals who the contact centre will attempt to contact during an Outbound Campaign. A campaign can contain multiple lists of Leads which can be weighted with a dial ratio. After an interaction, these are referred to as a Contact.
-
Open the Workspace and navigate to Campaigns Configuration from the menu
-
Select the campaign to view
-
From the configuration menu, the User can view, load or edit leads, or to view, create or edit the lead lists for the campaign:
1. Edit Lists
This feature allows the user to navigate the display of the lists associated with the selected campaign. Lead Lists for the selected campaign are displayed when first opened and can be refined using the Search.
Create a new List
This feature allows a User to add new List to contain Leads in a Campaign.
-
Open the Workspace and navigate to Campaigns Configuration from the menu
-
Select the campaign to view
-
From the Campaign configuration menu, click Edit Lists
-
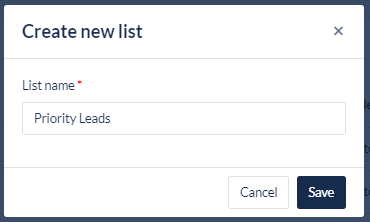
From the List view, click Create new list

-
A window will appear prompting to enter a name for the new List
-
Enter a List Name and click Save
View Lead Lists
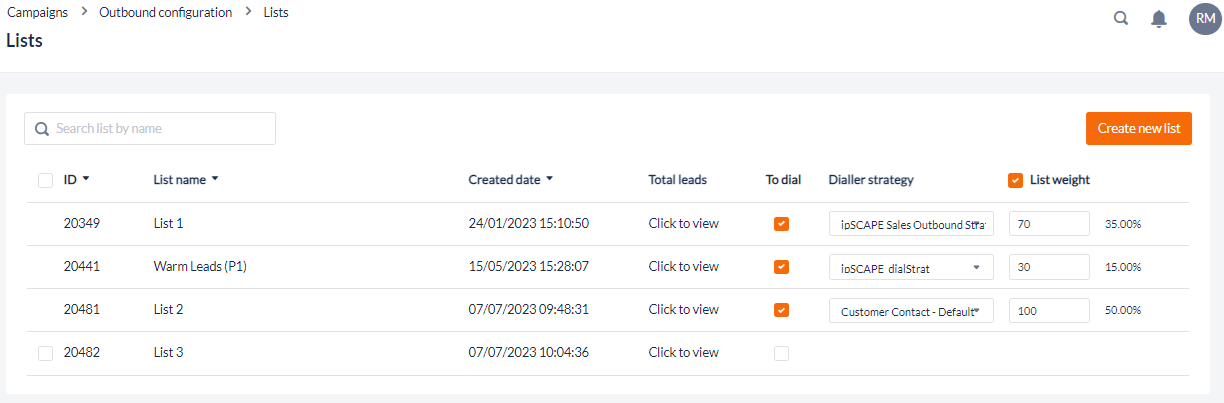
For each List, by default the list displays the following details and fields:
|
Column |
Description |
|---|---|
|
|
Click the Selection Checkbox to select the list to be used for bulk deletion of records. A List can not be deleted if it is selected To dial. |
|
Lead ID |
The unique List ID identifier |
|
Created Date |
The timestamp of when the List was created |
|
Total Leads |
Click to view a count of the total Leads contained in the List |
|
To Dial |
Check the box to enable to List to be dialled in the Campaign. This will not enable the Dialler for the Campaign. The Dialler on an Outbound Campaign can be enabled by clicking Start dialler on the main Campaign overview page. When checked, the user will be presented the option to select the Dialler Strategy to assign to the List. The List Weight can be enabled and adjusted when saved if required. 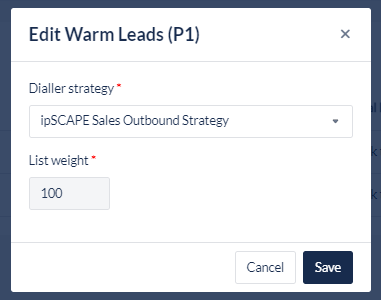
|
|
Dialler Strategy |
The dropdown will display the Dialler Strategy selected when the List is enabled To Dial. A new strategy can be selected from the dropdown and Save any changes. |
|
List Weight |
To enable List Weighting, check the box next to the column title. Once enabled, any Lists enabled to dial will be set to “100” by default which can be adjusted to control the ratio of Leads selected to dial from each List. The percentage ( % ) weight of the List will be displayed next to the weight number. For example, a Campaign can contain three Lists to dial:
This means that out of 100 calls made:
See the screenshot below for an example of how this is displayed in the Lists view. |
Ensure to click Save after making any changes to Lists. Navigating away from this page without saving will revert any updates.
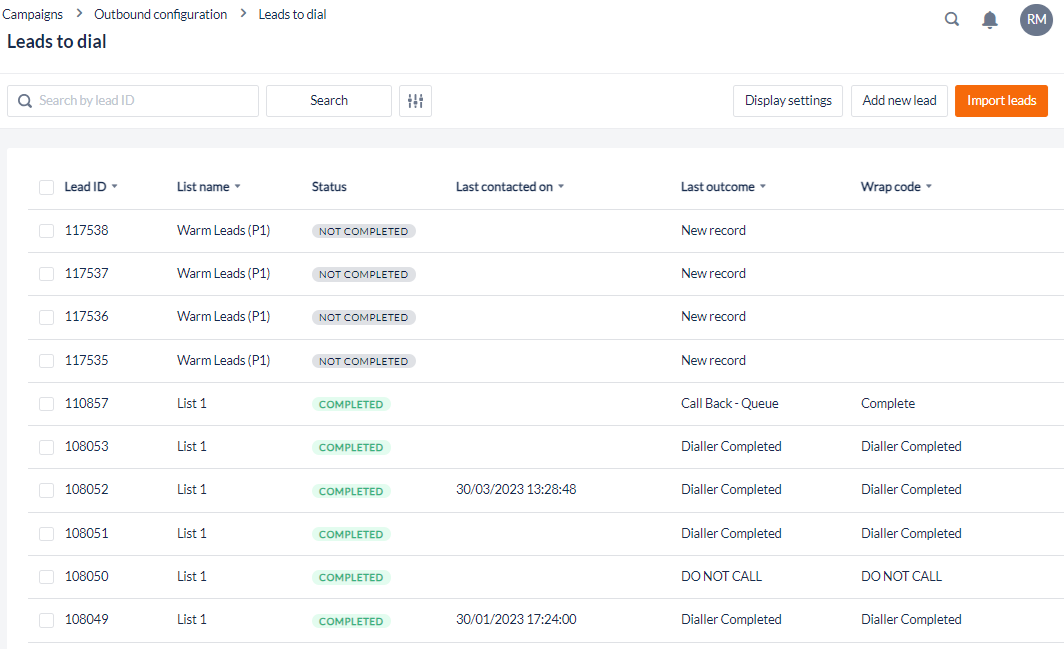
View Leads by List
To view the Leads contained within a List, click the List Name from the List view. By default the list displays the following details and fields, and additional fields can be shown by enabling under Display Settings:
|
Column |
Description |
|---|---|
|
|
Click the Selection Checkbox to select the list to be used for bulk deletion of records. A List can not be deleted if it is selected To dial. |
|
Lead ID |
The unique List ID identifier |
|
Status |
Indicates the status of the lead, either completed or Not completed |
|
Last contacted on |
Timestamp of the date and time the Lead was last contacted by an Agent (this does not include unsuccessful dialler attempts) |
|
Last outcome |
The outcome selected by an Agent when wrapping the last Interaction with the Lead |
|
Wrap code |
The last wrap code outcome selected |
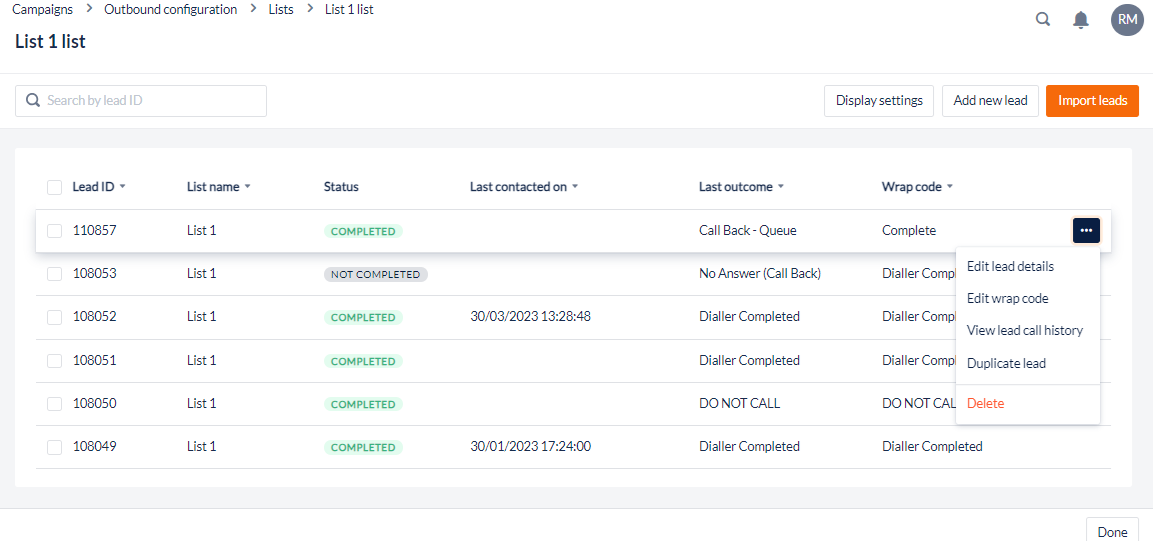
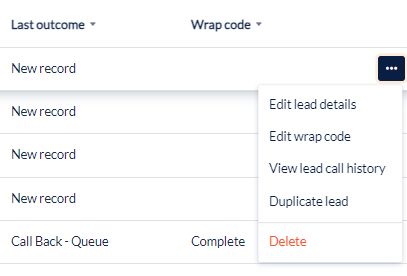
Additional options are available for each Lead displayed from the breadcrumb icon to the right of the record as shown above:
|
Option |
Description |
|---|---|
|
Edit lead details |
Click to edit the information in the data fields for the Lead. Click Save to keep any changes. 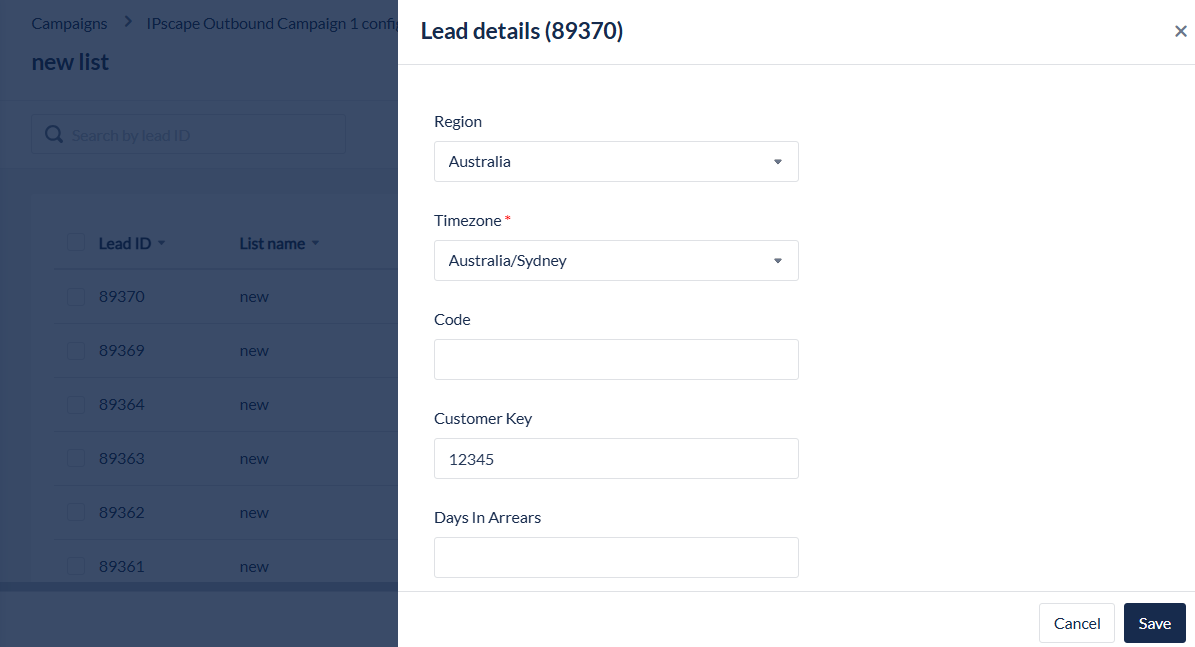
|
|
Edit wrap code |
Click to manually update the last wrap code selected by an Agent, update the complete status, and if a Callback wrap code is selected, enter the callback details: 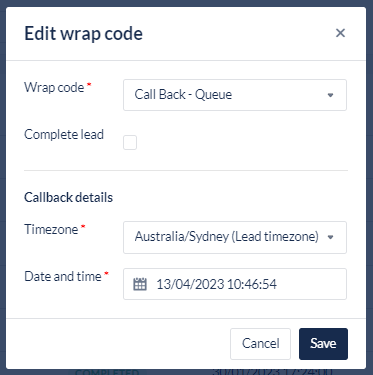
|
|
View lead call history |
View the call Interaction history for the Lead. Each Interaction can be expanded to view additional details about the Interaction such as:
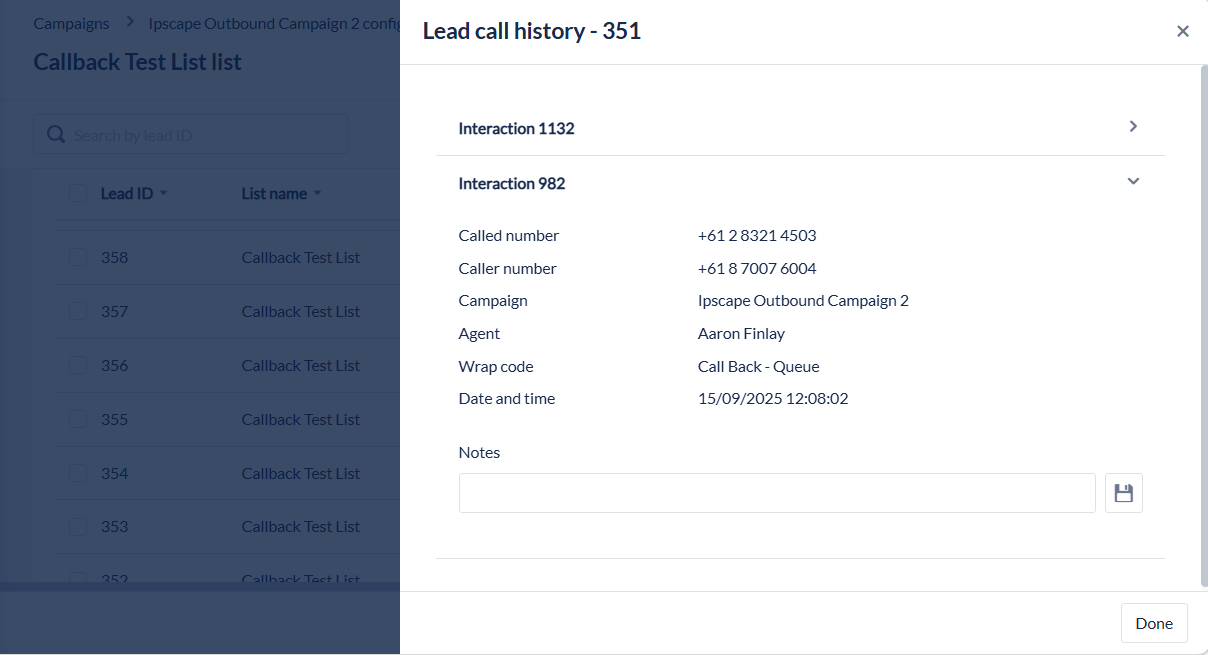
|
|
Duplicate lead |
Duplicate a lead with it’s details from the List to add to a List. A List to add to is required and a Customer Key can be added if the Lead is to be updated within the List selected. 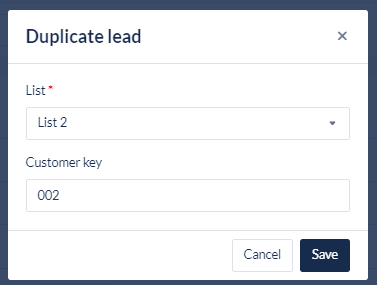
|
|
Delete |
Click to permanently delete a Lead record from the List. The User will be prompted to confirm the deletion. 
|
2. Edit Leads
This feature allows the user to navigate the display of leads associated with the selected campaign.
A list of all leads for the selected campaign is displayed when first opened and can be refined using the Advanced Search.
For each lead, by default the list displays the following details and fields can be added or removed using the Display Settings:
|
Column |
Description |
|---|---|
|
|
Click the Selection Checkbox to select the lead to be used for bulk deletion of records |
|
Lead ID |
The unique Lead ID identifier |
|
List Name |
The title of the List to which the Lead belongs |
|
Last Contacted On |
The timestamp of the most recent contact/attempt. |
|
Last Outcome |
The Dialler Outcome recorded for the most recent contact/attempt. |
|
Wrap Code |
The Wrap Code that was applied after the most recent contact. |
|
More options:
|
3. Search Leads
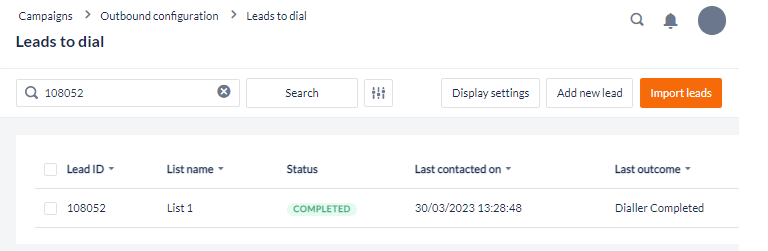
Search by Lead ID
If the Lead ID is know, enter it, or a part of it, into the Quick Search field and click the Search button to locate the lead with that ID.
Advanced Search
This advanced search feature allows a User to reduce the list of leads displayed by adding one or more search criteria.
-
Click the Advanced Search icon to open the advanced search options.
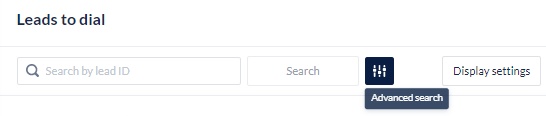
-
Enter the search criteria.
-
Click Search.
The search criteria include:
|
Field |
Description |
|---|---|
|
Last contacted date from |
Click this field to open the calendar control, which has arrows to select the month and year, and a monthly display of dates to select the first day of the search criteria. |
|
Last contacted date to |
Click this field to open the calendar control, which has arrows to select the month and year, and a monthly display of dates to select the last day of the search criteria. |
|
Interaction ID |
Enter the unique ID for the Interaction. |
|
Wrap Code |
Select a wrap code from the campaign that will be used in this search, leave blank (Select) to search all. |
|
Agent |
Select the Agent Name that will be used in this search, leave blank (Select) to search all |
|
List |
Enter the name of the list to which the lead belongs, leave blank (Select) to search all |
|
Completed Status |
Search by Completed or Not completed leads, leave blank (Select) to search all |
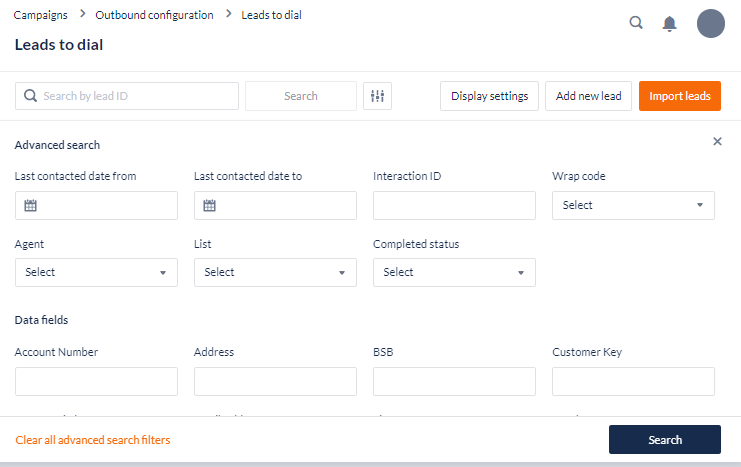
The data fields shown in the Advanced Search are all those which are assigned to the campaign, scroll down in the search module to view all fields available.
3. Set up Display Settings
Set Up Display Settings allows the User to determine which columns show on the Leads screen:
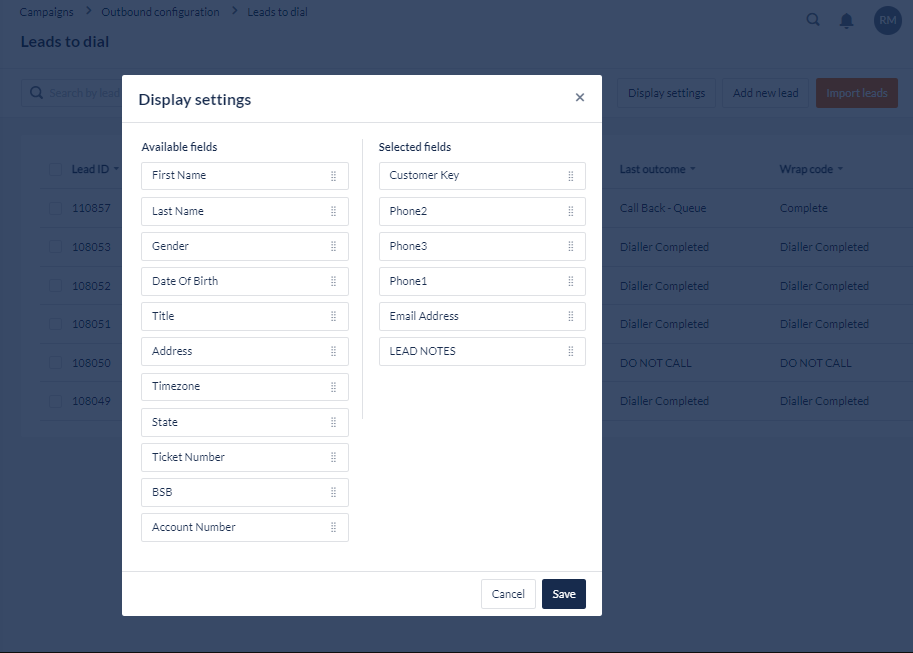
Where to find this feature
-
Open the Workspace.
-
Select Edit Leads from selected the Campaign Configuration.
-
Click the Display Settings button to view a list of fields available for inclusion in the display.
-
Select one of the Available fields and drag it into the Selected fields area. The field will become a column in the Leads Display.
-
Repeat this process for any remaining fields required to be included in the display.
-
Click the Save icon to save the changes
4. Add & Import Leads
This feature allows Users to import a single lead individually or in bulk using a CSV file with a list of leads in it.
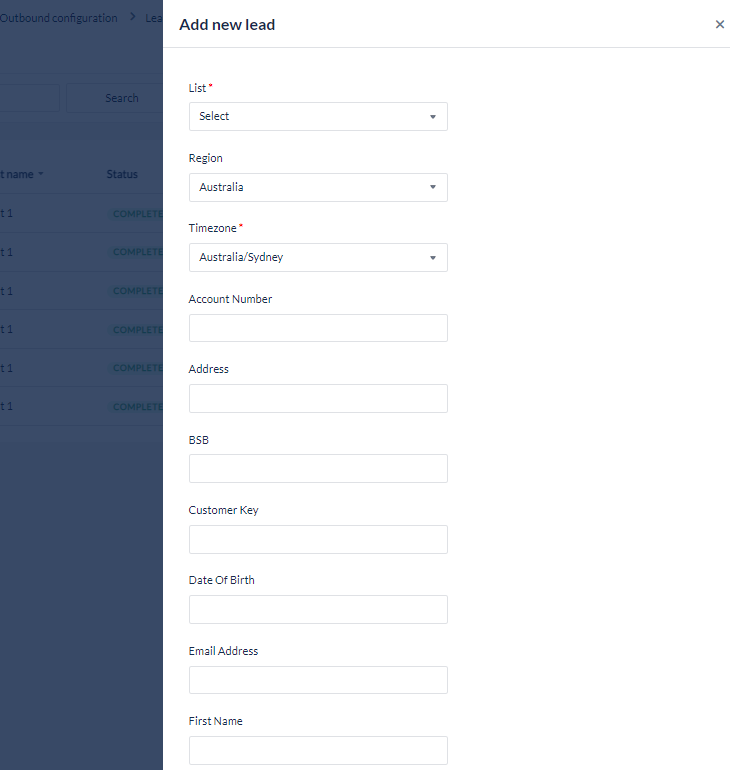
Add new (individual) Lead
To add a single lead to the campaign:
-
Click the Add new lead button to open the new lead dialog
-
Select the List to add the Lead to, the Region and Timezone
-
Enter the Lead details
-
Click Save to add the new lead
Import Leads by CSV
Lead List Preparation
Some preparation is required before the import process can be performed:
-
The file to be imported must be in comma-separated values (CSV) format, with separate lines for each contact's details (data fields).
-
The import process is simplified if the field names are provided in the first line of the import file (i.e. the field headers).
-
The file should contain a database key from the source database. This will be uploaded into the system as the customer_key field. If no such field exists, a field with a unique identifier for each record should be added. This field will subsequently be used for managing updates to lists.
-
The file must contain at least one phone number for each of the line items. The dialler will call any phone number imported so, if any numbers are not to be used for the campaign, do not import them.
-
An existing lead template to define the mapping between imported fields and database fields, or build the mappings manually.
Lead Importer
When the file containing the lead details is ready to be imported, click on the Import leads button from the Leads to dial page, and follow the steps through the import wizard:
-
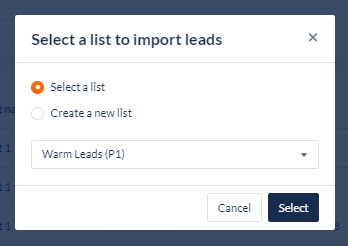
Select a list to import leads to:
-
This can be an existing list selected from a dropdown, or a new list can be created with a title:
-
-
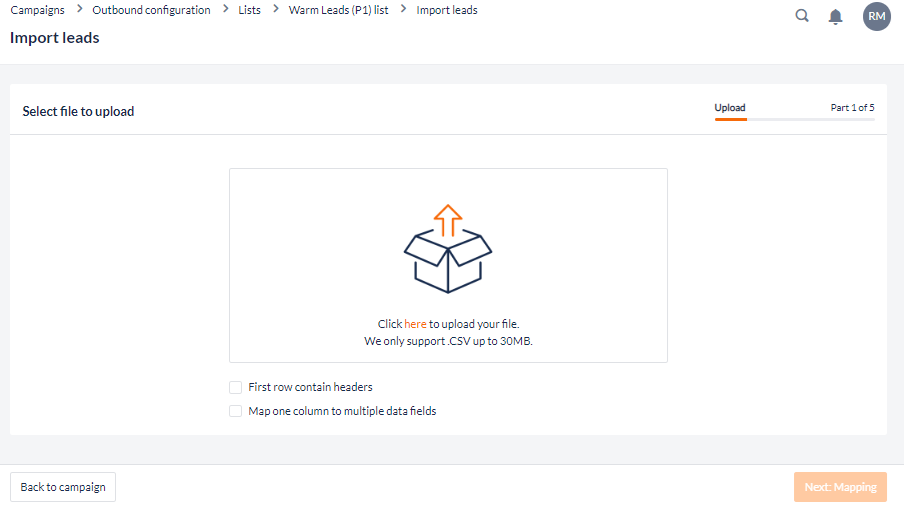
Upload a CSV lead list:
-
Select a CSV file to upload the leads from a local device and review the options to import the Headers from the CSV or whether any columns will be mapped to multiple data fields. When a CSV file is selected and ready, click Next: Mapping
-
If an imported value is longer than the available field size, it will be truncated.
It is best practice to keep the special characters out of the column headings to ensure that there is no conflict with loading the list. Also, while the numbers don’t need to have the “+(Country code)” at the beginning, removing any spaces between the numbers should assist in making sure the system recognizes the full number. (i.e. 04XXXXXXXX than 04XX XXX XXX)
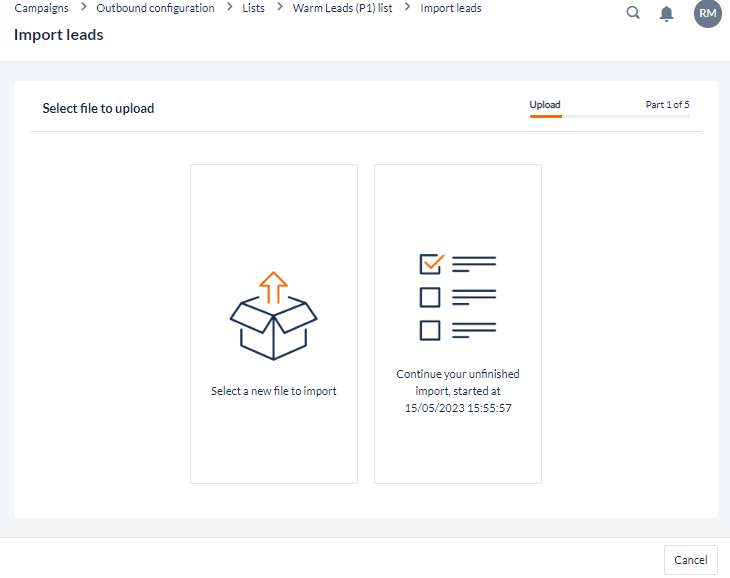
b. If a file has previously been uploaded but the import process has not been completed, the user will be presented the option to continue with this import or to select a new file for import. If Continue is selected, the user will proceed to the stage the import was at last.
-
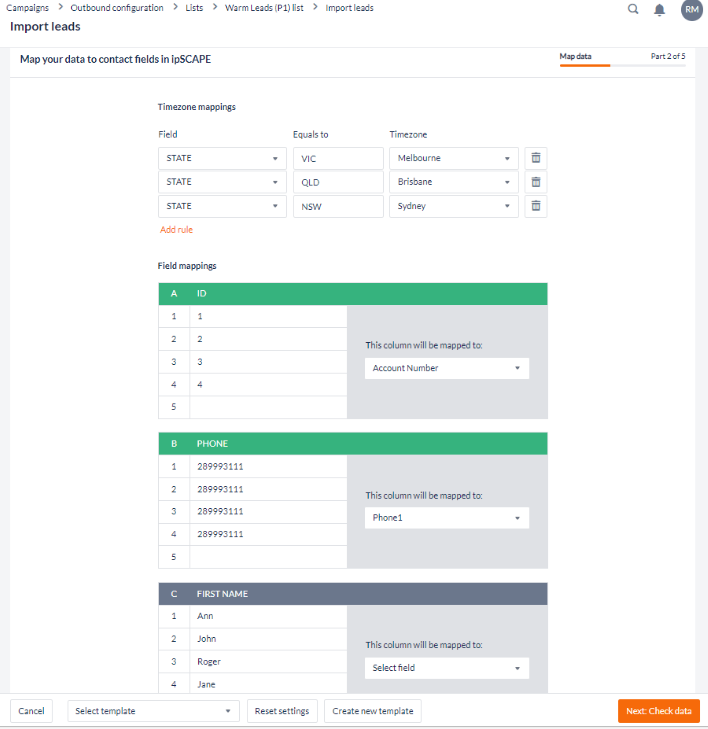
Data Mapping:
-
For each of the columns from the CSV lead file, map these to a Data Field in the Campaign by selecting from the drop down beside the preview data
-
When a mapping field is selected, the Header will change colour from grey to green
-
Timezone mappings can be added to be used by the dialer to ensure leads are called at an appropriate time. Every lead must have a defined timezone. There are three ways to achieve this:
-
The timezone can be pre-defined in a field in the imported .CSV file, in the correct IANA format (e.g. "Australia/Sydney"). In that case, all that is required is to map this imported field to the standard, system-defined "timezone" field.
-
The timezone can be deduced from other fields in the imported CSV file, such as a State field. This is done using the timezone mappings.
-
If neither of these options is selected, then all leads in the imported file will be assigned the default campaign time zone, which is set up in Campaigns > Configuration.
These mechanisms for assigning a timezone are evaluated in the order they are defined above until one applies. That is if a timezone field mapping is defined, but the contents of the timezone field are blank, then the timezone deduction rules will be applied. If none of the timezone mapping rules apply (e.g. the state defined for a lead is not covered by any of the defined rules) then the default campaign timezone will be used. This ensures that every lead has a timezone, which means it is always possible to determine when they may be called.
If selecting a mapping template, then the rules it defines will be displayed in the Timezone Mappings section.
If electing to enter timezone mappings manually or want to add to the already-defined timezone mappings, you can click the Add Rule and a new row will appear in the Timezone Mappings section.
-
-
A mapping template can be created for use again later, or select a template from the drop down to use a prebuilt mapping.
-
-
Check the data before importing for any errors and to ensure the columns have been mapped correctly.
-
Invalid leads will be highlighted
-
The leads displayed can be filtered using the dropdown at the top between Valid, Invalid, and All leads
-
Leads can be manually deleted prior to the import using the selection checkboxes and the Delete button and a new file can be Downloaded from the button in the bottom left
-
Any of the imported data displayed in the table can be edited, by double-clicking on the field to be changed. Once a change has been made, it can be saved by pressing ENTER or clicking anywhere outside that field, or selecting another field.
-
Valid phone numbers will be reformatted into a full International format (eg, +61 2 …) if required.
Invalid phone numbers will be highlighted in yellow, as shown below.
-
To update data for a lead while in Check data, double-click the field to edit and enter the new value. Any updates will be saved when proceeding to the next stage (Review)
-
-
Only data that is mapped to campaign data fields is shown since any other unmapped data read from the CSV file has been discarded (although the CSV file itself has not been modified in any way).
-
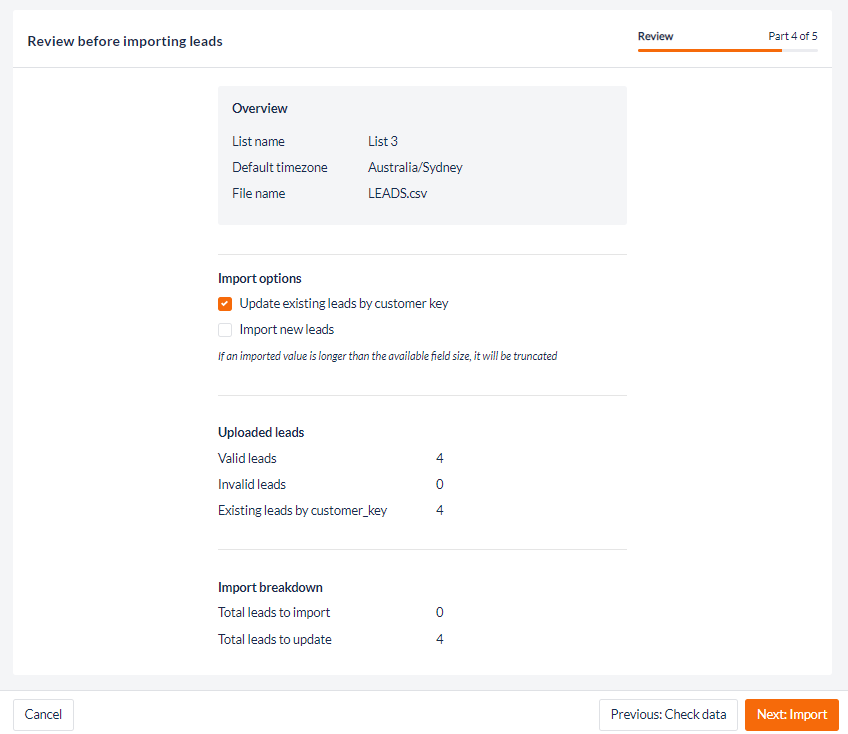
Review an overview before importing Leads to the List. This screen will display:
-
An Overview displaying:
-
The Name of the List to upload to
-
Default timezone will display the configured Timezone of the Outbound Campaign
-
The original file name of the CSV file uploaded by the user
-
-
Import Options:
Check Import new leads when updating an existing lead list with new data or records, or Update existing leads by Customer Key will be available if importing to a List populated with Leads and want the imported data for existing leads (matched by Customer_key) to overwrite existing data for those leads. If not selected, then this information will be stored in a separate record in the database, which may result in duplicate leads. -
Uploaded Leads:
View the total count for: Valid leads, Invalid leads, and Existing leads by customer_key -
Import Breakdown:
View the total count for: Total leads to import, and Total leads to update
-
-
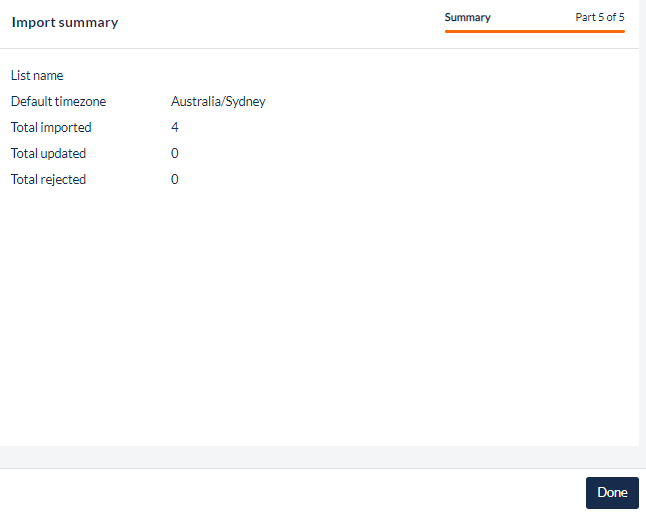
Import Summary
-
Once the list is Imported, the User will be presented a final summary:
-