Overview
Email filters can be used to create incoming email routing strategies within an Email Channel. Keywords can be associated with the following email fields:
-
Sender
-
Subject
-
Body
For example, one email filter might route incoming emails which contain the keyword "Sales" within the body of the email, to the email campaign called "All Sales". However, a second filter for this email channel might route incoming emails which contain the keyword "Support" within the subject of the email to the email campaign called "Customer Support".
A user can create as many filters as required for a single email channel and can also prioritise filters over others.
Routing emails to campaigns
The rules for assigning an incoming email to a particular campaign are specified for each email channel and can be quite flexible. It is possible to configure the system to route emails from several mailboxes to the same campaign, or emails from one mailbox to several different campaigns. A combination of these two models is also possible.
For example, one might route all emails (from several mailboxes) with the word "Sales" in the subject line, to one campaign - "All Sales". But emails from a "Product A" mailbox with the word "Support" in the Subject line could be routed to a specific "Product A Support" campaign, while emails from a "Product B" mailbox with the word "Support" in the Subject line could be routed to a specific "Product B Support" campaign.
Some cloud-based email servers, such as Gmail, may retain copies of all emails (including Sent emails) in the Inbox and manage their status using labels. The Contact Centre will retrieve any emails in the Inbox that have been sent to that address but will not fetch emails addressed to any other address.
In this case, it becomes the responsibility of the Mailbox Administrator to empty the mailbox of unfetched emails regularly. The Contact Centre will discontinue interaction with a mailbox that it detects to have more than 20 emails that it should not fetch.
4. Display or Edit Email Filters
This feature allows a user to access a list of filters for a specific email channel. It also allows a user to activate or deactivate a filter. Users can drag and drop filters to manage priorities.
Where to find this feature
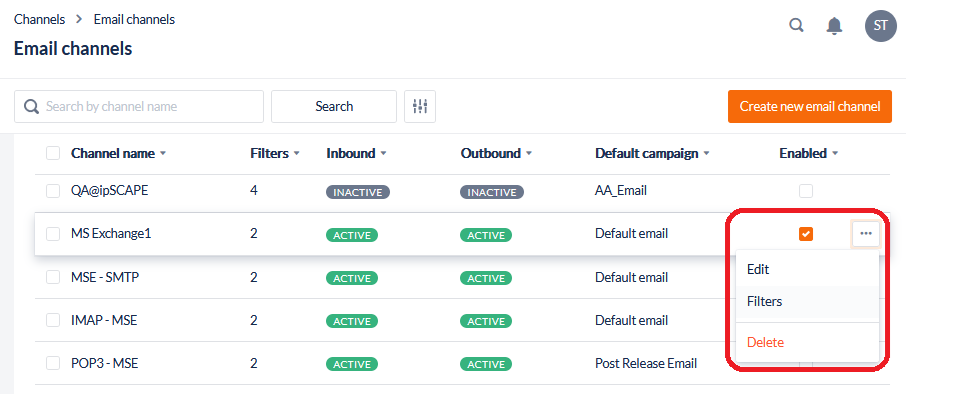
Filters for an Email channel can be found by accessing Filters from the overflow options in the https://knowledgehub.ipscape.com/Workspace/Email-Channels.1506771183.html view:
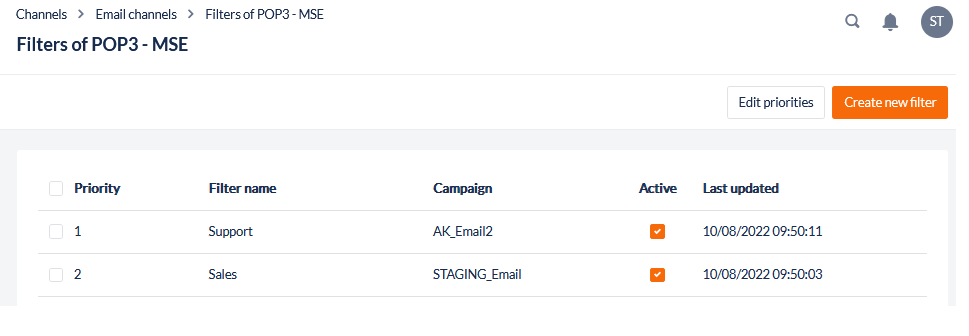
The Filters List shows the defined filters in the selected Email Channel and, for each, displays the following details:
|
Field |
Description |
|
Filter Priority |
The numerical Priority of the filter, with 1 being the highest priority.
|
|
Filter Name |
The Name of this filter. |
|
Campaign |
Emails which match the filter will be assigned to this campaign |
|
Active |
Indication of whether or not this filter is currently Active. |
|
Last Updated |
A date and timestamp of when the filter was last updated |
5. Add an Email Filter
This feature is used to route incoming emails that contain specific keywords to a specific email campaign.
-
Open the Workspace.
-
Navigate to Channels > Email
-
Hover over the channel in the display and click Filters from the overflow menu to the right of the email channel record
-
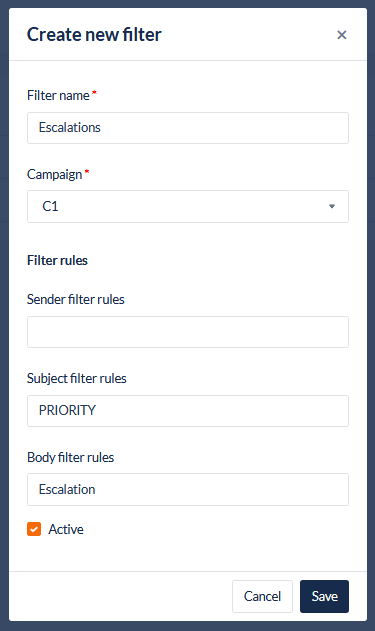
Click Create new filter and a window will appear to allow a user to configure the email filter
-
Once configured, click Save to create the filter or Cancel to exit without saving
Fields
|
Field |
Description |
|
Filter Name |
Enter the Name of this filter. |
|
Campaign |
Select the Email Campaign to which emails that match this filter are delivered. |
Filter Rules
|
Field |
Description |
|
Sender filter rules |
Enter the text string to be compared against the contents of the Sender field in incoming emails. The comparison is case-independent and partial. For example, a string of 'Company' would match both 'http://company.com ' and 'http://company.net '. |
|
Subject filter rules |
Enter a single word (no punctuation or trailing spaces) that will be compared to the contents of the Subject field in incoming emails. The comparison is case-independent and partial. |
|
Body filter rules |
Enter single word (no punctuation or trailing spaces) that will be compared to the contents of the Body in incoming emails. The comparison is case-independent and partial and there is no limit to the number of filters that can be applied. |
|
Filter Active |
Click the Checkbox to activate the Filter. |
Individual filters act independently of each other. If one of the three filters (Sender, Subject, or Body) matches the relevant field in the incoming email, then the Filter will be deemed to be matched, and the email will be passed to the selected Email Campaign
6. Edit Filter Priorities
When an Email channel has multiple filters it may be required to adjust the priorities to ensure a filter is applied when it should. In some cases, an incoming email may meet the filter rules of more than one filter, for example, an email might arrive that meet the rules for moving the email to a specific campaign based on a keyword in the body which takes precedent over another similar rule. As only one of these tasks can be carried out, priorities will ensure the top priority filter is executed to send the email to the correct campaign.
By default, the filter rules for an email channel are executed in the order they were created and appear on the filters list. To change which filter rule has priority:
-
Open Filters from the channel in Email Channels
-
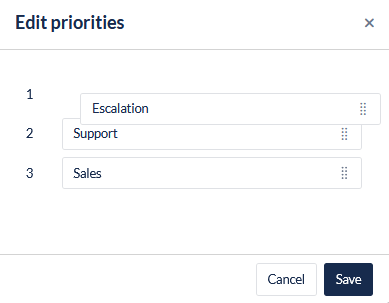
Click the Edit Priorities button to the top-right of the list to open Edit Priorities
-
To move a filter in the list, place the mouse cursor over the tile, click then drag and drop the tile to the new priority position in the list.
-
Click Save