Agent CTI Adapter
Overview
The CTI Adaptor is an Agent tool that provides essential voice functionality in a small, lightweight user interface. The CTI Adaptor is designed to be integrated natively with Customer Relationship Management (CRM) systems:
Salesforce
Service Now
Zendesk
Dynamics
1. Login and Connect Phone
Login to the Adaptor
Enter your Agent Username. This is a mandatory field.
Enter your Agent Password. This is a mandatory field.
Click Login. The Phone Connection screen opens.
Establish a Phone Connection
Select the Connection Method.
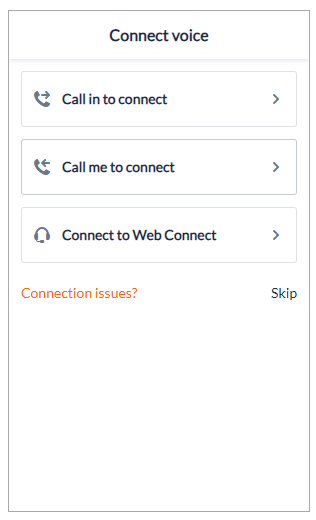
Call in to connect | Call me to connect | Web Connect |
|---|---|---|
|
|
|
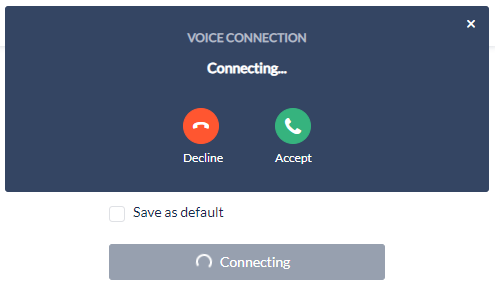
An option to save the connection as default is available for all methods by ticking the checkbox “Save as default”.
Skipping the connection method or failing to answer the persistent call connection will show “Connect Voice” in the interaction page and a disconnected icon on the top right corner as no connection method has been setup properly.
The color of the dot beside the agent avatar will also indicate the agent’s status.
Green: Available
Orange: On Pause
Red: Disconnected
2. Logout from the Adaptor
Click the Account Settings icon.

The Account Settings will be shown.
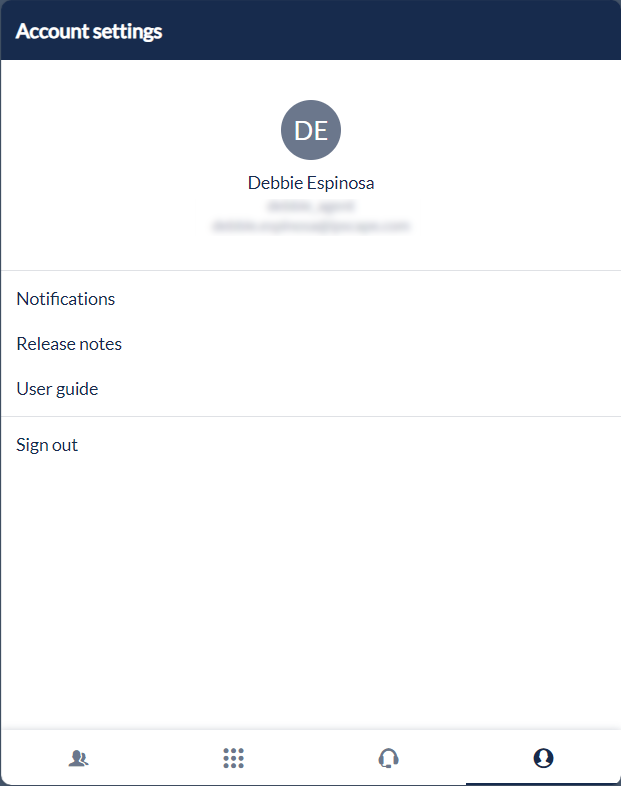
Select Sign out
3. Take a Break
Clicking anywhere within the header bar would open the list of available Pause reasons.
Select a Pause Reason.
The agent status will be changed to Paused, displaying the chosen Pause reason.

NOTE → Please note that the agent can still receive transferred calls when in a ‘paused’ state, if the agent has been configured to do so in the workspace. In addition, manual outbound calls are possible in this state.
4. Auto Pause
The system will change the status to Paused with a Pause Reason of "Auto Pause" when:
Agent connected using Call me to connect on a Non-Persistent voice connection method
The system allocates an inbound call to the agent
Agent did not answer the call, or the agent was not able to answer the call on time
If agent’s status is on Auto Pause, they would not be able to receive calls and should change their status immediately to Available.
5. Call Information Display
Select the Info tab.
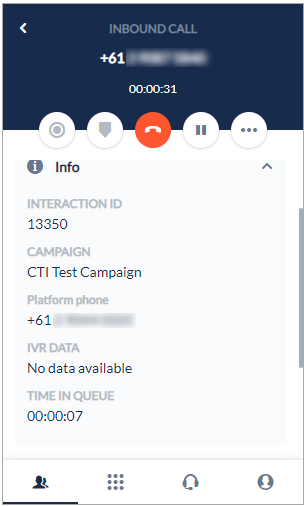
Inbound call information
The display is view only and it cannot be edited. It is the information that the CTI Adaptor acquires from the database or from live metadata.
Field Name | Description |
|---|---|
Interaction ID | The unique identifying number for the call |
Campaign | The name of the campaign associated with the call, where known |
Platform phone | The contact centre's phone number |
IVR Data | This contains information entered by the contact while in IVR.  |
Time in queue | In an inbound voice campaign, the duration between when the contact left the IVR and when the agent accepted the call |
6. Receive an Inbound Call
Any customer or caller that dials the DNIS number configured with the workflow, will be directed to the inbound queue when the call reaches the ‘join queue’ workflow object. If the agent is ‘ready’ and ‘available’ to take the call, the call is bridged to the first available agent.
The inbound call will be presented at your adaptor console.
During the call:
Select the CRM field to view lead information
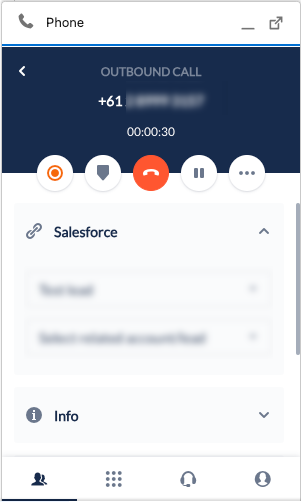
Select Info to view call data display.
Select Notes to add and edit notes for the call.
7. Make a Manual Outbound Call
An Agent can make a Manual Outbound Call when either Paused or Available.
Enter the phone number into the manual call text entry field by clicking digits on the keypad displayed in the CTI Adaptor or your PC's keyboard.
Select the applicable campaign from the drop-down list.
Click Call now.
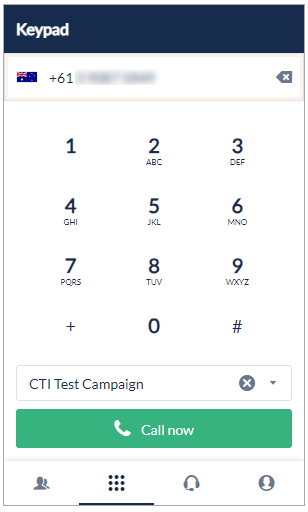
When the call is answered by the Contact, the call details will be seen on the Agent Interaction page.
Failed Outbound Calls
When agents make outbound calls, they may encounter instances where some calls fail. These messages can assist agents in identifying the reasons behind the call failures.
Cause | Toaster Message |
|---|---|
Called party did not answer the call |  |
Agent dialled an invalid number or incorrect number format |  |
Called party is busy |  |
8. Transferring a Call
Agent must be engaged in an active call to be able to transfer a call. To initiate a Transfer, select the overflow button and a dialogue will open.
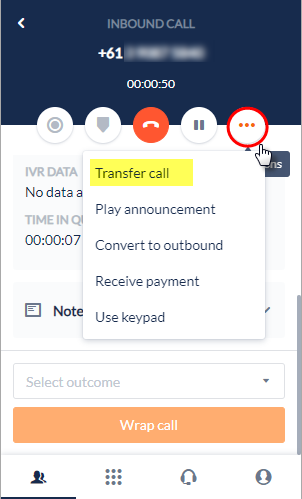
Select Transfer Call from the list. A call can be transferred to several types of destination:
Another Agent
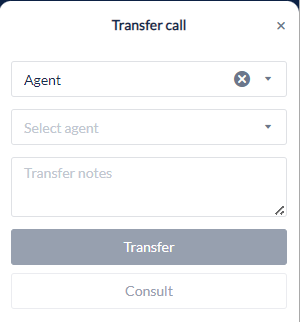
This option will only show a list of available agents or selected agents that are allowed to get calls while on pause state.
A Phone Number
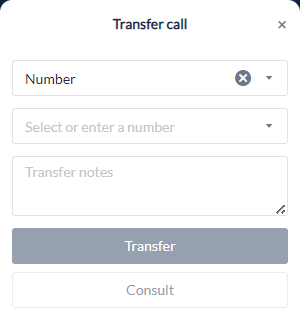
This option will show either a list of assigned transfer numbers to the campaign or to enter another number.
A Workflow
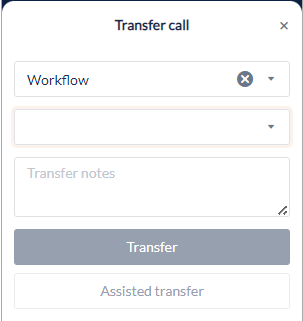
This option will show the list of available workflows to be able to transfer calls to another queue.
There are 3 types of transfers:
Transfer - a blind transfer where the call is transferred without any interaction between the transferring agent and the destination.
Consult - agents can speak to the person they are transferring to and will put the other line (caller) on hold. Once connected, the agent will have the following options to either transfer the call or merge lines.
Assisted Transfer (for Workflow) - when this option is selected, the agent interaction page will present a keypad, and the other line (caller) will be put on hold. The keypad will enable the agent to press numbers if there is a need for the recipient workflow.
This would have the same behavior as a consult where the agent will have the option to either transfer the call or merge lines.
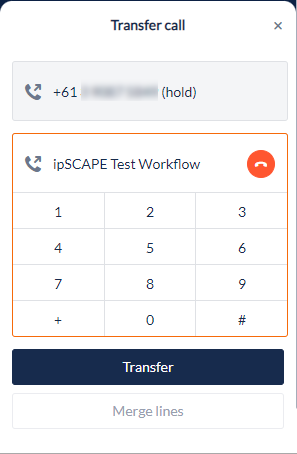
Assisted transfer
Button | Description |
|---|---|
Transfer | Allows agent to transfer the call to the selected agent, number, or workflow and wrap the call. |
Merge lines | This will allow the agent, the caller, and the person being transferred to speak with each other in a conference call. When the lines have already been merged, the agent has an option to "Leave" or "Terminate" the conference call by clicking the “Hang Up” button. This will open a pop-up message: 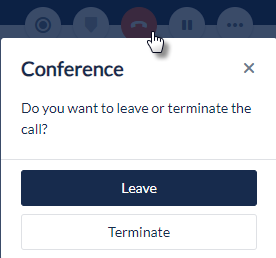 Selecting "Leave” will continue the conference call between the remaining parties and agent will need to wrap the activity and move to the next available action. Selecting "Terminate" will end the conference call for all parties. |
9. Call Recording
If the campaign configuration has enabled the call recording, agents may change the status of the Call Recording during a call. The color of the Call Recording Icon indicates the status of recording.
Image | Description |
|---|---|
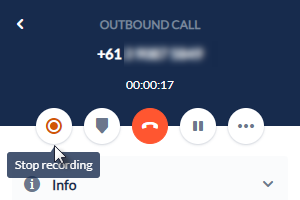 | Recording in Progress When the call is being recorded, the Call Recording Icon is Orange. |
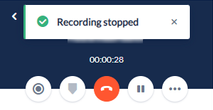 | Recording is Paused/Stopped When the call is not being recorded, the Call Recording Icon is Dark Grey |
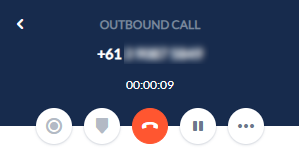 | Recording Status Control is Disabled When the call recording is not enabled, the Call Recording Icon is Light Grey |
10. Wrap Call
After the call with a Contact has ended, the agent will be on wrap status. A difference in color would be seen for an ongoing call and an ended call.

Left: Ended call
Right: Ongoing call
When the call is finished, agents may either:
Select their status for the next call. For example, if there is after call work.
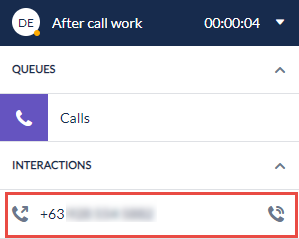
Agents can select a pause reason by clicking the “Back” button to go back to the Agent Interaction page and change the status from Available to a Pause reason.
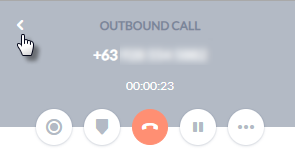
After selecting a pause reason, agents can go back to wrap the call by clicking the open interaction
Agents can then wrap the call by selecting an Outcome from the dropdown list then click Wrap call
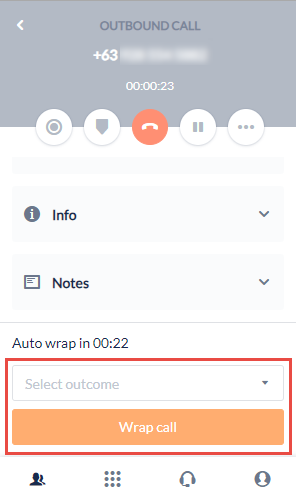
Select an Outcome from the dropdown list at the bottom of the information section and click Wrap Call.
11. Auto-wrap
An agent enters a state of Wrap when a call has finished but no Wrap Code is selected as default. This state gives agent time to do any after-call work, if required. The length of time an agent has to 'wrap' a call can be restricted by using the auto-wrap function which is configured at the Campaign level in the Workspace.
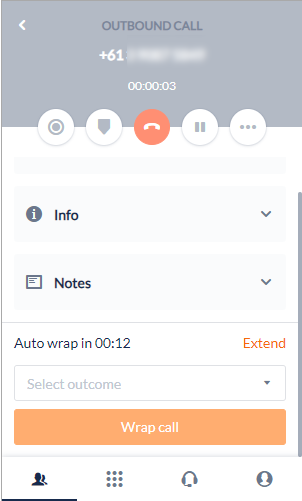
Agent on wrap state
When Auto-wrap is set, the Agent will see a counter indicating how long in seconds they have to wrap the call. If that time is exceeded, the call will be given a pre-defined Wrap Code (configured at the campaign level) and the agent will be pushed into Available status.
Extended Auto Wrap Time
This is another setting configured at the campaign level which gives the Agent the option to extend their Wrap Time by a pre-defined amount of time and appears as “Extend” beside the Auto Wrap counter.
Once the “Extend” button is clicked, the pre-defined amount of time will be added in the counter and the extend button will be removed.
12. Outbound Dialler
This functionality is used to automatically present calls to Agents, so they do not have to dial the number or have the Agents view the lead information prior to being dialled manually. These lists of phone numbers come from the Workspace and numbers from them are distributed to agents as they become available, based on rules defined on an Outbound Campaign. The lists are usually one of the following:
A lead list loaded from an Excel spreadsheet that was originally exported from a CRM or purchased from a lead vendor
A list of Callbacks from an Inbound Campaign where the agent has arranged for themselves or a queue to be called back at a specific time
A list of Callbacks from the 'Request a callback' object in a Workflow (IVR)
Phone numbers from these lists are presented to Agents in one of two ways depending on how the Campaign is configured:
a. Predictive Mode
A predictive dialler dials a list of telephone numbers and connects calls to agents. Predictive diallers use statistical algorithms to minimize the time that agents spend waiting between conversations and the occurrence of someone answering when no agent is available.
In this mode, numbers are dialled automatically and presented to the Agent only if they connect to a caller. Agents will hear only hear a single beep as the call is connected.
A sample of the Beep can be listened to by selecting this link:
An agent assigned to an Outbound Campaign on a Predictive dialler setting must always be connected on a persistent connection method. Upon login, selected agents will also see a reminder:
”You have been assigned to an outbound predictive campaign. You will not receive any calls from these campaigns in a non-persistent connection.”
b. Preview Mode
Preview dialling enables agents to first view the available information about the contact and decide when to place the call. In addition to the information about the contact, agents may also view all the history of the contact with the contact centre.
In this mode, a lead will be presented to an agent with a maximum of 3 numbers that can either be the customer’s mobile, home, or work number. They then make the decision to dial the number when they are ready, giving them time to review the information about the lead before making the call.
The agent may start dialling a number by clicking the “Dial” button beside the number chosen:
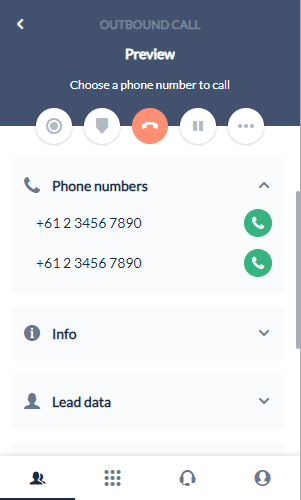
There is also a setting at the Campaign level that enables you to restrict how long an Agent can stay in preview mode called 'Auto-preview timeout'.
If the call is a Callback arranged by an agent to themselves or back to the queue, it will present in Preview mode.
13. Call tagging
This function enables a marker button that an agent can press during a call to mark a significant event, like payment details being given. This marker can be seen by someone reviewing the call in the Workspace under ‘Calls Management Module’ to easily find a specific event without having the need to listen to the whole recording.
How to mark a call recording
Click the “Add bookmark” button anytime while the call is recording.
Agents can add as many bookmarks as they like to a recording, however, depending on the speed of their network, there may be a slight delay in applying the bookmark (2~3 seconds)
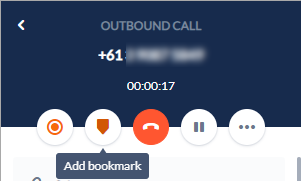
This will show up as “Manual” when reviewed in the call recording. Play Announcements will show the same icon; however, it will be labeled Play Announcement with the name of the announcement played.

If the call is not being recorded, the option to mark the event during a call is not available.
This function needs to be enabled by your local support desk as it is not switched on by default. Contact servicedesk@ipscape.com for assistance. The Call recording function must be enabled both in the Workspace and at the campaign level to be able to use this function.
14. Play an Announcement
The Announcements tab in the Agent Toolbar provides the facility for agents to play pre-recorded messages at any time to contacts. This could be used, for example, to play a pre-recorded warning that calls will be recorded or play a pre-recorded explanation of contractual terms and conditions.
How to play an announcement
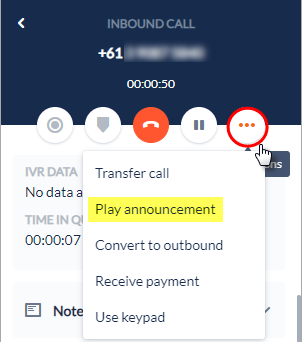
To play an announcement, select the options menu and select “Play Announcement”.
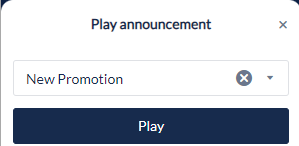
Select the announcement from the drop-down selection list then click the Play button.
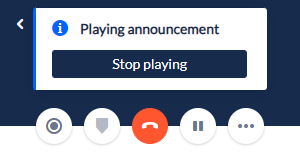
The agent will see a notification that the announcement is being played and have the option to stop it at any time.
There will be markers seen where the Announcement started and where the Announcement ended when reviewed in the call recording. The name of the announcement played would also be included.

Sound files can only be played as an announcement if it was assigned on the campaign level.
15. Convert to outbound
This feature is only available to agents that are assigned to an Outbound campaign while an Inbound interaction is active. Convert to Outbound can be used to convert an Inbound call to an Outbound campaign to update an existing lead.
With an interaction active on the toolbar, Select Convert to Outbound from the Options menu
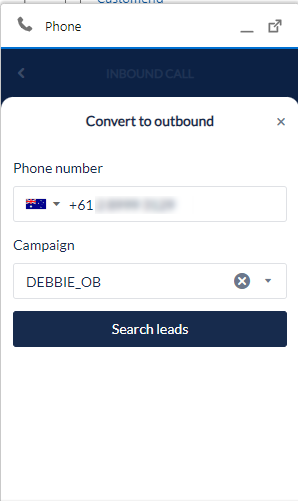
Depending on the Organisation setting, the agent view for available outbound campaigns would differ. See Call Settings for more information.
In the Convert to Outbound window, search for the lead by entering the phone number listed on the lead and the ipSCAPE campaign they are assigned to
Click Search Leads to display a list of leads matching the criteria.
Select the correct lead and click Convert
16. Receive Payment
When PaySCAPE is enabled and configured for a Campaign in the Workspace, agents can use the 'Receive payment' option to process payments.
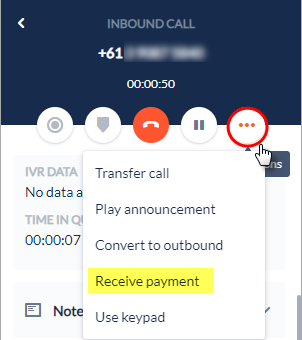
When selected, agents will be presented with the dropdown list to select the merchant then the following screen:
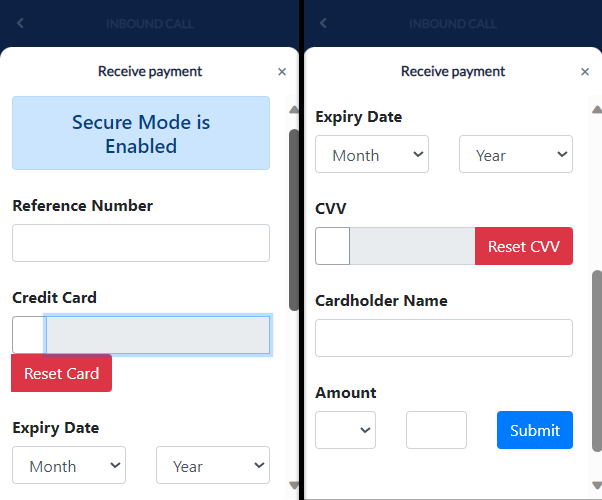
Agents will continue to speak with the customer and assist with completing the details on this page.
Field | What you should do |
|---|---|
Reference Number | Enter the reference number which identifies what the payment relates to. e.g. the reference on the statement or on the letter. |
Credit Card | Ask the Customer to enter the Credit Card number for the payment. Credit Card Number The tone on the phone will be masked whilst the Credit Card number is being entered by the Customer. This is to prevent the numbers from being recognised whilst they are being pressed on the keypad. |
Reset Card | Agents can press this button if customers want to reset the details that have been entered. This could be, for example, because the Customer entered the wrong details or wants to use a different Credit Card. |
Expiry Date | Ask the Customer for the expiry date on the credit card and enter it here. |
CVV | Ask the Customer to enter the CVV number which can be found on the back of the Credit Card. CVV Number The tone on the phone will be masked whilst the Credit Card CVV number is being entered by the Customer. This is to prevent the numbers from being recognised whilst they are being pressed on the keypad. |
Reset CVV | Agents can press this button if customers want to reset the details that have been entered. This could be, for example, because the Customer entered the wrong details. |
Cardholder Name | Ask the Customer for the Cardholder name as it appears on the Credit Card and enter the details here. |
Amount | Enter the amount to be processed. |
Submit | Click this button when all the above details have been correctly entered and if ready to process the payment. Clicking this button will send the request to the Merchant for processing. Payment sent for Processing Agents can still speak to the Customer whilst the payment is processing. |
What happens when you click on the "Submit" button
One of 2 things will happen when agents click on the "Submit" button.
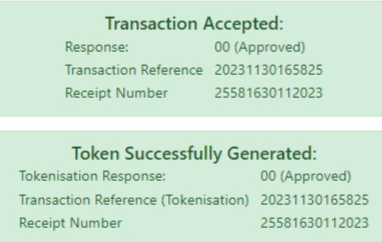
Payment successful - A confirmation in the following format will be seen:
Payment Rejected - A confirmation in the following format will be seen with the response including the rejection reason:
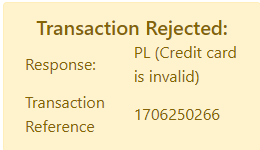
You can now complete the payment by pressing the Exit button at the bottom of the screen
When you click on the Exit button you will be presented with the following message:
Select the Leave button to leave this page. The system will return you to the CTI Adaptor to Wrap the call
Payment Confirmation
The details presented in the Payment Confirmation will differ for each transaction. The above is an example of what type of information will be returned, however, the actual values for each of the above 3 items will differ per transaction.
17. Request Assistance
This feature enables Agents requiring assistance while on a call to notify a manager (Workspace user) from within the CTI Adapter.
This feature is available only if it has been enabled for Agents.
While on a call, the “Request Assistance” feature can be selected as an option upon clicking the “More Options” button:
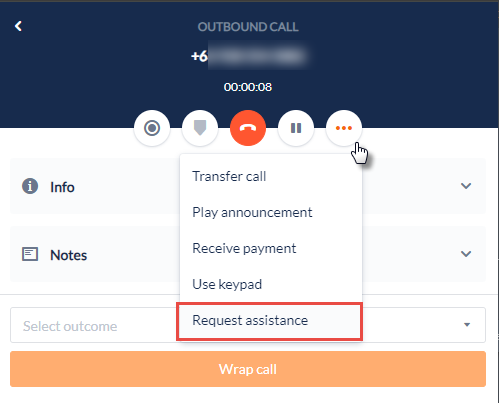
The agent can then select the respective user, add a message, set a priority, and send the message to the Workspace user.
The Users available to select from the dropdown must be logged in and assigned to the same Team
The default priority is set to High
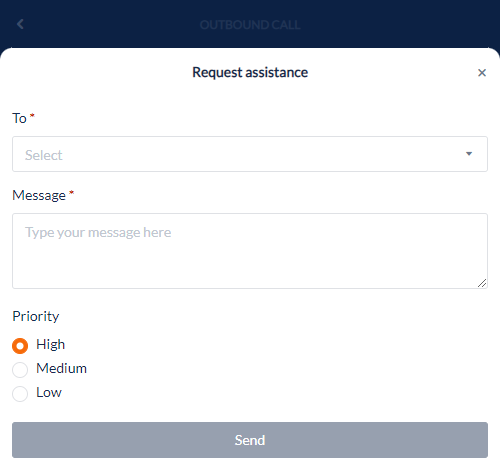
The agent will be notified once the message has been sent.
The agent will also be notified when the recipient has viewed the message.
The message field can support a maximum of 1,500 characters.
18. CTI Chat
The Chat component of the CTI will allow an Agent to converse with end-users who have initiated a Chat interaction from a website where a chat widget is published. Below is where an Agent will be able to select chat interactions:
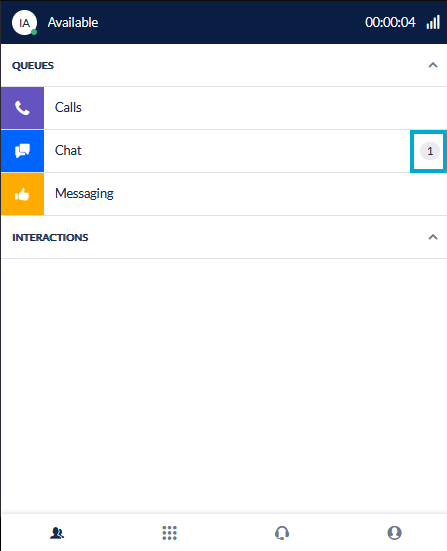
Once the Chat interaction has been selected, an Agent will be presented with the screen below:
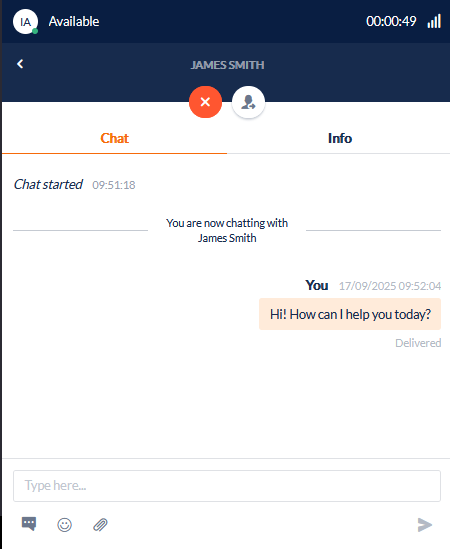
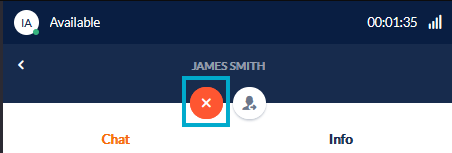
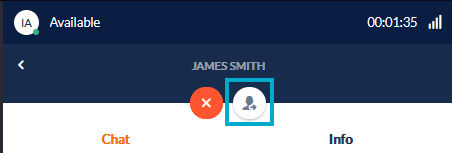
In the Live Chat screen, Agents are presented with 2 main options, End chat and Transfer chat.
End Chat: By selecting this option, Agents will terminate the chat with the client and be redirected to select a Wrap code and finish the interaction.
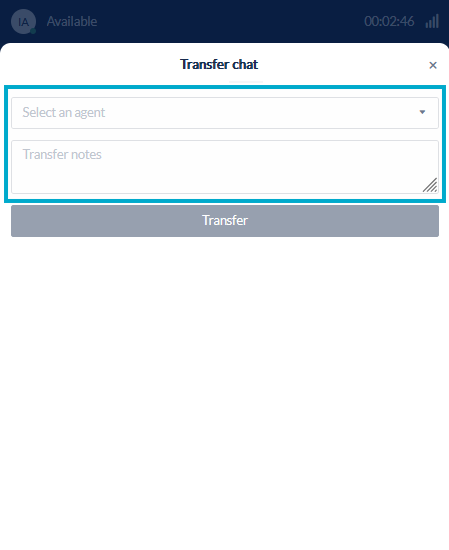
Transfer Chat: By selecting this option, a screen will appear providing options to select a campaign to transfer the chat, and a notes section to advise the next Agent of the purpose of the transfer.
Below, there are 2 main tabs, Chat and Info. See the operational features that can be used under both of these tabs below:
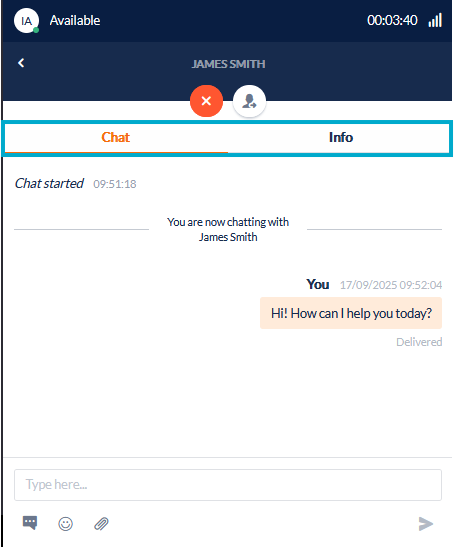
Chat Tab
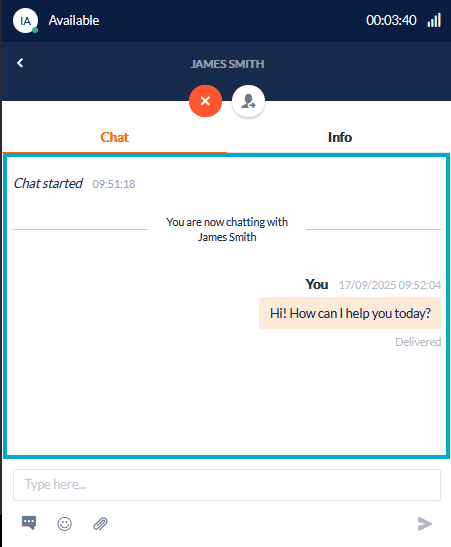
Transcript: The transcript area is where Agents can see the conversation between the Agent and the client
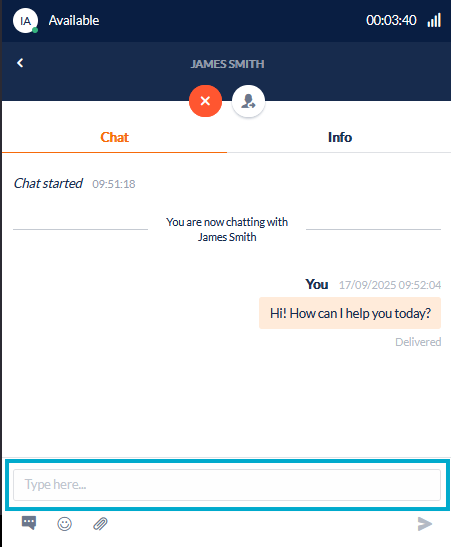
Text Field: The Text field is where Agents can manually enter messages to the client
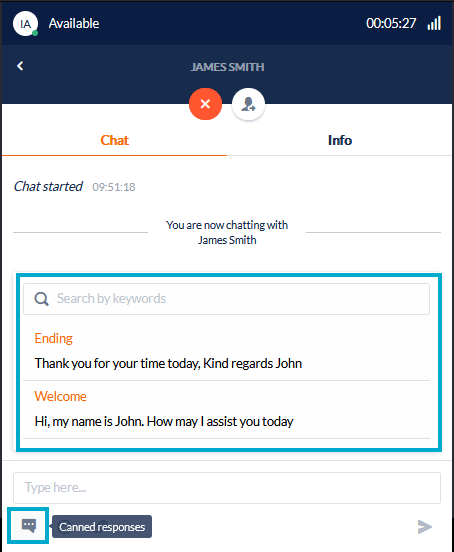
Canned Response Icon: Selecting this icon will allow Agents to enter pre-formulated responses. By typing “/” in the Text Field, the Canned responses will also appear.
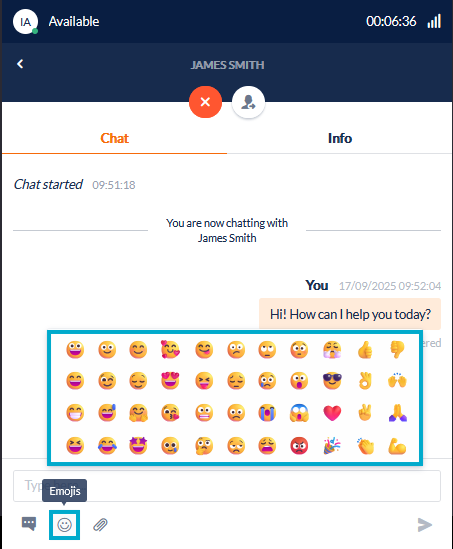
Emoji Icon: Selecting this icon will allow Agents to insert an Emoji icon. By typing “:” in the Text Field, the Emoji icons will also appear.
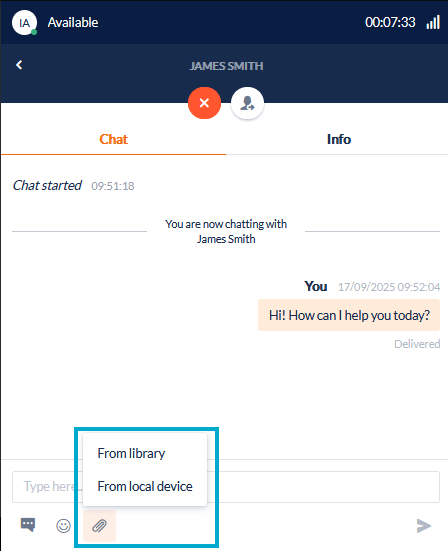
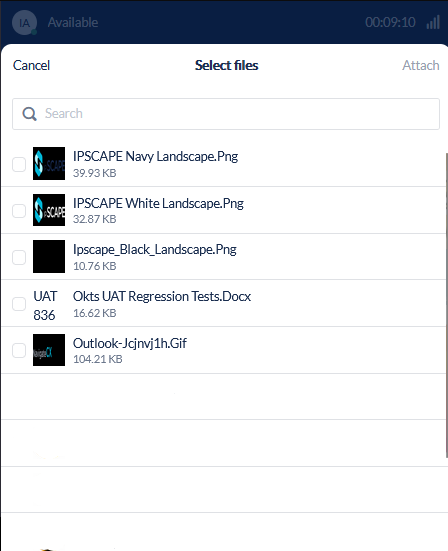
Attachment Icon: Selecting this will allow Agents to attach documents from the IPscape File library or their device, depending on permissions.
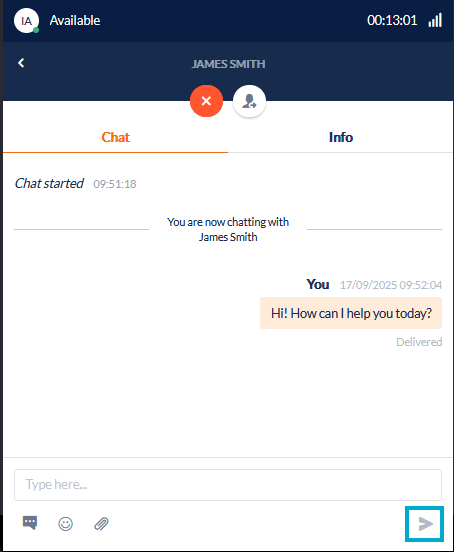
Send Icon: This icon allows Agents to send the message populated in the Text field
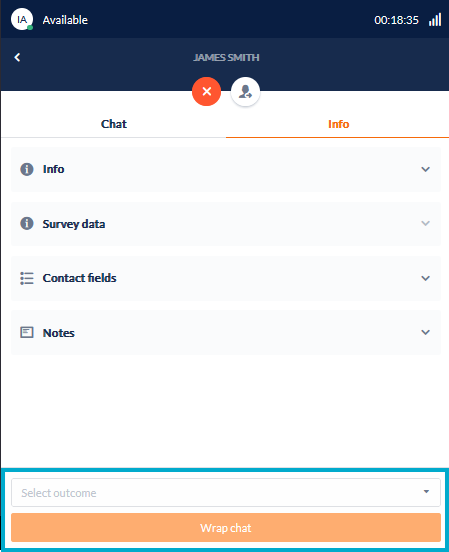
Info Tab
All sections under the info tab can be minimised by selecting the up arrow next to the title headings.
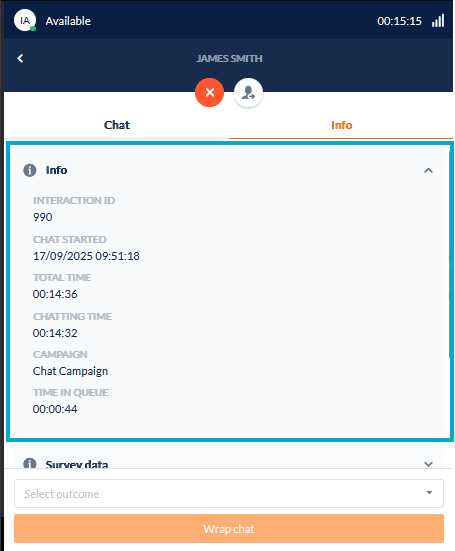
Info: In this section, Agents will be able to see the basic information of the chat interaction, including the Interaction ID, Chat Start D/T, Chat times and Campaign allocation
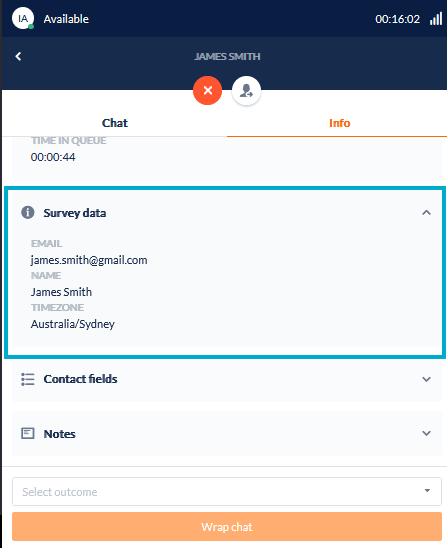
Survey Date: In this section, Agents will see the information the client has filled in on the Pre-chat survey
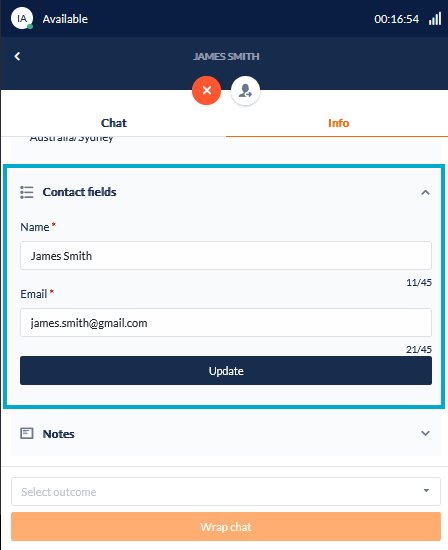
Contact Fields: In this section, Agents can change the client's contact information if required.
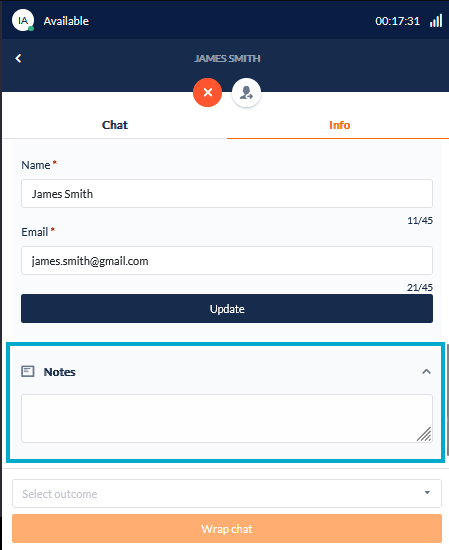
Notes: In this section, Agents can enter call notes that can be transferred to the next Agent.
Wrap: The option to wrap a Chat is under the Info tab. The chat window will default to the Info tab once a chat has been terminated.
19. CTI Messaging
The Messaging component of the CTI will allow Agents to converse with clients who have initiated a WhatsApp conversation via a website or the WhatsApp application.
In the Messaging screen, Agents are presented with 2 main options, End Interaction and Transfer Interaction.
End Interaction: By selecting this option, Agents will terminate the message interaction with the client and be redirected to select a Wrap code and finish the interaction.
Transfer Interaction: By selecting this option, a screen will appear providing options to select a campaign to transfer the message, and a notes section to advise the next Agent of the purpose of the transfer.
Chat Tab
Transcript: The transcript area is where an Agent can see the conversation between the Agent and the client. Agents will also be able to load previous messages from prior conversations.
Text Field: The Text field is where an Agent can manually enter messages to the client
Canned Response Icon: Selecting this icon will allow an Agent to paste pre-formulated responses. By typing “/” in the Text Field, the Canned responses will also appear.
Emoji Icon: Selecting this icon will allow the Agent to insert an Emoji icon. By typing “:” in the Text Field, the Emoji icons will appear.
Attachment Icon: Selecting this will allow the Agent to attach documents from a specific database or from their device, depending on permissions.
Send Icon: Send the message populated in the Text field
Info Tab
Info: In this section, Agents will be able to see the basic information of the chat interaction, including the Interaction ID, Chat Start D/T, Chat times and Campaign allocation
Notes: In this section, enter call notes that can be transferred to the next Agent.
Wrap: The option to wrap a Chat is under the Info tab. The chat window will default to the Info tab once a chat has been terminated.
