
Overview
To define the IPscape Call Center in Salesforce, follow these steps:
1. Create a Call Center
A ‘Call center’ in Salesforce corresponds to a single instance of a CTI system at your organisation. To create a ‘Call center’ for the IPscape CTI adapter:
-
Download the relevant XML file for Salesforce Lightning
-
Open the xml file you downloaded and replace ‘tenant’ and ‘token’ with your own data and save.
-
In Salesforce, from Setup, enter Call Centers in the Quick Find box, then select Call Centers
-
If the Introducing Salesforce CRM Call Center splash page appears, click Continue
-
Click Import
-
Next to the Call Center Definition File field, click Browse to navigate to the IPscape Call Center definition file that you downloaded in Step 1. Click Open to enter the path in the Call Center Definition File field
-
Click Import
-
Click Edit next to the name of the new call Center to make any additional changes
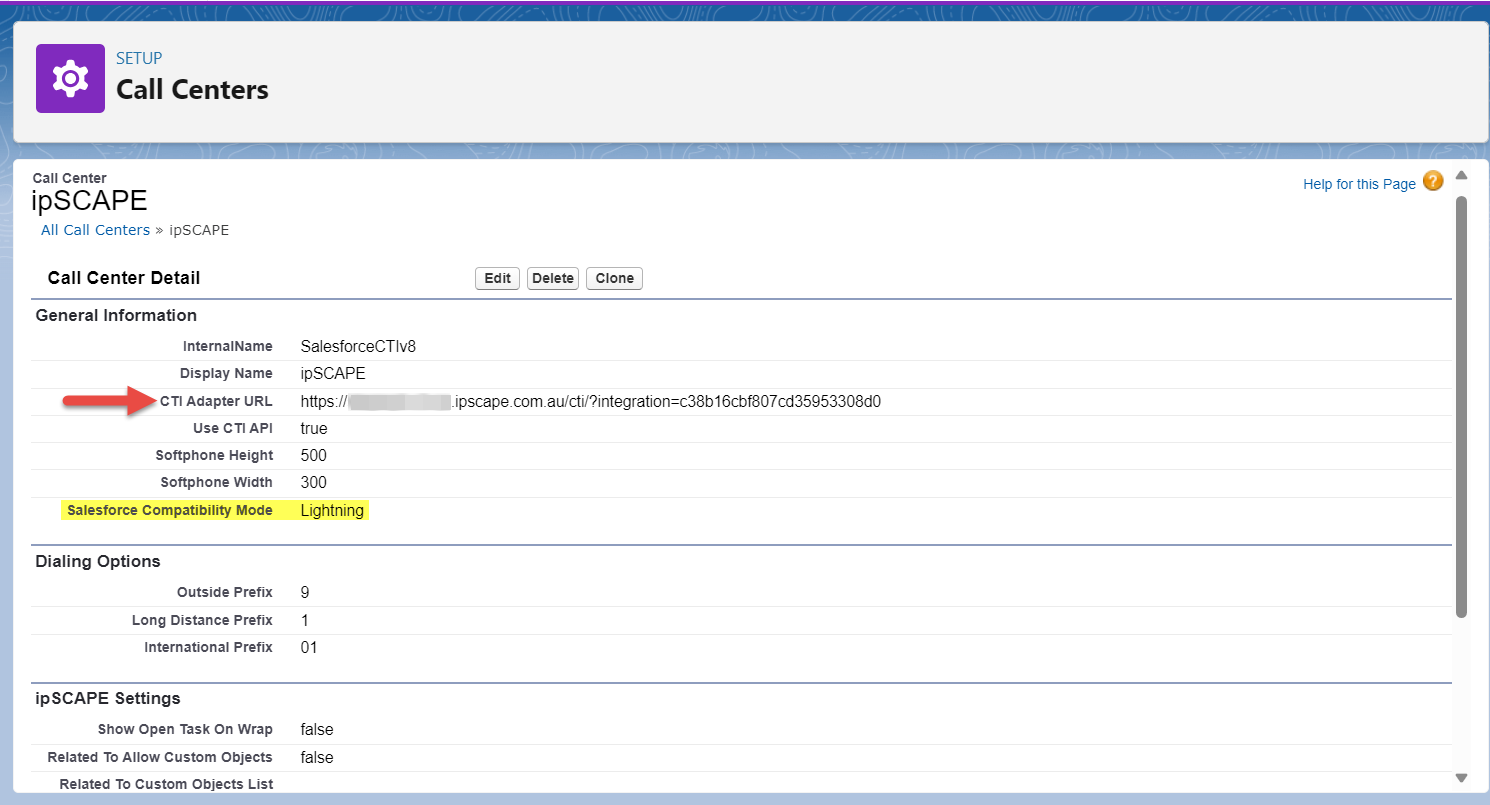
2. Configure
Both parameters should be added to the CTI adapter URL field to point the CTI adapter to your Cloud Contact Center tenant and enable the Salesforce Integration features:
|
Parameter |
Sample Value |
Notes |
|---|---|---|
|
Tenant URL |
This is the base domain that you use to login to Workspace. |
|
|
Integration key |
c38b16cbf807cd35953308d0 |
This value should be retrieved from your Workspace on the Key column in Integration>CTI adapter. |
Example CTI Adapter URL with both parameters:
Lightning:
https://yourtenant.ipscape.com.au/cti/?integration=c38b16cbf807cd35953308d0
3. Assigning users
Salesforce users must be assigned to a call center before they can use a Softphone.
To assign users to a call Center:
-
From Setup, enter Call Centers in the Quick Find box, then select Call Centers
-
Click the name of the call center to which you want to assign users
-
In the Call Center Users related list, click Manage Call Center Users
-
Click Add More Users
-
Specify criteria to find the users who should be assigned to the call center
-
Click Find. All users who already belong to a call center are excluded from search results because a user can only be assigned to one call center at a time
-
Select the checkbox next to each user who should be assigned to the call center and click Add to Call Center
To change a user’s call center: first, remove from their current call center assignment and then add to the new call center.
You can view a user’s call center assignment on the User detail page
4. Customising Softphone Layouts
Similar to page layouts, you can design custom Softphone layouts and assign them to call center users based on their user profile.
To define a custom Softphone layout:
-
From Setup, enter Softphone Layouts in the Quick Find box, then select Softphone Layouts.
-
Click New.
-
In the Name field, enter a label that uniquely identifies your layout.
-
In the Select Call Type pick list, choose the type of call for which the currently displayed Softphone layout should be used. A single Softphone layout definition allows you to specify different layouts for inbound, outbound, and internal calls.
-
In the Display these call-related fields section, click Edit to add, remove, or change the order of fields that are directly related to a phone call, such as the number of the caller or the number that was dialed.
-
In the Display these Salesforce objects section, click Add/Remove Objects to add, remove, or change the order of links to call-related objects.
-
Below the list of selected objects, click Edit next to each If single <Object> found, display row to specify the fields that should be displayed if a single record of that type is the only record that is found.
-
In the Screen Pop Settings section (for inbound call types), click Edit next to each type of record-matching row to specify which screens should display when the details of an inbound call match or don't match existing records in Salesforce. The following table describes each record-matching row and its screen pop options:
|
Record-Matching Row |
Description |
Screen pop Options |
|---|---|---|
|
Screen pops open within |
Use to set where the screen pops display |
Select to display in open browser window.
Select to display in new browser windows or tabs. Users' browsers may handle these settings differently:
|
|
No Matching Records |
Use to set the screen pop options for when the details of an inbound call don't match any existing Salesforce records |
Select if you don't want any screen to display.
Select to display a new record page you specify from the dropdown list:
Select to display a specific Visualforce page. The CTI adapter passes data from the call to the Visualforce page via a URL. This includes at least ANI (the caller ID) and DNIS (the number that the caller dialled). The URL can pass more data to the Visualforce page if necessary. |
|
Single-matching record |
Use to set the screen pop options for when the details of an inbound call match one existing Salesforce Record. |
Select if you don't want any screen to display.
Select to display the matching record's detail page.
Select to display a specific Visualforce page. The CTI adapter passes data from the call to the Visualforce page via a URL. This includes at least ANI (the caller ID) and DNIS (the number that the caller dialled). The URL can pass more data to the Visualforce page if necessary. |
|
Multiple-matching records |
Use to set the screen pop options for when the details of an inbound call match more than one existing Salesforce record. |
Select if you don't want any screen to display.
Select to display a search page.
Select to display a specific Visualforce page. The CTI adapter passes data from the call to the Visualforce page via a URL. This includes at least ANI (the caller ID) and DNIS (the number that the caller dialed). The URL can pass more data to the Visualforce page if necessary. |
Configure layouts for any remaining call types in the Select Call Type list
-
Click Save
-
To assign a custom Softphone layout to a user profile:
-
From Setup, enter Softphone Layouts in the Quick Find box, then select Softphone Layouts
-
Click Layout Assignment
-
For each user profile that appears on the page, select the Softphone layout that the profile should use.
-
Click Save
Profiles are only listed on this page if they include users that are currently assigned to a call center, or if they have already been assigned a custom Softphone layout. The number in parentheses shows the number of call center users who are assigned to that profile
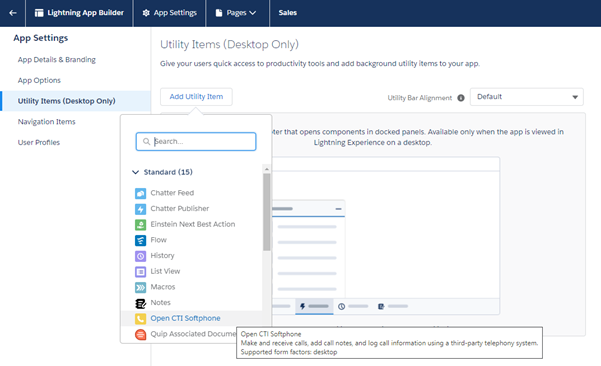
5. Configure Salesforce Lightning App
Once you have configured your Salesforce Call Center, you will need to make sure that you have a Lightning App configured with a CTI Softphone.
To configure Salesforce Lightning Apps with a CTI Softphone:
-
From Setup, enter App Manager in the Quick Find search box.
-
Select the Lightning App from the list displayed in the App Manager and click Edit from the dropdown
-
Navigate to Utility Items (Desktop Only)
-
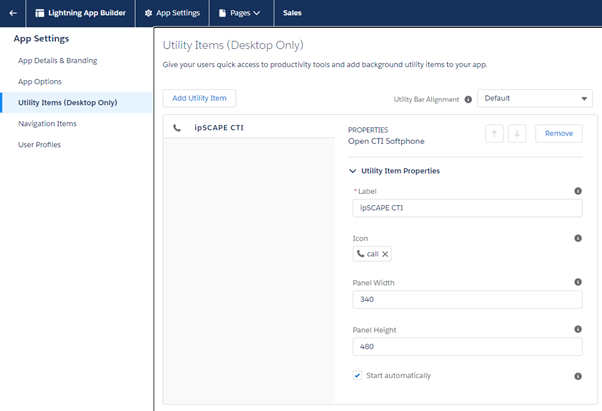
Click Add New Utility Item and select Open CTI Softphone from the list
-
Edit the label and properties if required and click Save
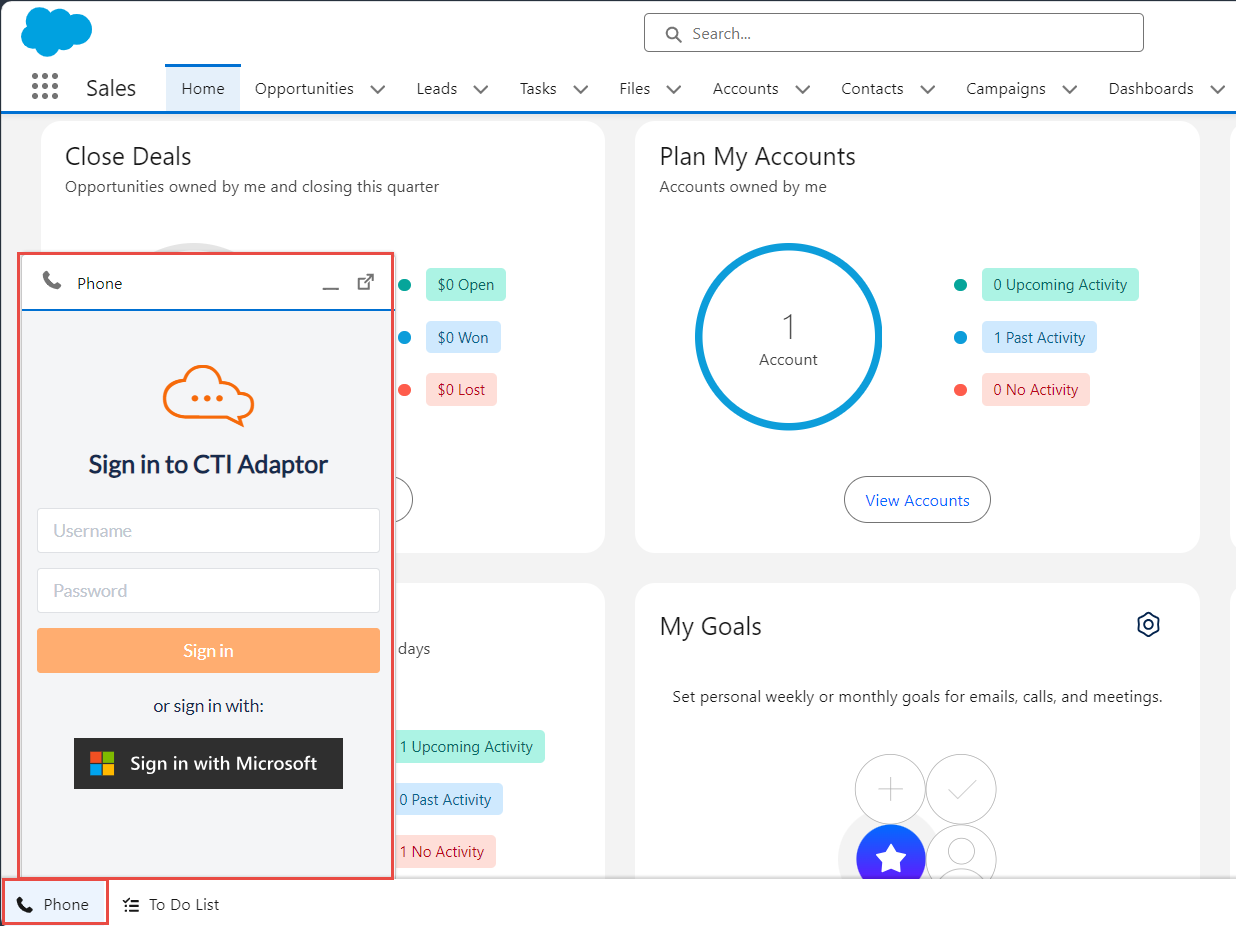
-
To check the phone was configured correctly, navigate to the Salesforce Lightning page that was configured and the CTI should be visible
-
For instances where CTI is required for multiple Salesforce Apps (E.g. Sales, Service, Marketing), repeat steps 2-6
6. Add IPscape fields to Salesforce manually
IPscape fields can be mapped to two different types of Salesforce field:
-
Standard - these fields already exist in your standard Salesforce. The fields in the table below are already mapped, select the ones you need in The 'Task Page Layout' to use them
-
Custom - these fields need to be manually created in Salesforce and mapped using details in the second table below
To make your fields visible to the end-user you need to add them to the Task Page Layout'. To do that follow these steps:
-
For Salesforce Lightning:
-
You will find your Salesforce data labels in Object Manager.
-
Select Task from the list of Objects.
-
In the left panel, navigate to Page Layouts and click Task Layout
-
-
From the top panel drag and drop the fields you require into the Task Page Layout
If the standard fields are not mapped to the fields you want them to be or you want to use more IPscape fields than those listed below you can use a custom settings file.
Standard Field Mapping
|
IPscape Field |
Save Event |
SF Field Name |
Activity Field Type |
Notes |
|---|---|---|---|---|
|
AgentInteractionId |
Call Answer |
CallObject |
Text(255) |
|
|
Call Duration |
Call Hangup |
CallDurationInSeconds |
Number(8,0) |
|
|
Wrap Code Description |
Call Wrap |
CallDispostion |
Text(255) |
|
|
Call Direction (Inbound or Outbound) |
Call Answer |
CallType |
Picklist |
Valid Salesforce values are "Inbound", "Outbound", or "Internal" |
|
N/A |
Call Answer & Call Wrap |
Subject |
Picklist/Text |
IPscape inserts Text into Subject.
|
|
Notes |
Call Wrap |
Description |
Long Text Area (32000) |
|
|
N/A |
Call Wrap |
What |
Lookup(Contract, Order, Campaign, Account, Opportunity, Product, Asset, Case, Solution, Coaching, Goal, Metric) |
Salesforce can be configured to allow other objects in this field. |
|
N/A |
Call Wrap |
Who |
Lookup(Contact,Lead) |
|
|
N/A |
Call Answer & Call Wrap |
Status |
Picklist |
IPscape writes "In Progress" when a call is answered and "Complete" when the call is wrapped. |
|
Customer Phone Number |
Call Answer |
Phone |
Phone |
|
|
N/A |
Call Answer |
Type |
Picklist |
IPscape writes "Call" for all activities. |
|
N/A |
Call Answer |
Activitydate |
Date |
Sets to the date of the call in the Agent's local time. |
Custom Field Mapping
-
For Salesforce Lightning:
-
You will find your Salesforce data labels in Object Manager
-
Select Activity from the list of Objects
-
In the left panel, navigate to Fields & Relationships.
-
-
Click New. The New Custom Field dialog box opens
-
Choose a field type:
-
Date
-
Enter a Field Label, e.g. "Due date".
-
Enter a Field Name, e.g. "Due_Date"
-
Enter a Description for the field, e.g. "This field displays the date when the call was answered."
-
Enter Help Text, e.g. "Set to the date of the call in the Agent's local time.."
-
Ignore the Required setting.
-
Ignore the Default Value setting.
-
Click Next
-
-
Formula
-
Lightning Only:
-
Enter a Field Label, e.g. "Link Call Recording".
-
Enter a Field Name, e.g. " Link Call Recording"
-
Select a Formula Return Type, click Next
-
-
Click the Advanced Formula tab.
-
Copy and paste the following code into the Call Recording Link (text) = field:
IF( CallObject = " ", " ", HYPERLINK https://{tenantURL}/workspace/call-management?search=simple&search_inputbox={interactionID} -
Enter a Description of the field, for future reference, e.g. "Displays a link to the call recording link in ContactWorld".
-
Enter the Help Text that appears alongside the field, e.g. "Click to access the call recording".
-
Click Next.
-
-
Number
-
Enter a Field Label, e.g. "Time in Queue".
-
Set the Field Length to '18'.
-
Set the decimal places to '0'.
-
Enter a Field Name, e.g. "ipSCAPE_Time_in_Queue"
-
Enter a Description for the field, e.g. "This field displays the time the caller waited before the call was answered."
-
Enter Help Text, e.g. "The time in the queue."
-
Ignore the Required setting.
-
Ignore the Unique setting.
-
Ignore the External ID setting.
-
Ignore the Default Value setting.
-
Click Next.
-
-
Phone
-
Enter a Field Label, e.g. "Customer Phone Number".
-
Enter a Field Name, e.g. "ipSCAPE_Customer_Phone_Number"
-
Enter a Description, e.g. "This is the phone number for the contact".
-
Enter Help Text, e.g. "Customer Phone Number".
-
Click Required. This is now a mandatory field.
-
Enter a Default Value, e.g. "Customer Number".
-
Click Next.
-
-
Text
-
Enter a Field Label, e.g. "Campaign Description".
-
Set the Field Length to '255'.
-
Enter a Field Name, e.g. "ipSCAPE_Campaign" (the "_c" suffix is added by Salesforce)
-
Enter a Description for the field, e.g. "This records the campaign description, entered in the ipSCAPE Workspace campaign details, in the Salesforce record."
-
Enter Help Text, e.g. "Campaign Description"
-
Ignore the Required setting.
-
Ignore the Unique setting.
-
Ignore the External ID setting.
-
Ignore the Default Value setting.
-
Click Next.
-
-
-
Establish field-level security
-
Add to Task Page Layouts
The SF Field Name is required to connect the CTI adapter to the Salesforce record. The "_c" is added by Salesforce.
|
IPscape Field |
Save Event |
SF Field Name |
Activity Field Type |
|---|---|---|---|
|
Agent First Name + Agent Last Name |
Call Answer |
|
Text(255) |
|
Campaign Title |
Call Answer |
|
Text(255) |
|
Time in Queue |
Call Answer |
|
Number (18, 0) |
|
Link to the voice recording in IPscape workspace |
Call Wrap |
|
Formula (Text) |
All integrations require a configuration to be created in the Workspace.
The default Salesforce configuration contains mapping for:
ipSCAPE_Time_In_Queue__c
ipSCAPE_AgentName__c
ipSCAPE_campaign__c
7. Add IPscape fields using a JSON custom settings file
If data mapping is set using the JSON file, the Custom Field Mapping described in the previous section is not applicable
The JSON file must be hosted in Workspace > Integration > CTI Adapter
A custom settings file can be used to:
-
Map IPscape fields to Salesforce Task Custom Fields beyond the standard mapping.
-
Have additional control over which records are popped in Salesforce when managing calls
-
Set if task opens on wrap
Here is an example of the settings file format. You need to modify this to include the mappings and settings you require. Take note of the IPscape fields you would like to map to Salesforce custom fields from the list below:
Default Salesforce JSON schema in Workspace
To find this JSON schema, please go to “Workspace > Integration > CTI Adapter. Click “Create new integration” and select “Salesforce” from the “Integration type” dropdown.
There are 2 src scripts needed for CTI integration to work:
-
The Salesforce instance must be inserted
-
For example, “
d7f000002g0x7uaa-dev-ed"
-
-
The Salesforce integration file
-
This is managed by IPscape, and users will be notified when to update it.
-
{
    "Salesforce": {
        "scripts": [
            {
                "src": "https://<your Salesforce instance>.salesforce.com/support/api/59.0/lightning/opencti.js"
            },
            {
                "src": "https://developer.onipscape.com/integrations/ipscape-salesforce.v1.0.1-beta.2.min.js",
                "type": "module"
            }
        ],
        "config": {
            "options": {
                "disableListRefresh": false,
                "popTaskOnWrap": true,
                "createTaskOnPreview": true,
                "apex": {
                    "getCapabilities": "IpscapeHelper::getCapabilities"
                }
            },
            "customObjects": [],
            "screenPop": {
                "default": {
                    "map": [
                        {
                            "name": "phone",
                            "type": "phone",
                            "format": "local",
                            "path": "interaction.activity.customerCli"
                        }
                    ]
                },
                "rules": []
            },
            "dataMap": [
                {
                    "name": "ipSCAPE_Time_In_Queue__c",
                    "type": "date",
                    "path": "interaction.activity.timeInQueue"
                },
                {
                    "name": "ipSCAPE_AgentName__c",
                    "type": "string",
                    "path": "agent.agentDisplayName"
                },
                {
                    "name": "ipSCAPE_campaign__c",
                    "type": "string",
                    "path": "interaction.campaign.title"
                }
            ],
            "inCallComponents": {
                "title": "Salesforce",
                "body": [
                    {
                        "component": "select",
                        "name": "whoId",
                        "disabled": false,
                        "placeholder": "Select person",
                        "options": []
                    },
                    {
                        "component": "select",
                        "name": "whatId",
                        "disabled": false,
                        "placeholder": "Select related",
                        "options": []
                    }
                ]
            }
        }
    }
}
Configuration
|
|
Parameter |
Default Value |
Description |
|---|---|---|---|
options
|
|
|
When |
|
|
|
Stops the refresh action taking place after an update is sent to Salesforce. |
|
|
|
|
Create a task when a preview lead is allocated to the Agent. No call has been made at this point. |
|
|
|
|
The
You need to install the IPscape Apex classes in your Salesforce instance for this functionality. |
|
|
customObjects |
Array of STRING |
|
If your Salesforce instance uses custom objects and you wish to use any of these custom objects as relational fields on tasks created during agent interactions, you should list these custom objects by their API name. |
|
inCallComponents |
|
|
Any 
The |
|
screenPop |
|
|
The screen pop configuration is designed to allow more control over the searchAndPop feature in Salesforce. Using this feature, admins have control over the behaviour in Salesforce when a call is allocated to an agent it can either:
The config is designed so that when a call is allocated, the CTI adapter will read through the rules and attempt to find a match. Matches are possible on either a campaignId or a callType. The CTI will always follow the first matching rule, which is why the more generic "callType" rules should be included after any "campaignId" rules. If no matching rule is found, the CTI will fall-back to the default. The Phone numbers can be formatted as:
Example: This will also create a |
|
|
|
The rules array contains a collection of condition-based rules. For example, the rule below specifies that this rule applies to calls where the callType is either The integration will then search through each The If false, we assume that the supplied string is a Salesforce object key and we can the use that to ask Salesforce to pop the page. If true, we use the parameter created by the rule as a search query and pass this to Salesforce to apply as a search. Example only Using the Salesforce search to pop a record will be influenced by the softPhone layout specified in your Salesforce setup. |
|
|
dataMap |
|
|
The This literally maps data from the IPscape call data to a Salesforce API named parameter that can then be recorded in a Salesforce activity/task. The key/value pairs are the map. The key is a Salesforce API name and the value is a parameter name from the call data. "name": " In this example, the call data parameter with path " The "__c" is added automatically by Salesforce when creating your data field. |
Data Mapping
The most common errors when debugging this data mapping usually relates to API names incorrectly recorded.
IPscape Call Data includes the following:
|
Data |
Field Type |
Description |
Path |
|---|---|---|---|
|
|
Number |
Campaign identifier |
interaction.campaign.campaignId |
|
|
Number |
Unique identifier for the agent leg of the call |
interaction.agentInteractionId |
|
|
Phone |
Caller phone number in E164 format |
interaction.activity.customerCli |
|
|
Phone |
Platform number in E164 format
|
interaction.activity.platformCli |
|
|
Text |
IPscape Campaign title |
interaction.campaign.title |
|
|
Text |
Campaign timezone setting.
|
interaction.campaign.timezone |
|
|
Text |
Call/interaction type |
interaction.interactionType |
|
|
Number |
Length of time in seconds the caller waited in queue |
interaction.activity.timeInQueue |
|
|
Boolean |
The call recording has been started? |
interaction.activity.callRecording.record |
|
|
Number |
Activity identifier |
interaction.activity.activityId |
|
|
Date/Time |
Date and Time the activity started |
interaction.activity.activityStart |
|
|
Date/Time |
Date and Time the call was answered |
interaction.activity.activityAnswered |
|
|
Date/Time |
Date and Time the call ended |
interaction.activity.activityEnd |
IVR Data
Data entered into the IVR by the caller for example entering a booking ID. This will be available in the call data and available for data mapping. In the call data it will be available as:
{ "bookingId": "987654321" }
Settings
Modifying the Task Page Layout to include your Custom Fields
To make your fields visible to the end-user you may need to add them to the 'Task Page Layout'. To do that follow these steps:
-
Go to the Administration Setup Page in Salesforce
-
On the left-hand side of the Salesforce window, in the Build section, expand Customize and then Activities
-
In the expanded list of items, click Task Page Layout
-
From the top panel drag and drop the fields you require into the Task Page Layout
8. Salesforce Views and Permissions
There are different ways of viewing Salesforce, such as Sales or Console views. For this section, Sample Console will be used as an example.
To view in Salesforce Lightning- In the top left-hand corner of Salesforce, from the App Menu icon, click to search for and select Sample Console.
If you do not see the view in the App Menu, it is because it has not been made visible to your user Profile.
Each user in Salesforce is given a Profile that defines what they see and can do as they navigate through the system. To make the Sample Console visible you need to go to the profile that has been applied to your User and edit the settings following these steps:
-
Open Salesforce with an account that has admin rights
-
Go to Setup in the top right-hand corner
-
In the Quick Search bar to the left of the screen type in Profiles and select Administer>Manage Users>Profiles
-
Select and open the relevant Profile and click Edit
-
In the Custom App Settings check the column called Visible for Sample Console (standard__ServiceConsole) and click Save
-
Log out and log back in again and you will be able to see the Sample Console option in the App Menu using the steps above.
IPscape is aware of instances where customers have experienced issues with data fields that are caused by incorrect field permission configurations. Agents need to be granted access to the data fields that are modified when updating tasks.
If you are experiencing any issues, please review the data field permissions prior to contacting IPscape Support.
8. Advanced Configuration - Custom APEX Classes
The Salesforce integration can be enhanced with custom Apex classes, providing additional functionality to streamline workflows and improve user experience.
While the CTI integration remains functional without the Apex classes, users will miss out on the additional functionality provided by these custom components. Installing the classes enhances the integrations' capabilities and improves overall efficiency.
Key Features of Custom Apex Classes:
-
getLead and getOpportunity Functions:
These functions query Salesforce to determine if a lead has been converted and, if so, return the ID for the corresponding opportunity. This facilitates seamless navigation and access to relevant data. -
getTask Function:
This function checks if the current interaction ID has an open task in Salesforce, ensuring updates are applied to the correct task. This helps maintain data accuracy and workflow efficiency.
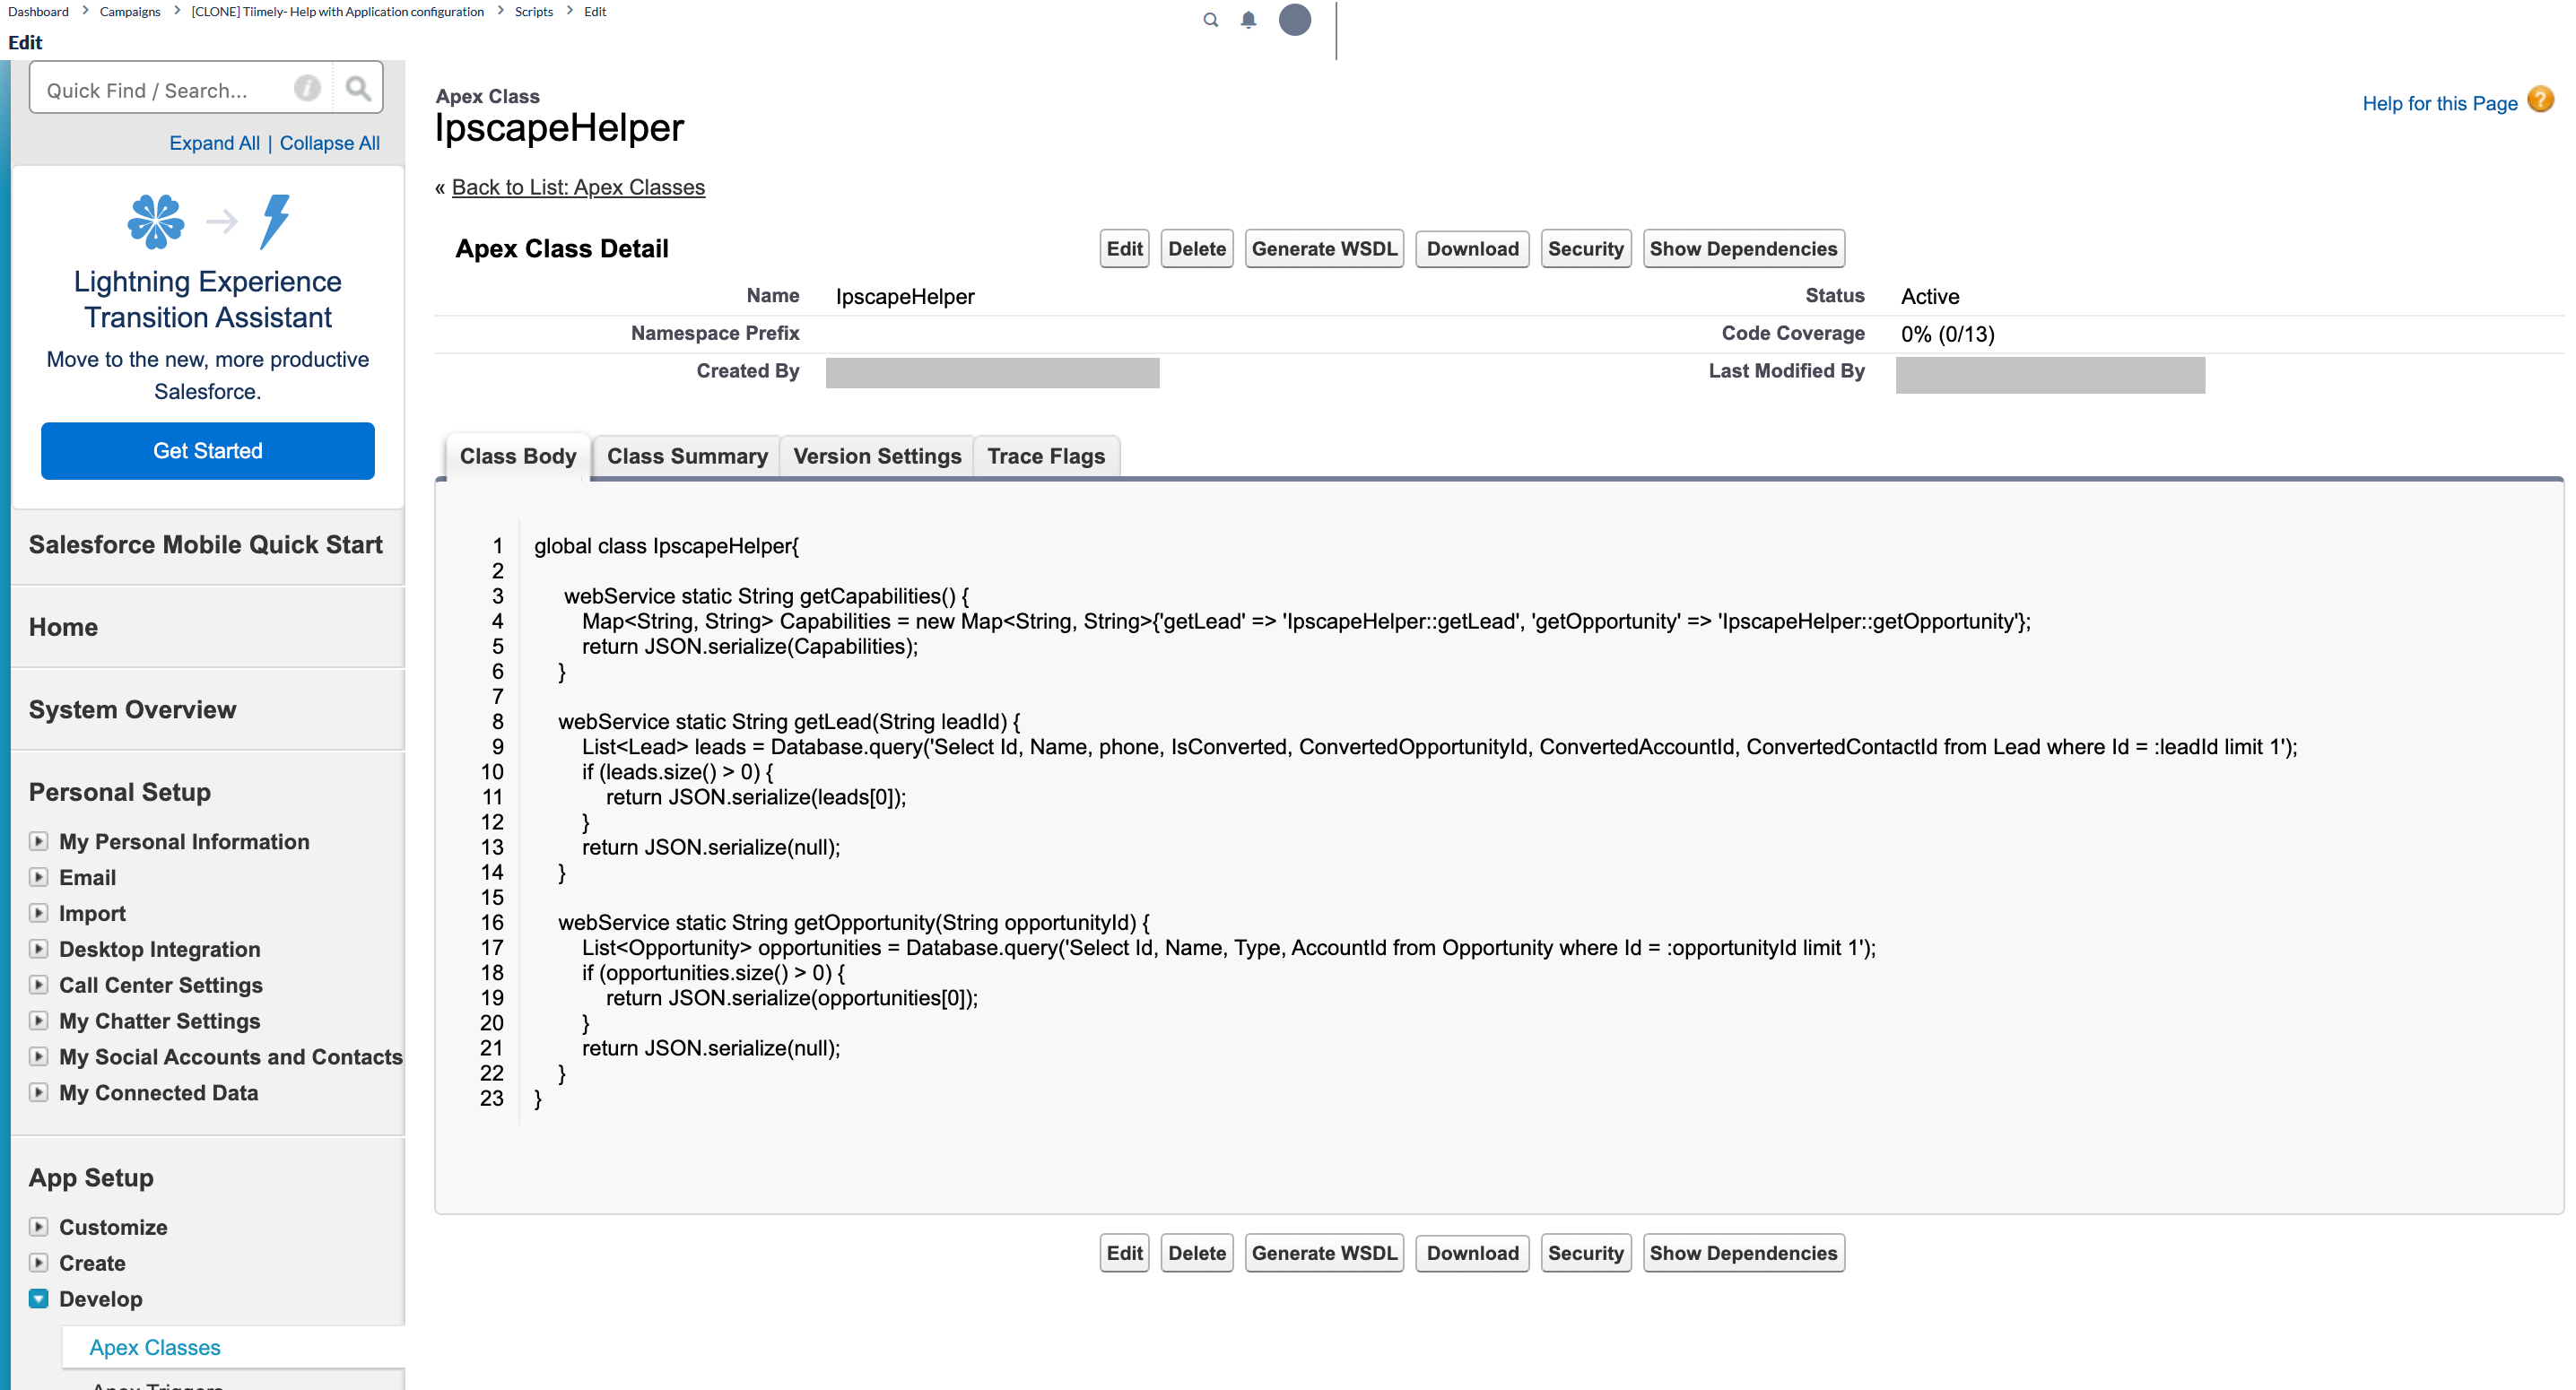
Installing Apex IpscapeHelper
The Salesforce IpscapeHelper Apex class enables the CTI integration to execute custom scripts and extend the capabilities.
To configure the new Apex Class, go to your salesforce instance setup menu and select Apex Classes. Create a new class and name it IpscapeHelper. See the following file:
If a test file is required, also please see:
Your Apex class page should look like this:
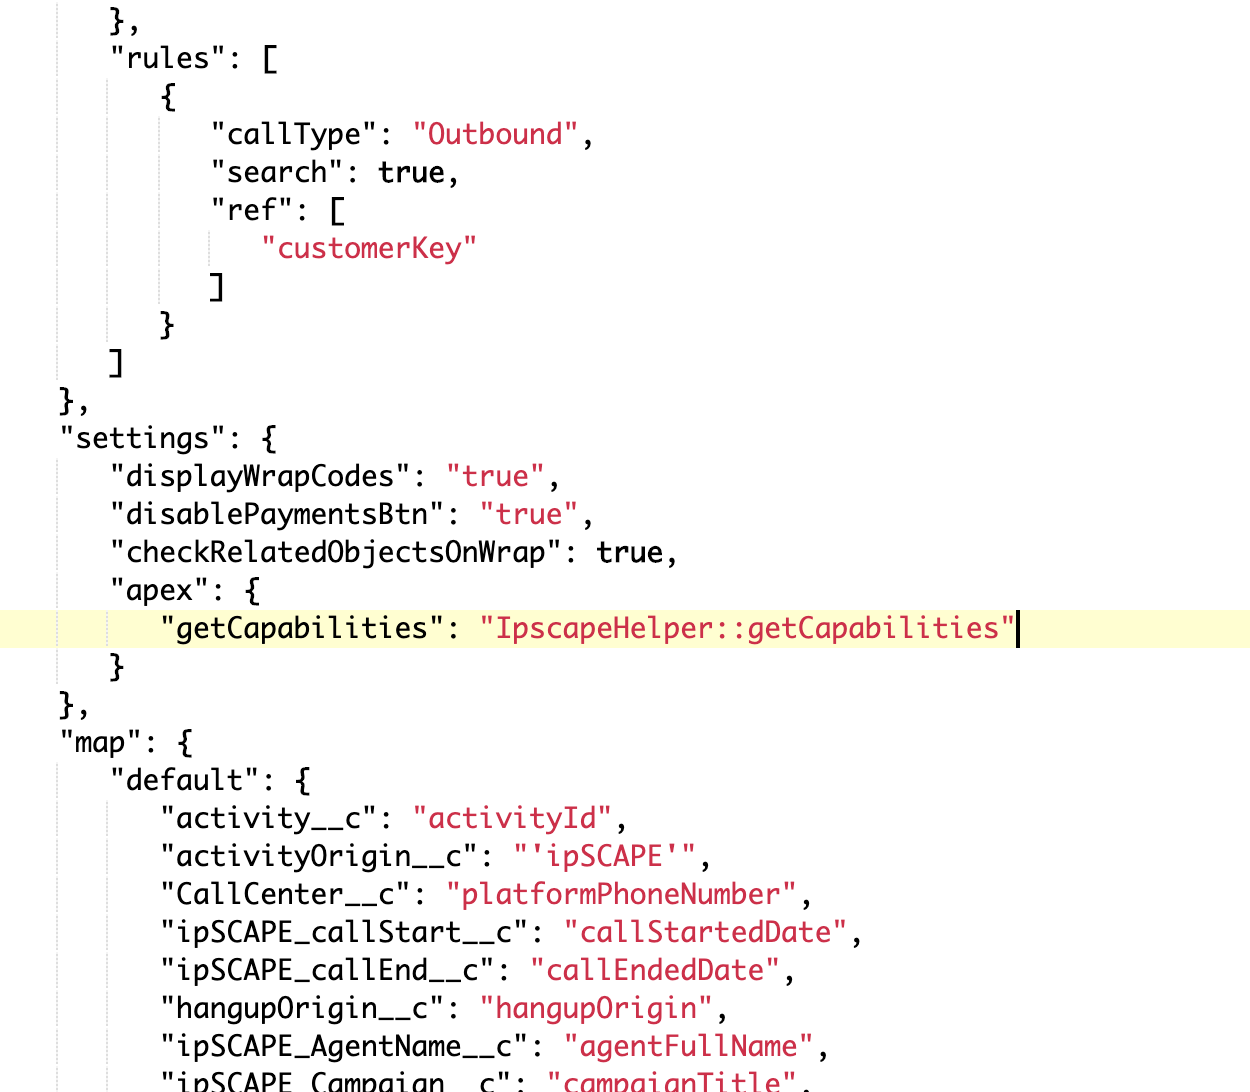
Now, let's enable this functionality in your CTI JSON configuration file. Inside the "settings" block, please add the following:
"apex": {
	"getCapabilities": "IpscapeHelper::getCapabilities"
}
Please make sure you validate your JSON file before using it in production. You can use an online tool like https://jsonformatter.org/
Your JSON Apex block should look like this:
See also: https://developer.salesforce.com/docs/atlas.en-us.apexcode.meta/apexcode/apex_qs_class.htm