Okta Integration
Overview
Okta (https://www.okta.com/au/) for Ipscape gives Administrators the ability to simplify management of Agents or Users accessing the Workspace, Agent Toolbar, or the CTI Adaptor using Single Sign-on (SSO)
To configure Okta for IPscape, please raise a request with IPscape Service Desk to enable this feature.
1. Creating an Okta Application for IPscape
The application must first be created in Okta for the successful integration with IPscape
In the Admin Console, go to Applications > Applications
Click Create App Integration.
To create an OIDC app integration, select OIDC - OpenID Connect as the Sign-in method.
Choose Web Application as the type of app to integrate with Okta
Click Next.
In General Settings, specify a name for your app integration.
The app integration name can only consist of UTF-8, 3-byte characters. Okta automatically assigns a default name to your app integration based on the platform that you select. If an app integration with the default name exists in your Okta org, then a number is appended to the default name to differentiate the integrations.
Add the Sign-in redirect URIs.
http://{tenant.domain}/workspace/security/sso-oauth-callbackhttp://{tenant.domain}/workspace/authorize-ssohttps://{tenant.domain}/cti/loginhttps://{tenant.domain}/toolbar/login
The sign-in redirect URI is where Okta sends the authentication response and ID token for the sign-in request. The URIs must be absolute URIs.
Click Save to commit your General Settings changes.
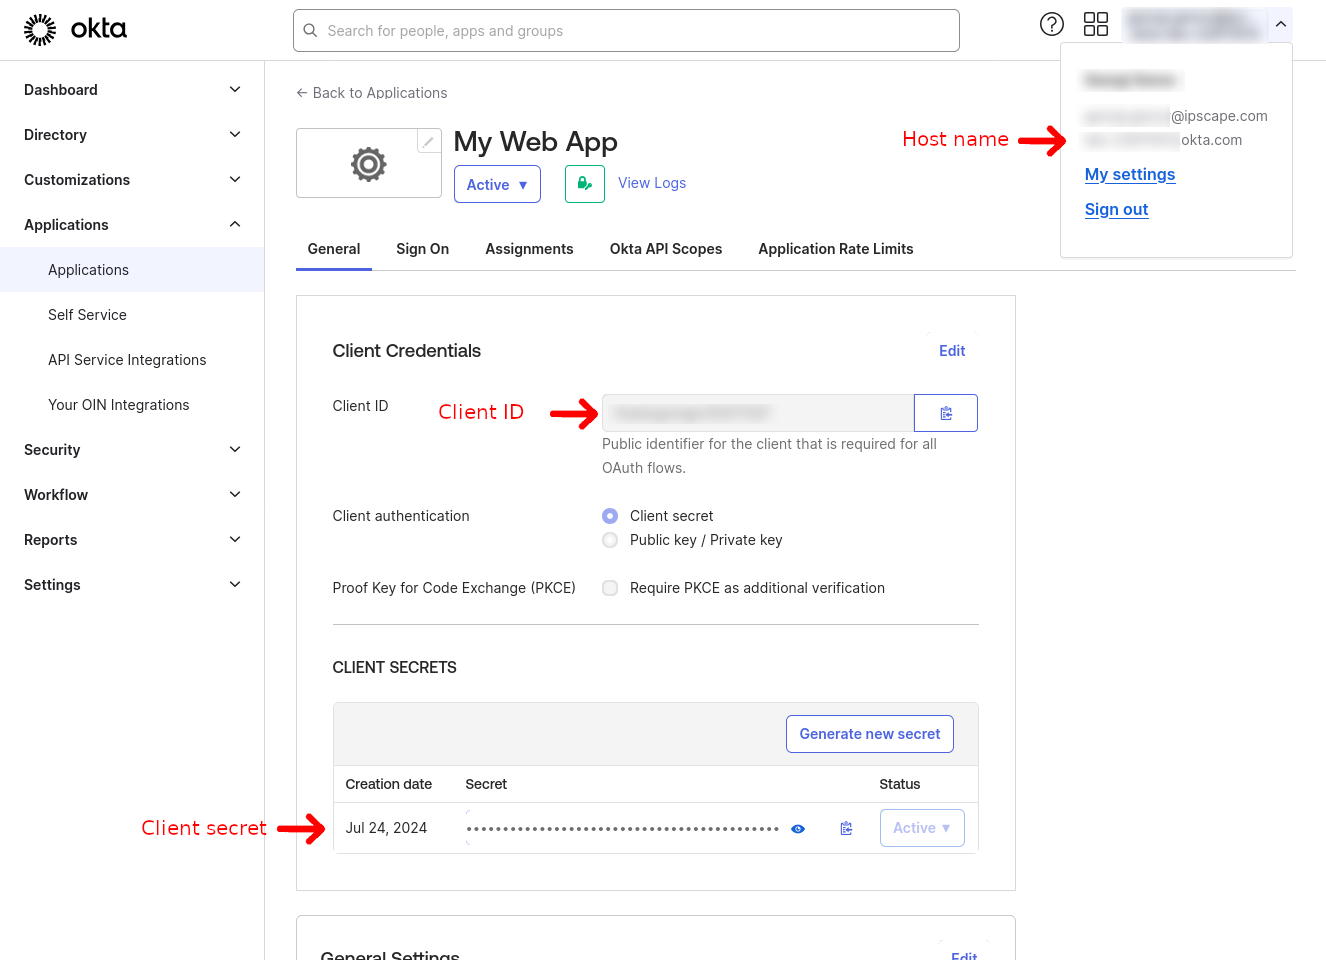
Note all the values for Host Name, Client ID and Client Secret for use later in ipSCAPE Workspace.

For a more detailed information on how to create the application in Okta, please head to their help page here: Create OIDC app integrations (okta.com)
Ensure the email address for all agents and Workspace users matches between IPscape and Okta
2. Enable and configure Okta in Workspace
To use Okta as the Organisation’s Single Sign On provider, it must be enabled in the Workspace.
In the Workspace, go to Administration > Organisation settings
Click the tab “Login and security”
Under Single sign on, tick Enable.
Select Okta as provider from the drop-down list.
Input the required fields then click “Save and authorise”
Client ID
Host Name
Client Secret
After authorising successfully, click “Save” to commit changes.
